
User Manual
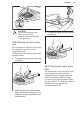
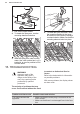


Table Of Contents
- CONTENTS
- 1. SAFETY INFORMATION
- 2. SAFETY INSTRUCTIONS
- 3. PRODUCT DESCRIPTION
- 4. CONTROL PANEL
- 5. PROGRAMME SELECTION
- 6. BASIC SETTINGS
- 7. BEFORE FIRST USE
- 8. DAILY USE
- 8.1 Using the detergent
- 8.2 How to select and start a programme using MY TIME selection bar
- 8.3 How to select and start the programme Pre-rinse
- 8.4 How to activate EXTRAS
- 8.5 How to start the AUTO Sense program
- 8.6 How to delay the start of a programme
- 8.7 How to cancel the delay start while the countdown operates
- 8.8 How to cancel a running programme
- 8.9 Opening the door while the appliance operates
- 8.10 The Auto Off function
- 8.11 End of the programme
- 9. HINTS AND TIPS
- 10. CARE AND CLEANING
- 11. TROUBLESHOOTING
- 12. TECHNICAL INFORMATION
- TABLE DES MATIÈRES
- 1. INFORMATIONS DE SÉCURITÉ
- 2. CONSIGNES DE SÉCURITÉ
- 3. DESCRIPTION DE L’APPAREIL
- 4. BANDEAU DE COMMANDE
- 5. SÉLECTION DES PROGRAMMES
- 6. RÉGLAGES DE BASE
- 7. AVANT LA PREMIÈRE UTILISATION
- 8. UTILISATION QUOTIDIENNE
- 8.1 Utilisation du produit de lavage
- 8.2 Comment sélectionner et démarrer un programme en utilisant la barre de sélection MY TIME.
- 8.3 Comment sélectionner et lancer le programme Pré-rinçage
- 8.4 Comment activer l'option EXTRAS
- 8.5 Comment démarrer le programme AUTO Sense
- 8.6 Comment différer le départ d'un programme
- 8.7 Comment annuler le départ différé au cours du décompte
- 8.8 Pour annuler un programme en cours
- 8.9 Ouverture de la porte au cours du fonctionnement de l'appareil
- 8.10 Fonction Auto Off
- 8.11 Fin du programme
- 9. CONSEILS
- 10. ENTRETIEN ET NETTOYAGE
- 11. DÉPANNAGE
- 12. CARACTÉRISTIQUES TECHNIQUES

CAUTION!
An incorrect position of the
filters can cause bad
washing results and damage
to the appliance.
10.6 Cleaning the lower spray
arm
We recommend to clean the lower spray
arm regularly to prevent soil from
clogging the holes.
Clogged holes can cause unsatisfactory
washing results.
1. To remove the lower spray arm, pull
it upwards.
2. Wash the spray arm under running
water. Use a thin pointed tool, e.g. a
toothpick, to remove particles of soil
from the holes.
3.
To install the spray arm back, press it
downwards.
10.7 Cleaning the upper spray
arms
We recommend to clean the upper spray
arms regularly to prevent soil from
clogging the holes. Clogged holes can
cause unsatisfactory washing results.
The upper spray arms are placed under
the upper basket. The spray arms (B) are
installed in the duct (A) with the
mounting elements (C).
ENGLISH 21