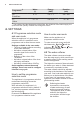
GA45SLV EN Dishwasher User Manual
www.electrolux.com CONTENTS 1. PRODUCT DESCRIPTION................................................................................ 3 2. CONTROL PANEL............................................................................................. 4 3. PROGRAMMES................................................................................................. 4 4. SETTINGS..........................................................................................................6 5. OPTIONS.....................
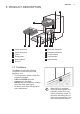
ENGLISH 1. PRODUCT DESCRIPTION 1 2 11 10 1 2 3 4 5 6 9 8 7 Upper spray arm Lower spray arm Filters Rating plate Salt container Air vent 6 7 8 9 10 11 5 4 3 Rinse aid dispenser Detergent dispenser Cutlery basket Lower basket Upper basket 1.1 TimeBeam TimeBeam displays the following information on the floor below the appliance door: • The programme duration when the programme begins. • 0:00 and CLEAN when the programme is complete. • DELAY and the countdown duration when the delay start begins.
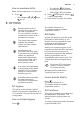
www.electrolux.com 2. CONTROL PANEL 1 2 3 4 5 3 2 1 On/off button Display Delay touchpad Program touchpad Hygiene touchpad 4 6 7 8 9 5 6 7 8 9 TimeSaver touchpad XtraDry touchpad Reset touchpad Indicators 2.1 Indicators Indicator Description End indicator. Rinse aid indicator. It is always off while the programme operates. Salt indicator. It is always off while the programme operates. 3. PROGRAMMES The numbering of the programmes in the table (P1, P2, etc.
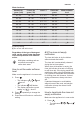
ENGLISH Programme Degree of soil Type of load Programme phases Options P4 Pro • • Heavy soil Crockery, cut‐ lery, pots and pans • • • • Prewash Wash 70 °C Rinses Dry • • • Hygiene TimeSaver XtraDry • P5 Quick 30 Min.
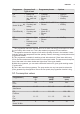
www.electrolux.com Programme 1) Water (l) Energy (kWh) Duration (min) P6 ExtraSilent 9 - 11 0.9 - 1.1 220 - 230 P7 Gläser 10 - 12 0.8 - 0.9 60 - 80 1) The pressure and the temperature of the water, the variations of the mains supply, the options and the quantity of dishes can change the values. 4. SETTINGS 4.1 Programme selection mode and user mode When the appliance is in programme selection mode it is possible to set a programme and to enter the user mode.
ENGLISH 7 Water hardness German de‐ grees (°dH) French de‐ grees (°fH) mmol / l Clarke de‐ grees Water softener level 47 - 50 84 - 90 8.4 - 9.0 58 - 63 10 43 - 46 76 - 83 7.6 - 8.3 53 - 57 9 37 - 42 65 - 75 6.5 - 7.5 46 - 52 8 29 - 36 51 - 64 5.1 - 6.4 36 - 45 7 23 - 28 40 - 50 4.0 - 5.0 28 - 35 6 19 - 22 33 - 39 3.3 - 3.9 23 - 27 5 1) 15 - 18 26 - 32 2.6 - 3.2 18 - 22 4 11 - 14 19 - 25 1.9 - 2.5 13 - 17 3 4 - 10 7 - 18 0.7 - 1.8 5 - 12 2 <4 <7 <0.
www.electrolux.com • • The indicator still flashes. The display shows the current setting: = the rinse aid empty notification is activated (factory setting). to change the setting. 2. Press = the rinse aid empty notification is deactivated. 3. Press on/off to confirm the setting. 4.4 Acoustic signals Acoustic signals sound when a malfunction of the appliance occurs. It is not possible to deactivate these acoustic signals. There is also an acoustic signal that sounds when the programme is completed.
ENGLISH How to deactivate AirDry Make sure the appliance is in user mode. 1. Press • . The indicators , , and are off. • • 9 The indicator still flashes. The display shows the current setting: = AirDry activated. to change the setting: 2. Press = AirDry deactivated. 3. Press on/off to confirm the setting. 5. OPTIONS Desired options must be activated every time before you start a programme. It is not possible to activate or deactivate options while a programme is running.
www.electrolux.com The washing results are the same as with the normal programme duration. The drying results can decrease. The display shows the updated programme duration. How to activate TimeSaver Press . The related indicator is on. 6. BEFORE FIRST USE 1. Make sure that the current level of the water softener agrees with the hardness of the water supply. If not, adjust the level of the water softener. 2. Fill the salt container. 3. Fill the rinse aid dispenser. 4. Open the water tap. 5.
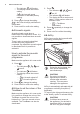
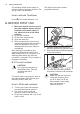
ENGLISH 6.2 How to fill the rinse aid dispenser A DB M AX 4 1 3 2 + 11 1. Press the release button (D) to open the lid (C). 2. Pour the rinse aid in the dispenser (A) until the liquid reaches the fill level 'max'. 3. Remove the spilled rinse aid with an absorbent cloth to prevent too much foam. 4. Close the lid. Make sure that the release button locks into position.
www.electrolux.com Starting a programme 1. Keep the appliance door ajar. 2. Press the on/off button to activate the appliance. Make sure that the appliance is in programme selection mode. 3. Press repeatedly until the display shows the number of the chosen programme. The display shows the programme number for approximately 3 seconds and then shows the programme duration. 4. Set the applicable options. 5. Close the appliance door to start the programme. Starting a programme with delay start 1.
ENGLISH 13 8. HINTS AND TIPS 8.1 General Follow the hints below to ensure optimal cleaning and drying results in daily use and to help you protect the environment. • • • • • • Remove larger residues of food from the dishes into the waste bin. Do not pre-rinse dishes by hand. When needed, select a programme with a prewash phase. Always use the whole space of the baskets. Make sure that items in the baskets do not touch or cover each other. Only then can the water completely reach and wash the dishes.
www.electrolux.com 8.5 Before starting a programme • Before you start the selected programme, make sure that: 8.6 Unloading the baskets • • • • • • The filters are clean and correctly installed. The cap of the salt container is tight. The spray arms are not clogged. There is enough salt and rinse aid (unless you use multi-tablets). The arrangement of the items in the baskets is correct. The programme is suitable to the type of load and the degree of soil.
ENGLISH 15 CAUTION! An incorrect position of the filters can cause bad washing results and damage to the appliance. 9.2 Cleaning the spray arms Do not remove the spray arms. If the holes in the spray arms are clogged, remove remaining parts of soil with a thin pointed object. 9.3 External cleaning 5. Make sure that there are no residues of food or soil in or around the edge of the sump. 6. Put back in place the flat filter (A). Make sure that it is correctly positioned under the 2 guides. • • • 9.
www.electrolux.com solve the problem by yourself with the help of the information in the table or contact an Authorised Service Centre. WARNING! Repairs not properly done may result in serious risk to the safety of the user. Any repairs must be performed by qualified personnel. With some problems, the display shows an alarm code. The majority of problems that can occur can be solved without the need to contact an Authorised Service Centre.
ENGLISH Problem and alarm code Possible cause and solution The remaining time in the display increases and skips nearly to the end of program time. • This is not a defect. The appliance is working cor‐ rectly. Small leak from the appli‐ ance door. • The appliance is not levelled. Loosen or tighten the adjustable feet (if applicable). The appliance door is not centred on the tub. Adjust the rear foot (if applicable). The appliance door is diffi‐ cult to close.
www.electrolux.com Problem Possible cause and solution Poor drying results. • • • • • Tableware has been left for too long inside a closed appliance. There is no rinse aid or the dosage of rinse aid is not enough. Set the rinse aid dispenser to a higher level. Plastic items may need to be towel dried. For the best drying performance activate the option XtraDry and set AirDry. We recommend to always use rinse aid, even in combination with multi-tablets.
ENGLISH Problem Possible cause and solution Limescale deposits on the • tableware, on the tub and on • the inside of the door. • • • • • Dull, discoloured or chipped tableware. 19 • • • The level of salt is low, check the refill indicator. The cap of the salt container is loose. Your tap water is hard. Refer to "The water soft‐ ener". Even using multi-functional tabs use salt and set regeneration of the water softener. Refer to "The water softener".
12. www.electrolux.com CH GUARANTEE Customer Service Centres Point of Service Industriestrasse 10 5506 Mägenwil Le Trési 6 1028 Préverenges Via Violino 11 6928 Manno Morgenstrasse 131 3018 Bern Langgasse 10 9008 St. Gallen Seetalstrasse 11 6020 Emmenbrücke Schlossstrasse 1 4133 Pratteln Comercialstrasse 19 7000 Chur Spare parts service Industriestrasse 10, 5506 Mägenwil, Tel. 0848 848 111 Specialist advice/Sale Badenerstrasse 587, 8048 Zürich, Tel.
ENGLISH 21
www.electrolux.
ENGLISH 23
156914523-A-402018 www.electrolux.