GA55IEEVWE GA55IEEVCN EN DE Dishwasher Geschirrspüler User Manual Benutzerinformation 2 25
www.electrolux.com CONTENTS 1. SAFETY INFORMATION....................................................................................3 2. SAFETY INSTRUCTIONS..................................................................................4 3. PRODUCT DESCRIPTION................................................................................ 6 4. CONTROL PANEL............................................................................................. 6 5. PROGRAMMES.....................................
ENGLISH 1. 3 SAFETY INFORMATION Before the installation and use of the appliance, carefully read the supplied instructions. The manufacturer is not responsible for any injuries or damages that are the result of incorrect installation or usage. Always keep the instructions in a safe and accessible location for future reference. 1.
www.electrolux.com • • • • • • • • • The operating water pressure (minimum and maximum) must be between 0.5 (0.05) / 8 (0.8) bar (MPa) Obey the maximum number of 12 place settings. If the supply cord is damaged, it must be replaced by the manufacturer, its Authorised Service Centre or similarly qualified persons in order to avoid a hazard. Put the cutlery in the cutlery basket with the sharp ends pointing down or put them in the cutlery drawer in a horizontal position with the sharp edges down.
ENGLISH • • • • Connect the mains plug to the mains socket only at the end of the installation. Make sure that there is access to the mains plug after the installation. Do not pull the mains cable to disconnect the appliance. Always pull the mains plug. This appliance complies with the E.E.C. Directives. UK and Ireland only. This appliance is fitted with a 13 A mains plug. If it is necessary to change the mains plug fuse, use only a 13 A ASTA (BS 1362) fuse. 2.
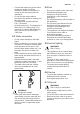
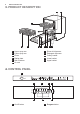
www.electrolux.com 3. PRODUCT DESCRIPTION 1 2 11 10 1 2 3 4 5 6 9 8 7 Upper spray arm Lower spray arm Filters Rating plate Salt container Air vent 4 6 5 7 8 9 10 11 Rinse aid dispenser Detergent dispenser Cutlery basket Lower basket Upper basket 3 4.
ENGLISH 3 Programme indicators 4 Display 5 Zeitvorwahl / Départ Différé / Ritardo button 6 Option button 7 Indicators 8 Start button 4.1 Indicators Indicator Description Salt indicator. It is on when the salt container needs refilling. It is al‐ ways off while the programme operates. Rinse aid indicator. It is on when the rinse aid dispenser needs refill‐ ing. It is always off while the programme operates. Washing phase indicator. It is on when the washing phase operates. Rinsing phase indicator.
www.electrolux.
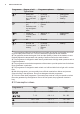
ENGLISH Programme 1) Water (l) Energy (kWh) Duration (min) 10 0.7 30 4 0.1 14 8 - 10 1.1 - 1.2 225 - 235 9 1) The pressure and the temperature of the water, the variations of the mains supply, the options and the quantity of dishes can change the values. 5.2 Information for test institutes To receive the necessary information for conducting performance tests (e.g. according to EN60436), send an email to: In your request please include the product number code (PNC) found on the rating plate.
www.electrolux.com advise you on the hardness of the water in your area. It is important to set the right level of the water softener to assure good washing results. Water hardness German de‐ grees (°dH) French de‐ grees (°fH) mmol/l Clarke de‐ grees Water softener level 47 - 50 84 - 90 8.4 - 9.0 58 - 63 10 43 - 46 76 - 83 7.6 - 8.3 53 - 57 9 37 - 42 65 - 75 6.5 - 7.5 46 - 52 8 29 - 36 51 - 64 5.1 - 6.4 36 - 45 7 23 - 28 40 - 50 4.0 - 5.0 28 - 35 6 19 - 22 33 - 39 3.
ENGLISH • The indicators , • The indicator still flashes. The display shows the current setting. 11 and are off. • – = the rinse aid empty notification is deactivated. – = the rinse aid empty notification is activated. 2. Press to change the setting. 3. Press on/off to confirm the setting. During the drying phase, the door opens automatically and remains ajar. 6.
www.electrolux.com 2. Press to change the setting. 3. Press on/off to confirm the setting. 6.6 MyFavourite This option allows to set and save the most frequently used programme. You can also set applicable options. 2. Press and hold simultaneously and until the indicators of the selected programme and options flash for a few seconds. It is possible to save only 1 programme. A new setting cancels the previous one.
ENGLISH 13 How to activate TimeSaver °C for at least 10 minutes during the last rinsing phase. Press until the indicator is on. The display shows the updated programme duration. How to activate XtraHygiene 7.3 XtraHygiene This option provides better hygiene results by keeping the temperature at 70 Press until the indicator is on. The display shows the updated programme duration. 8. BEFORE FIRST USE 1.
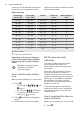
www.electrolux.com 8.2 How to fill the rinse aid dispenser A B CAUTION! Only use rinse aid designed specifically for dishwashers. 1. Open the lid (C). 2. Fill the dispenser (B) until the rinse aid reaches the marking ''MAX''. 3. Remove the spilled rinse aid with an absorbent cloth to prevent excessive foam formation. 4. Close the lid. Make sure that the lid locks into position. Fill the rinse aid dispenser when the indicator (A) is clear. C 9. DAILY USE 1. Open the water tap. 2.
ENGLISH 15 The display shows the programme duration. 4. Set applicable options if desired. Cancelling the delay start while the countdown operates 5. Press to start the programme. • The indicator of the running phase is on. • The programme duration counts down in minutes. When you cancel the delay start, you have to set a programme and options again. Cancelling the programme 1. Set a programme. repeatedly until the display 2. Press shows the desired delay time (from 1 to 24 hours). is on. 3.
www.electrolux.com 10. HINTS AND TIPS 10.1 General Follow the hints below to ensure optimal cleaning and drying results in daily use and to help you protect the environment. • • • • • • Remove larger residues of food from the dishes into the waste bin. Do not pre-rinse dishes by hand. When needed, select a programme with a prewash phase. Always use the whole space of the baskets. Make sure that items in the baskets do not touch or cover each other.
ENGLISH 10.5 Before starting a programme • Before you start the selected programme, make sure that: 10.6 Unloading the baskets • • • • • • The filters are clean and correctly installed. The cap of the salt container is tight. The spray arms are not clogged. There is enough salt and rinse aid (unless you use multi-tablets). The arrangement of the items in the baskets is correct. The programme is suitable to the type of load and the degree of soil. 17 The correct quantity of detergent is used. 1.
www.electrolux.com CAUTION! An incorrect position of the filters can cause bad washing results and damage to the appliance. 11.2 Cleaning the spray arms Do not remove the spray arms. If the holes in the spray arms are clogged, remove remaining parts of soil with a thin pointed object. 5. Make sure that there are no residues of food or soil in or around the edge of the sump. 6. Put back in place the flat filter (A). Make sure that it is correctly positioned under the 2 guides. 11.
ENGLISH 19 12. TROUBLESHOOTING WARNING! Improper repair of the appliance may pose a danger to the safety of the user. Any repairs must be performed by qualified personnel. to contact an Authorised Service Centre. Refer to the below table for information on possible problems. With some problems, the display shows an alarm code. The majority of problems that may occur can be solved without the need Problem and alarm code Possible cause and solution You cannot activate the appliance.
www.electrolux.com Problem and alarm code Possible cause and solution The programme lasts too long. • If the delay start option is set, cancel the delay set‐ ting or wait for the end of the countdown. Activate the TimeSaver option to reduce the pro‐ gramme duration. Activating options can increase the programme dura‐ tion. • • The remaining time in the display increases and skips nearly to the end of the programme duration. • This is not a defect. The appliance is working cor‐ rectly.
ENGLISH Problem Possible cause and solution Poor drying results. • • • • • 21 Tableware has been left for too long inside the closed appliance. There is no rinse aid or the dosage of rinse aid is not sufficient. Adjust the rinse aid level to a higher level. Plastic items may need to be towel dried. For the best drying performance, activate XtraDry and AirDry. We recommend to always use rinse aid, even in combination with multi-tablets.
www.electrolux.com Problem Possible cause and solution Limescale deposits on the • tableware, on the tub and on • the inside of the door. • • • • • Dull, discoloured or chipped tableware. • • • • The level of salt is low. Check the salt indicator. The cap of the salt container is loose. Your tap water is hard. Refer to "The water soft‐ ener". Use salt and set regeneration of the water softener even when multi-functional tablets are used. Refer to "The water softener".
ENGLISH Drying efficiency class on a scale from G (least efficient) to A (most efficient) A The ‘standard programme’ is the standard cleaning cycle to which the information in the label and the fiche relates. This pro‐ gramme is suitable to clean normally soiled tableware and is the most efficient programme in terms of combined energy and wa‐ ter consumption. It is indicated as "Eco" programme.
www.electrolux.com Spare parts service Industriestrasse 10, 5506 Mägenwil, Tel. 0848 848 111 Specialist advice/Sale Badenerstrasse 587, 8048 Zürich, Tel. 044 405 81 11 Warranty For each product we provide a two-year guarantee from the date of purchase or delivery to the consumer (with a guarantee certificate, invoice or sales receipt serving as proof). The guarantee covers the costs of materials, labour and travel.
DEUTSCH 25 INHALTSVERZEICHNIS 1. SICHERHEITSHINWEISE................................................................................26 2. SICHERHEITSANWEISUNGEN...................................................................... 28 3. GERÄTEBESCHREIBUNG.............................................................................. 30 4. BEDIENFELD................................................................................................... 30 5. PROGRAMME.............................................
1. www.electrolux.com SICHERHEITSHINWEISE Lesen Sie vor der Montage und dem Gebrauch des Geräts zuerst die Gebrauchsanleitung. Bei Verletzungen oder Schäden infolge nicht ordnungsgemäßer Montage oder Verwendung des Geräts übernimmt der Hersteller keine Haftung. Bewahren Sie die Anleitung immer an einem sicheren und zugänglichen Ort zum späteren Nachschlagen auf. 1.
DEUTSCH Bauernhöfe, Personalküchenbereiche in Geschäften, Büros und anderen Arbeitsumfeldern. – Für Gäste in Hotels, Motels, Pensionen und anderen wohnungsähnlichen Räumlichkeiten. Nehmen Sie keine technischen Änderungen am Gerät vor. Der Betriebswasserdruck (Mindest- und Höchstdruck) muss zwischen 0.5 (0.05) / 8 (0.8) bar (MPa) liegen Beachten Sie, dass die Höchstzahl an Maßgedecken 12 beträgt.
www.electrolux.com 2. SICHERHEITSANWEISUNGEN 2.1 Montage • • • • • • WARNUNG! Die Montage des Geräts darf nur von einer qualifizierten Fachkraft durchgeführt werden. • Entfernen Sie das gesamte Verpackungsmaterial. Montieren Sie ein beschädigtes Gerät nicht und benutzen Sie es nicht. Halten Sie sich an die mitgelieferte Montageanleitung. Seien Sie beim Umsetzen des Gerätes vorsichtig, da es sehr schwer ist. Tragen Sie stets Sicherheitshandschuhe und festes Schuhwerk.
DEUTSCH • WARNUNG! Gefährliche Spannung. Drehen Sie sofort den Wasserhahn zu und ziehen Sie den Netzstecker aus der Steckdose, wenn der Wasserzulaufschlauch beschädigt ist. Wenden Sie sich für den Austausch des Wasserzulaufschlauchs an den autorisierten Kundendienst. 2.4 Gebrauch • • • • • • Setzen oder stellen Sie sich niemals auf die geöffnete Gerätetür. Geschirrspüler-Reinigungsmittel sind gefährlich. Beachten Sie die Sicherheitsanweisungen auf der Reinigungsmittelverpackung.
www.electrolux.com 3. GERÄTEBESCHREIBUNG 1 2 11 10 1 2 3 4 5 6 9 8 7 Mittlerer Sprüharm Unterer Sprüharm Siebe Typenschild Salzbehälter Entlüftung 4 6 5 7 8 9 10 11 Klarspülmittel-Dosierer Reinigungsmittelfach Besteckkorb Unterkorb Oberkorb 3 4.
DEUTSCH 3 Programmkontrolllampen 4 Display 5 Zeitvorwahl / Départ Différé / Ritardo Taste 31 6 Option Taste 7 Kontrolllampen 8 Start Taste 4.1 Kontrolllampen Kontrolllam‐ Beschreibung pe Kontrolllampe Salz. Leuchtet, wenn der Salzbehälter nachgefüllt wer‐ den muss. Sie erlischt während des Programmbetriebs. Kontrolllampe Klarspülmittel. Leuchtet, wenn der Klarspülmittel-Dosie‐ rer nachgefüllt werden muss. Sie erlischt während des Programmbet‐ riebs. Kontrolllampe Hauptspülgang.
www.electrolux.
DEUTSCH Programm 7) Verschmutzungs‐ Programmphasen grad Beladung • • Normaler Ver‐ schmutzungs‐ grad Geschirr und Besteck • • • • 33 Optionen Vorspülen • Hauptspülgang 50 °C Spülen Trocknen XtraDry 1) Dieses Programm gewährleistet den wirtschaftlichsten Wasser- und Energieverbrauch für normal verschmutztes Geschirr und Besteck. Dies ist das Standardprogramm für Prüfinstitu‐ te. 2) Das Gerät erkennt den Verschmutzungsgrad und die Anzahl der Geschirrteile in den Kör‐ ben.
www.electrolux.com 5.2 Informationen für Prüfinstitute Wenn Sie Informationen zur Durchführung von Leistungsprüfungen (z.B. gemäß EN60436) benötigen, schicken Sie eine E-Mail an: Geben Sie in Ihrer Anfrage den Produktnummerncode (PNC) an, den Sie auf dem Typenschild finden. Bezüglich anderer Fragen zu Ihrem Geschirrspüler siehe die mit dem Gerät gelieferte Bedienungsanleitung. info.test@dishwasher-production.com 6. EINSTELLUNGEN 6.
DEUTSCH 35 Wasserhärte Deutsche Wasserhärte‐ grade (°dH) Französische Wasserhärte‐ grade (°fH) mmol/l Clarke Wasserhär‐ tegrade Einstellung für den Wasseren‐ thärter 47 - 50 84 - 90 8,4 - 9,0 58 - 63 10 43 - 46 76 - 83 7,6 - 8,3 53 - 57 9 37 - 42 65 - 75 6,5 - 7,5 46 - 52 8 29 - 36 51 - 64 5,1 - 6,4 36 - 45 7 23 - 28 40 - 50 4,0 - 5,0 28 - 35 6 19 - 22 33 - 39 3,3 - 3,9 23 - 27 5 1) 15 - 18 26 - 32 2,6 - 3,2 18 - 22 4 11 - 14 19 - 25 1,9 - 2,5 13 - 17 3 4 - 10
www.electrolux.com – Die Klarspülmittelstufen reichen von 0A bis 6A, wobei bei Stufe 0A kein Klarspülmittel zugegeben wird. Ausschalten der Klarspülmittelnachfüllanzeige Stellen Sie sicher, dass sich das Gerät im Benutzermodus befindet. 1. Drücken Sie • Die Kontrolllampen und • • 2. Drücken Sie wiederholt zum Ändern der Einstellung. 3. Drücken Sie Ein/Aus zum Bestätigen der Einstellung. . , erlöschen. 6.5 AirDry Die Kontrolllampe blinkt weiterhin.
DEUTSCH VORSICHT! Haben Kinder Zugang zum Gerät, wird empfohlen AirDry auszuschalten, da das Öffnen der Tür eine Gefahr darstellen könnte. So schalten Sie AirDry aus Stellen Sie sicher, dass sich das Gerät im Benutzermodus befindet. 1. Drücken Sie • . Die Kontrolllampen und • • , erlöschen. Die Kontrolllampe blinkt weiterhin. Im Display wird die aktuelle Einstellung angezeigt. – = AirDry ist ausgeschaltet. – = AirDry ist eingeschaltet. 2. Drücken Sie zum Ändern der Einstellung. 3.
www.electrolux.com Ist die Option nicht mit einem Programm kombinierbar, leuchtet die entsprechende Kontrolllampe nicht oder sie blinkt ein paar Sekunden schnell und erlischt dann. Die eingeschalteten Optionen können sich auf den Wasser- und Energieverbrauch sowie die Programmdauer auswirken. 7.2 TimeSaver Mit dem TimeSaver können Sie die Dauer des gewählten Programms um etwa 50% verkürzen. Die Spülergebnisse entsprechen denen einer normalen Programmdauer.
DEUTSCH 39 Wenn Sie ein Programm starten, kann es bis zu 5 Minuten dauern das Filterharz des Wasserenthärters zu regenerieren. Das Gerät scheint nicht zu arbeiten. Die Spülphase startet erst nach Abschluss dieses Vorgangs. Dieser Vorgang wird regelmäßig wiederholt. 8.1 Salzbehälter VORSICHT! Verwenden Sie ausschließlich speziell für Geschirrspüler bestimmtes grobkörniges Salz. Mit feinem Salz besteht erhöhte Korrosionsgefahr.
www.electrolux.com Tuch auf, um eine übermäßige Schaumbildung zu vermeiden. 4. Schließen Sie den Deckel. Achten Sie darauf, dass der Deckel einrastet. Füllen Sie den Klarspülmittel-Dosierer, wenn das Schauglas (A) klar ist. 9. TÄGLICHER GEBRAUCH 1. Öffnen Sie den Wasserhahn. 2. Drücken Sie die Taste Ein/Aus, um das Gerät einzuschalten. Stellen Sie sicher, dass sich das Gerät im Programmwahlmodus befindet. • Füllen Sie den Salzbehälter auf, wenn die Kontrolllampe Salz leuchtet.
DEUTSCH Die verbleibende Zeit zählt stundenweise rückwärts. In der letzten Stunde wird die Zeit minutenweise heruntergezählt. Nach dem Ablauf der Zeitvorwahl startet das Programm und die Kontrolllampe der laufenden Phase leuchtet. Die Kontrolllampe erlischt. Öffnen der Tür während eines laufenden Programms Wenn Sie die Tür während eines laufenden Programms öffnen, stoppt das Gerät. Dies kann sich auf den Energieverbrauch und die Programmdauer auswirken.
www.electrolux.com • • Sie können Geschirrspülreiniger, Klarspülmittel und Salz separat oder Kombi-Reinigungstabletten (z.B. „Allin-1“) verwenden. Beachten Sie die auf der Verpackung angegebenen Hinweise. Wählen Sie ein Programm, das für die Beladung und den Verschmutzungsgrad geeignet ist. bietet den effizientesten Wasser- und Energieverbrauch. 10.2 Gebrauch von Salz, Klarspül- und Reinigungsmittel • • • • • Verwenden Sie nur Salz, Klarspülmittel und Reinigungsmittel für Geschirrspüler.
DEUTSCH • • • • • • Der Deckel des Salzbehälters fest geschlossen ist. Die Sprüharme nicht verstopft sind. Geschirrspülsalz und Klarspülmittel vorhanden sind (außer Sie verwenden Multi-Reinigungstabletten). Die Geschirrteile richtig in den Körben angeordnet sind. Das Programm sich für die Beladung und den Verschmutzungsgrad eignet. Die Reinigungsmittelmenge stimmt. 43 2. Entladen Sie zuerst den Unter- und dann den Oberkorb.
www.electrolux.com 2. Nehmen Sie den Filter (C) aus dem Filter (B). 3. Entfernen Sie den flachen Filter (A). 4. Reinigen Sie die Filter. 5. Achten Sie darauf, dass sich keine Lebensmittelreste oder Verschmutzungen in oder um den Rand der Wanne befinden. 6. Setzen Sie den flachen Filter (A) wieder ein. Stellen Sie sicher, dass er korrekt unter den beiden Führungen eingesetzt wurde. 7. Bauen Sie die Filter (B) und (C) wieder zusammen. 8. Setzen Sie den Filter (B) in den flachen Filter (A) ein.
DEUTSCH Reinigungsschwämmchen oder Lösungsmittel. 11.4 Reinigung des Geräteinnenraums • • Reinigen Sie das Gerät und die Gummidichtung der Tür sorgfältig mit einem weichen, feuchten Tuch. Verwenden Sie einmal im Monat ein spezielles Reinigungsmittel für Geschirrspüler, um die Leistungsfähigkeit des Geräts zu erhalten. Befolgen Sie sorgfältig die • • 45 Anweisungen auf der Reinigungsmittelverpackung.
www.electrolux.com Störung und Alarmcode Mögliche Ursache und Abhilfe Es läuft kein Wasser in das • Gerät. • Im Display erscheint oder . • • • Das Gerät pumpt das Wasser nicht ab. Im Display erscheint • • . • • Das Überlaufschutzsystem • ist eingeschaltet. Im Display erscheint Stellen Sie sicher, dass der Wasserzulaufhahn geöff‐ net ist. Vergewissern Sie sich, dass der Wasserdruck der Wasserversorgung nicht zu niedrig ist. Diese Infor‐ mationen erhalten Sie von Ihrem lokalen Wasserver‐ sorger.
DEUTSCH Störung und Alarmcode 47 Mögliche Ursache und Abhilfe Klappernde oder schlagen‐ • de Geräusche aus dem Geräteinneren. • Das Geschirr ist nicht richtig in den Körben eingeord‐ net. Siehe Broschüre zum Beladen der Körbe. Achten Sie darauf, dass sich die Sprüharme frei dre‐ hen können. Das Gerät löst die Siche‐ rung aus. Die abgesicherte Stromstärke reicht nicht für den gleichzeitigen Betrieb aller eingeschalteten Geräte. Überprüfen Sie, für welche Stromstärke die Steckdo‐ se bzw.
www.electrolux.com Störung Mögliche Ursache und Abhilfe Wasserflecken und andere Flecken auf Gläsern und Geschirr. • Das Geschirr ist nass. • • • • • • Die zugegebene Klarspülmittelmenge ist zu niedrig. Stellen Sie eine höhere Klarspülmittelmenge ein. Die Ursache kann in der Qualität des Klarspülmit‐ tels liegen. Schalten Sie XtraDry und AirDry ein, um die beste Trocknungsleistung zu erzielen. Das Programm enthält keine Trocknungsphase oder eine Trocknungsphase mit niedriger Tempera‐ tur.
DEUTSCH Störung Mögliche Ursache und Abhilfe Kalkablagerungen auf dem Geschirr, im Innenraum und auf der Türinnenseite. • • • • • • • Das Geschirr ist glanzlos, verfärbt sich oder ist ange‐ schlagen. • • • • 49 Die Salzmenge ist nicht ausreichend. Überprüfen Sie die Salzkontrolllampe. Der Deckel des Salzbehälters ist locker. Ihr Leitungswasser ist hart. Siehe „Wasserenthär‐ ter“.
www.electrolux.com Energieverbauch im nicht-ausgeschalteten Zustand 5.0 Wasserverbrauch in Liter/Jahr, auf der Grundlage von 280 Stan‐ dardreinigungszyklen. Der tatsächliche Wasserverbrauch hängt von der Art der Nutzung des Geräts ab. 2775 Trocknungseffizienzklasse auf einer Skala von G (geringste Effi‐ zienz) bis A (höchste Effizienz).
DEUTSCH 51 Servicestellen Morgenstrasse 131 3018 Bern Zürcherstrasse 204E 9000 St. Gallen Seetalstrasse 11 6020 Emmenbrücke Schlossstrasse 1 4133 Pratteln Comercialstrasse 19 7000 Chur Ersatzteilverkauf Industriestrasse 10, 5506 Mägenwil, Tel. 0848 848 111 Fachberatung/Verkauf Badenerstrasse 587, 8048 Zürich, Tel. 044 405 81 11 Garantie Für jedes Produkt gewähren wir ab Verkauf bzw. Lieferdatum an den Endverbraucher eine Garantie von 2 Jahren. (Ausweis durch Garantieschein, Faktura oder Verkaufsbeleg).
117872551-A-402018 www.electrolux.