GA60GLISCN GA60GLISSP GA60GLISWE EN DISHWASHER USER MANUAL
www.electrolux.com CONTENTS 1. SAFETY INFORMATION...................................................................................... 3 2. SAFETY INSTRUCTIONS.....................................................................................4 3. PRODUCT DESCRIPTION................................................................................... 6 4. CONTROL PANEL............................................................................................... 7 5. PROGRAMMES..........................
ENGLISH 1. 3 SAFETY INFORMATION Before the installation and use of the appliance, carefully read the supplied instructions. The manufacturer is not responsible for any injuries or damages that are the result of incorrect installation or usage. Always keep the instructions in a safe and accessible location for future reference. 1.
www.electrolux.com • • • • • Do not keep the appliance door open without supervision to prevent to fall on it. Before any maintenance operation, deactivate the appliance and disconnect the mains plug from the socket. Do not use high pressure water sprays and/or steam to clean the appliance. The ventilation openings in the base (if applicable) must not be obstructed by a carpet. The appliance is to be connected to the water mains using the new supplied hose-sets. Old hose sets must not be reused. 2.
ENGLISH 5 • This appliance has an internal lamp that comes on when you open the door and goes off when the door is closed. • The lamp in this appliance is not suitable for household room illumination. • To replace the lamp, contact the Service. 2.6 Service WARNING! Dangerous voltage. • If the water inlet hose is damaged, immediately disconnect the mains plug from the mains socket. Contact the Authorised Service Centre to replace the water inlet hose. 2.4 Use • Do not sit or stand on the open door.
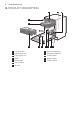
www.electrolux.com 3.
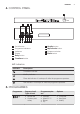
ENGLISH 4. CONTROL PANEL 1 3 2 3 4 10 9 8 7 6 5 1 2 3 4 5 6 On/off button Programme indicators Indicators Display Delay button TimeSaver button 7 8 9 10 XtraDry button MyFavourite button Programme button Reset button 4.1 Indicators Indicator Description TimeSaver indicator. XtraDry indicator. Rinse aid indicator. It is always off while the programme operates. Salt indicator. It is always off while the programme operates. 5.
www.electrolux.
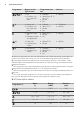
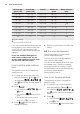
ENGLISH Programme 1) Water (l) Energy (kWh) Duration (min) 9 - 10 1.1 - 1.3 219 - 229 9 1) The pressure and the temperature of the water, the variations of the mains supply, the options and the quantity of dishes can change the values. 5.2 Information for test institutes For all the necessary information for test performance, send an email to: Write down the product number (PNC) that is on the rating plate. info.test@dishwasher-production.com 6. SETTINGS 6.
www.electrolux.com German degrees (°dH) French degrees (°fH) mmol/l Clarke degrees Water softener level 37 - 42 65 - 75 6.5 - 7.5 46 - 52 8 29 - 36 51 - 64 5.1 - 6.4 36 - 45 7 23 - 28 40 - 50 4.0 - 5.0 28 - 35 6 19 - 22 33 - 39 3.3 - 3.9 23 - 27 5 1) 15 - 18 26 - 32 2.6 - 3.2 18 - 22 4 11 - 14 19 - 25 1.9 - 2.5 13 - 17 3 4 - 10 7 - 18 0.7 - 1.8 5 - 12 2 <4 <7 <0.7 <5 1 2) 1) Factory setting. 2) Do not use salt at this level.
ENGLISH • The display shows the current setting: e.g. = level 4. – The levels of rinse aid are from 0A to 6A. – Level 0 = no rinse aid is released. again and again to change 3. Press the setting. 4. Press the on/off button to confirm the setting. 6.4 The rinse aid empty notification When rinse aid chamber is empty, the rinse aid indicator is turned on notifying to refill rinse aid.
www.electrolux.com 7. OPTIONS Desired options must be activated every time before you start a programme. It is not possible to activate or deactivate options while a programme is running. Not all options are compatible with each other. If you have selected non compatible options, the appliance will automatically deactivate one or more of them. Only the indicators of the options still active will stay on. How to activate TimeSaver Press , the related indicator comes on.
ENGLISH 13 To improve the drying performance refer to the XtraDry option or activate AutoOpen again. 8. BEFORE FIRST USE 1. Make sure that the current level of the water softener agrees with the hardness of the water supply. If not, adjust the level of the water softener. 2. Fill the salt container. 3. Fill the rinse aid dispenser. 4. Open the water tap. 5. Start a programme to remove any processing residuals that can still be inside the appliance. Do not use detergent and do not load the baskets.
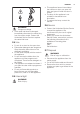
www.electrolux.com 8.2 How to fill the rinse aid dispenser A B 1. Open the lid (C). 2. Fill the dispenser (B) until the rinse aid reaches the marking ''MAX''. 3. Remove the spilled rinse aid with an absorbent cloth to prevent too much foam. 4. Close the lid. Make sure that the lid locks into position. Fill the rinse aid dispenser when the indicator (A) becomes clear. If you use multi-tablets and the drying performance is satisfactory, the rinse aid refill indication can be disabled.
ENGLISH detergent on the inner part of the appliance door. 4. Close the lid. Make sure that the lid locks into position. 9.2 Setting and starting a programme The AUTO OFF function This function decreases energy consumption by deactivating automatically the appliance when it is not operating. The function comes into operation: • 5 minutes after the completion of the programme. • After 5 minutes if the programme has not started. Starting a programme 1. Keep the appliance door ajar. 2.
www.electrolux.com All buttons are inactive except for the on/off button. 1. Press the on/off button or wait for the AUTO OFF function to automatically deactivate the appliance. If you open the door before the activation of AUTO OFF, the appliance is automatically deactivated. 2. Close the water tap. 10. HINTS AND TIPS 10.1 General The following hints will ensure optimal cleaning and drying results in daily use and also help to protect the environment.
ENGLISH • Put hollow items (cups, glasses and pans) with the opening down. • Make sure that cutlery and dishes do not bond together. Mix spoons with other cutlery. • Make sure that glasses do not touch other glasses. • Put small items in the cutlery basket. • Put light items in the upper basket. Make sure that the items do not move. • Make sure that the spray arm can move freely before you start a programme. 10.5 Before starting a programme • The spray arms are not clogged.
www.electrolux.com 8. Put back the filter (B) in the flat filter (A). Turn it clockwise until it locks. 2. Remove the filter (C) out of filter (B). 3. Remove the flat filter (A). 4. Wash the filters. CAUTION! An incorrect position of the filters can cause bad washing results and damage to the appliance. 11.2 Cleaning the upper spray arm We recommend to clean regularly the upper spray arm to avoid soil to clog the holes. Clogged holes can cause unsatisfactory washing results. 5.
ENGLISH 19 11.3 External cleaning • Clean the appliance with a moist soft cloth. • Only use neutral detergents. • Do not use abrasive products, abrasive cleaning pads or solvents. 11.4 Internal cleaning 4. To engage again the spray arm to the basket, press the spray arm upwards in the direction indicated by the lower arrow and simultaneously turn it counterclockwise until it locks into place. • Carefully clean the appliance, including the rubber gasket of the door, with a soft damp cloth.
www.electrolux.com Problem and alarm code Possible cause and solution You cannot activate the ap- • Make sure that the mains plug is connected to the pliance. mains socket. • Make sure that there is no damaged fuse in the fuse box. The program does not start. • Make sure that the appliance door is closed. • If the delay start is set, cancel the setting or wait for the end of the countdown. • The appliance has started the procedure to recharge the resin inside the water softener.
ENGLISH 21 Problem and alarm code Possible cause and solution The appliance door is difficult to close. • The appliance is not levelled. Loosen or tighten the adjustable feet (if applicable). • Parts of the tableware are protruding from the baskets. Rattling/knocking sounds from inside the appliance. • The tableware is not properly arranged in the baskets. Refer to basket loading leaflet. • Make sure that the spray arms can rotate freely. The appliance trips the circuit-beaker.
www.electrolux.com Problem Possible cause and solution The dishes are wet. • For the best drying performance activate the option XtraDry. • The programme does not have a drying phase or has a drying phase with low temperature. • The rinse aid dispenser is empty. • The quality of the rinse aid can be the cause. • The quality of the multi-tablets can be the cause. Try a different brand or activate the rinse aid dispenser and use rinse aid and multi-tablets together.
ENGLISH Voltage (V) 200 - 240 Frequency (Hz) 50 / 60 bar (minimum and maximum) 0.5 - 8 MPa (minimum and maximum) 0.05 - 0.8 Water supply Cold water or hot water 2) max 60 °C Capacity Place settings 15 Power consumption Left-on mode (W) 5.0 Power consumption Off-mode (W) 0.10 Electrical connection 1) Water supply pressure 23 1) Refer to the rating plate for other values. 2) If the hot water comes from alternative source of energy, (e.g.
www.electrolux.com 15. ENVIRONMENT CONCERNS Please recycle all materials marked with the symbol . Dispose of all packaging materials appropriately and help to protect the environment, and future generations. Do not dispose of electrical equipment marked with the symbol along with the general house hold waste. Dispose all electrical goods via applicable local authority collections, or at local authority or, commercial recycling centres.
ENGLISH 25
www.electrolux.
ENGLISH 27
117891730-A-422015 www.electrolux.