17989 21/1en 9-06-2007 11:39 Pagina 1 user manual dishwasher GA60SLI300
117989 21/1en 9-06-2007 11:39 Pagina 2 We were thinking of you when we made this product
117989 21/1en 9-06-2007 11:39 Pagina 3 welcome to the world of Electrolux electrolux 3 Welcome to the world of Electrolux You’ve chosen a first class product from Electrolux, which hopefully will provide you with lots of pleasure in the future. Electrolux ambition is to offer a wide variety of quality products that make your life more comfortable. You can look at some examples on the cover in this manual.
117989 21/1en 9-06-2007 11:39 Pagina 4 4 electrolux contents Contents Safety information 5 Product description 7 Control panel 8 Display 12 First use 14 Daily use 18 Washing programmes 29 Care and cleaning 31 Something not working 33 Technical data 36 Hints for test institutes 38 Installation 39 Environment concerns 43 Warranty/Point of service 44 The following symbols are used in this manual: Important information concerning your personal safety and information on how to av
117989 21/1en 9-06-2007 11:39 Pagina 5 safety information electrolux 5 Safety information ● In the interest of your safety and to ensure the correct use, before installing and first using the appliance, read this user manual carefully, including its hints and warnings. To avoid unnecessary mistakes and accidents, it is important to ensure that all people using the appliance are thoroughly familiar with its operation and safety features.
117989 21/1en 9-06-2007 11:39 Pagina 6 6 electrolux safety information ● ● ● Keep all packaging well away from children. There is risk of suffocation. Keep all detergents in a safe place out of children’s reach. Keep children well away from the dishwasher when the door is open. Installation Check your dishwasher for any transport damage. Never connect a damaged machine. If your dishwasher is damaged contact your supplier. ● All packaging must be removed before use.
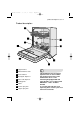
117989 21/1en 9-06-2007 11:39 Pagina 7 product description electrolux 7 Product description 1 Upper basket 2 Water hardness dial 3 Salt container 4 Detergent dispenser 5 Rinse aid dispenser 6 Rating plate 7 Filters 8 Lower spray arm 9 Upper spray arm This dishwasher has an internal light that turns on and off when the opening and closing of the dishwasher’s door occurs.
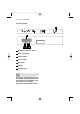
117989 21/1en 9-06-2007 11:39 Pagina 8 8 electrolux control panel Control panel 1 Programme selection button 2 Delay start button 3 Option button 4 Cancel button 5 OK button 6 Display 7 On/Off button A sequence of displayed messages and audible signals will guide you in the setting of the appliance and the selection of a washing programme and available options.
117989 21/1en 9-06-2007 11:39 Pagina 9 control panel electrolux 9 Programme selection button With this control it is possible to select the desired washing programme. Delay start button Allows the start of the washing programme to be delayed from 1 hour up to 19 hours. The countdown will decrease with steps of 1 hour. Only in the last hour the decrease is in minutes. Once the countdown has elapsed the washing programme will start automatically.
117989 21/1en 9-06-2007 11:39 Pagina 10 10 electrolux control panel Option menu ANTIBACTERIAL Option submenu During the last rinse, this option allows to increase the temperature to 68°C and be held at over 65°C for at least 10 minutes. This gives a greater degree of hygiene to dishes and glasses. This option is not available with all washing programmes (see “Washing programmes” chart).
7989 21/1en 9-06-2007 11:39 Pagina 11 control panel electrolux 11 3 IN 1 Set the dishwasher for the use of combi detergent tablets (“3 in 1” - “4 in 1” - “5 in 1” etc...). See “3 in 1 function”. Symbol 3 IN 1 appears in the display ON active OFF not active SETTINGS LANGUAGE Allows you to set the language of the displayed messages. WATER HARDNESS Allows you to set electronically the water softener. SOUND VOLUME Allows you to adjust the volume of the audible signals (from 0 to 5).
117989 21/1en 9-06-2007 11:39 Pagina 12 12 electrolux display Display Washing phases: during the progress of the programme these little bars indicate the phase of the washing programme: prewash - main wash - rinses - drying Symbols: indicate the various options In this row several details are displayed: - Setting mode: guide to the selection of the washing programme - duration time of the programme, options (when together with the washing programme one or more options are set, the update of the progra
117989 21/1en 9-06-2007 11:39 Pagina 13 display electrolux 13 The symbols have the following meaning: Delay start: fixed in setting mode; flashing when countdown in progress Antibacterial: is illuminated when antibacterial option has been selected. Extra rinse: is illuminated when the Extra rinse option has been selected. 3 IN 1: is illuminated when the 3 IN 1 function is active. Energy: is illuminated when the Energy washing programme is selected or in progress.
117989 21/1en 9-06-2007 11:39 Pagina 14 14 electrolux first use First use Before using your dishwasher for the first time: ● Ensure that the electrical and water connections comply with the installation instructions ● Remove all packaging from inside the appliance ● Set the water softener ● Pour 1 litre of water inside the salt container and then fill with dishwasher salt ● Fill the rinse aid dispenser The water softener must be set in both ways: manually, using the water hardness dial and electronica
117989 21/1en 9-06-2007 11:39 Pagina 15 first use electrolux 15 Setting electronically The dishwasher is factory set at level 5. Option menu ➞ SETTINGS ➞ WATER HARDNESS With the help of the below chart, set the level of the water softener according to the hardness of the water in your area. Adjusting the water hardness setting Water hardness Use of salt °dH °TH mmol/l manually electronically 51 - 70 43 - 50 91 - 125 76 - 90 9.0 - 12.5 7.6 - 8.
117989 21/1en 9-06-2007 11:39 Pagina 16 16 electrolux first use Filling with dishwasher salt Only use salt specifically designed for use in dishwashers. All other types of salt not specifically designed for use in a dishwasher, especially table salt, will damage the water softener. Only fill with salt just before starting one of the complete washing programmes.
117989 21/1en 9-06-2007 11:39 Pagina 17 first use electrolux 17 Filling with rinse aid Rinse aid ensures thorough rinsing, and spot and streak free drying. Rinse aid is automatically added during the last rinse. According to the finish and drying results obtained, adjust the dose of rinse aid by means of the 6 position selector (position 1 minimum dosage, position 6 maximum dosage). 1. Open the container by pressing the release button (A). The dose is factory set in position 4. 2.
117989 21/1en 9-06-2007 11:39 Pagina 18 18 electrolux daily use Clean up any rinse aid spilt during filling with an absorbent cloth to avoid excess foaming during the next wash. Only use branded rinse aid for dishwashers. Never fill the rinse aid dispenser with any other substances (e.g. dishwasher cleaning agent, liquid detergent). This would damage the appliance. Daily use ● Check if it’s necessary to refill with dishwasher salt or rinse aid ● Load cutlery and dishes into the dishwasher.
117989 21/1en 9-06-2007 11:39 Pagina 19 daily use electrolux 19 For washing in the dishwasher the following cutlery and dishes are not suitable: - Cutlery with wooden, horn, china or mother-of-pearls handles. - Plastic items that are not heat resistant. - Older cutlery with glued parts that are not temperature resistant. - Bonded cutlery items or dishes. - Pewter or copper items. - Lead crystal glass. - Steel items prone to rusting. - Wooden platters. - Items made from synthetics fibres.
117989 21/1en 9-06-2007 11:39 Pagina 20 20 electrolux daily use Open the door and slide out the baskets to load the dishes. The lower basket The lower basket is designed to take saucepans, lids, plates, salad bowls, cutlery etc. Serving dishes and large lids should be arranged around the edge of the basket, ensuring that the spray arms can turn freely. The two rows of prongs on the lower basket can be easily lowered to allow you to load pots, pans and bowls.
117989 21/1en 9-06-2007 11:39 Pagina 21 daily use electrolux 21 The cutlery basket Long bladed knives stored in an upright position are a potential hazard. Long and/or sharp items of cutlery such as carving knives must be positioned horizontally in the upper basket. Take care when loading or unloading sharp items such as knives. To make loading of the cutlery basket easier, lower the cutlery basket handle (fig.2). fig.
117989 21/1en 9-06-2007 11:39 Pagina 22 22 electrolux daily use The cutlery basket is in two parts which can be separated to give greater loading flexibility. To separate the two parts, slide them horizontally in opposite directions and pull them apart (fig. 4). fig. 4 To reassemble, reverse the procedure.
117989 21/1en 9-06-2007 11:39 Pagina 23 daily use electrolux 23 The upper basket The upper basket is designed for saucers, salad bowls, cups, glasses, pots and lids. Arrange items on and underneath the cup racks so that water can reach all surfaces. Glasses with long stems can be placed upside down in the cup racks. The cup racks can be adjusted in three different positions to improve loading flexibility.
117989 21/1en 9-06-2007 11:39 Pagina 24 24 electrolux daily use Adjusting the height of the upper basket If washing very large plates you can load them in the lower basket after moving the upper basket to the higher position. Maximum height of the dishes in the lower basket With upper basket raised 31 cm With upper basket lowered 27 cm To move to the higher position proceed as follows: 1. Pull out the basket until it stops. 2.
117989 21/1en 9-06-2007 11:39 Pagina 25 daily use electrolux 25 Use of detergent 20 = approximately 20 g of detergent 30 = approximately 30 g of detergent Only use detergents specifically designed for use in dishwashers. Please observe the manufacturer’s dosing and storage recommendations as stated on the detergent packaging. 3. All programmes with prewash need an additional detergent dose (5/10 g) that must be placed in the prewash detergent chamber (2).
117989 21/1en 9-06-2007 11:39 Pagina 26 26 electrolux daily use 3 IN 1 function This appliance is equipped with the 3 in 1 function, that allows the use of the “3 in 1” combi detergent tablets. These products are detergents with a combined cleaning, rinsing and salt functions. They can also contain other different agents depending on which kind of tablets you choose (“3 in 1”, “4 in 1”, “5 in 1” etc...) Check whether these detergents are suitable for your water hardness.
117989 21/1en 9-06-2007 11:39 Pagina 27 daily use electrolux 27 Set and start a washing programme 1. Check that the baskets have been loaded correctly and that the spray arms are free to rotate 2. Check that the water tap is opened 3. Close the dishwasher door. 4. Press the On/Off button. 5. Select the washing programme.
117989 21/1en 9-06-2007 11:39 Pagina 28 28 electrolux daily use Close the dishwasher door; the programme will continue from the point at which it was interrupted. Cancel a washing programme in progress ● Press Cancel button. ● The message CONFIRM CANCEL? is displayed. ● Press OK button to confirm. ● The appliance returns to setting mode and the message CHOOSE PROGRAMME is displayed.
117989 21/1en 9-06-2007 11:39 Pagina 29 washing programmes electrolux 29 Washing programmes Programme Automatic (1) 45° Glass 70° Intensive 65° Normal Degree of soil Type of load Programme description Prewash Main wash up to 45°C or 70°C 1 or 2 intermediate rinses Final rinse Drying Heavy or Normal soil Crockery, cutlery, pots and pans Normal soil Delicate crockery and glassware Main wash up to 45°C 1 intermediate rinse Final rinse Drying Heavy soil Crockery, cutlery, pots and pans Prewa
117989 21/1en 9-06-2007 11:39 Pagina 30 30 electrolux washing programmes Washing programmes information (1) During the Automatic washing programme the amount of soil on the dishes is determined by how cloudy the water is. The programme duration, water and energy consumption levels can vary; this depends upon if the appliance is fully or partially loaded and if the dishes are lightly or heavily soiled. The temperature of the water is automatically adjusted between 45°C and 70°C.
117989 21/1en 9-06-2007 11:39 Pagina 31 care and cleaning electrolux 31 Care and cleaning Cleaning the filters The filters must be checked and cleaned from time to time. Dirty filters will degrade the washing result. Before cleaning the filters ensure that the machine is switched off. 4. Take hold of the coarse filter (A) by the handle with the hole and remove from the microfilter (B). 5. Clean all filters thoroughly under running water. 6.
117989 21/1en 9-06-2007 11:39 Pagina 32 32 electrolux care and cleaning NEVER try to remove the spray arms. If residues of soil have clogged the holes in the spray arms, remove them with a cocktail stick. External cleaning Clean the external surfaces of the machine and control panel with a damp soft cloth. If necessary use only neutral detergents. Never use abrasive products, scouring pads or solvent (acetone, trichloroethylene etc....).
117989 21/1en 9-06-2007 11:39 Pagina 33 something not working electrolux 33 Something not working The dishwasher will not start or stops during operation. Certain problems are due to the lack of simple maintenance or oversights, which can be solved with the help of the indications described in the chart, without calling out an engineer. Switch off the appliance and carry out the following suggested corrective actions.
117989 21/1en 9-06-2007 11:39 Pagina 34 34 electrolux something not working Malfunction The programme does not start Once these checks have been carried out switch on the appliance. The programme will continue from the point at which it was interrupted. If the message reappears in the display contact the Service Force Centre. For other messages not described in the chart, please contact your Service Force Centre. Contact your local Service Force Centre, quoting the model (Mod.
117989 21/1en 9-06-2007 11:39 Pagina 35 something not working electrolux 35 The wash results are not satisfactory The dishes are not clean ● The wrong washing programme has been selected. ● The dishes are arranged in such a way as to stop water reaching all parts of the surface. The baskets must not be overloaded. ● The spray arms do not rotate freely due to incorrect arrangement of the load. ● The filters in the base of the washing compartment are dirty or incorrectly positioned.
117989 21/1en 9-06-2007 11:39 Pagina 36 36 electrolux technical data Technical data Dimensions Width 59.6 cm Height 81.8 - 87.8 cm Depth 57.5 cm Electrical connection Voltage - Overall power Fuse Information on the electrical connection is given on the rating plate on the inner edge of the dishwasher’s door Water supply pressure Minimum 0,5 bar (0.05 MPa) Maximum 8 bar (0.8 MPa) Capacity Max.
117989 21/1en 9-06-2007 11:39 Pagina 37 technical data electrolux 37 Consumption values Programme Programme duration (in minutes) Energy consumption (in kWh) Water consumption (in litres) Automatic 90 - 115 1.1 - 1.5 12 - 23 45° Glass 60 - 70 0.8 - 0.9 14 - 15 70° Intensive 130 - 140 1.4 - 1.6 16 - 18 65° Normal 95 - 105 1.4 - 1.6 18 - 20 160 1.05 14 30 minutes 30 0.9 9 55° Quick 45 - 55 1.0 - 1.2 11 - 12 Prewash 12 0.
117989 21/1en 9-06-2007 11:39 Pagina 38 38 electrolux hints for test institutes Hints for test institutes Testing in accordance with EN 60704 must be carried out with appliance fully loaded and using the test programme (see "Consumption values"). Test in accordance with EN 50242 must be carried out when the salt container and rinse aid dispenser have been filled with salt and rinse aid respectively and using the test programme (see "Consumption values").
117989 21/1en 9-06-2007 11:39 Pagina 39 installation electrolux 39 Installation Any electrical and/or plumbing work required to install this appliance should be carried out by a qualified electrician and/or plumber or competent person. Remove all packaging before positioning the machine. If possible, position the machine next to a water tap and a drain. This dishwasher is designed to be fitted under a kitchen counter or worksurface.
117989 21/1en 9-06-2007 11:39 Pagina 40 40 electrolux installation (Attention! NOT all models of dishwashers have fill and drain hoses provided with locknut. In this case, this kind of facility is not possible). If the machine is connected to new pipes or pipes which have not been used for a long time, you should run the water for a few minutes before connecting the inlet hose. DO NOT use connection hoses which have previously been used for an old appliance.
117989 21/1en 9-06-2007 11:39 Pagina 41 installation electrolux 41 Water outlet hose connection The end of the drain hose can be connected in the following ways: 1. To the sink outlet spigot, securing it to the underside of the work surface. This will prevent waste water from the sink running into the machine. 2. To a stand pipe provided with venthole, minimum internal diameter 4 cm. The waste connection must be at a maximum height of 60 cm from the bottom of the dishwasher.
117989 21/1en 9-06-2007 11:39 Pagina 42 42 electrolux installation Electrical connection Safety standards require the appliance to be earthed. Prior to using the appliance for the first time, ensure that the rated voltage and type of supply on the rating plate match that of the supply where the appliance is to be installed. The fuse rating is also to be found on the rating plate. Always plug the mains plug into a correctly installed shockproof socket.
117989 21/1en 9-06-2007 11:39 Pagina 43 environment concerns electrolux 43 Environment concerns Packaging material The packaging materials are environmentally friendly and can be recycled. The plastic components are identified by markings, e.g. >PE<, >PS<, etc. Please dispose of the packaging materials in the appropriate container at the community waste disposal facilities. When a unit is no longer being used: - Pull the plug out of the socket. - Cut off the cable and plug and dispose of them.
117989 21/1en 9-06-2007 11:39 Pagina 44 44 electrolux warranty/point of service Warranty/Point of service Servicestellen Points de service Servizio dopo vendita Point of service 5506 Mägenwil/Zürich Industriestr. 10 9000 St. Gallen Zürcherstrasse 204 e 4127 Birsfelden Hauptstrasse 52 6020 Emmenbrücke Seetalstrasse 11 Service-Helpline 0848 848 111 service@electrolux.
117989 21/1en 9-06-2007 11:39 Pagina 45 warranty/point of service electrolux 45 Garantie Für jedes Produkt gewähren wir ab Verkauf bzw. Lieferdatum an den Endverbraucher eine Garantie von 2 Jahren. (Ausweis durch Garantieschein, Faktura oder Verkaufsbeleg). Die Garantieleistung umfasst die Kosten für Material, Arbeitsund Reisezeit.
117989 21/1en 9-06-2007 11:39 Pagina 46 46 electrolux Notes ........................................................... ........................................................... ........................................................... ........................................................... ........................................................... ........................................................... ........................................................... ...........................
117989 21/1en 9-06-2007 11:39 Pagina 47
117989 21/1en 9-06-2007 11:39 www.electrolux.com www.electrolux.