GA60SLISCN GA60SLISSP EN DISHWASHER DE GESCHIRRSPÜLER USER MANUAL BENUTZERINFORMATION 2 25
www.electrolux.com CONTENTS 1. SAFETY INFORMATION...................................................................................... 3 2. SAFETY INSTRUCTIONS.....................................................................................4 3. PRODUCT DESCRIPTION................................................................................... 6 4. CONTROL PANEL............................................................................................... 7 5. PROGRAMMES..........................
ENGLISH 1. 3 SAFETY INFORMATION Before the installation and use of the appliance, carefully read the supplied instructions. The manufacturer is not responsible for any injuries or damages that are the result of incorrect installation or usage. Always keep the instructions in a safe and accessible location for future reference. 1.
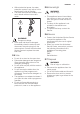
www.electrolux.com • • • • • • Put knives and cutlery with sharp points in the cutlery basket with the points down or in a horizontal position. Do not keep the appliance door open without supervision to prevent to fall on it. Before any maintenance operation, deactivate the appliance and disconnect the mains plug from the socket. Do not use high pressure water sprays and/or steam to clean the appliance. The ventilation openings in the base (if applicable) must not be obstructed by a carpet.
ENGLISH • Without electrical power, the water protection system is not active. In this case there is a risk of flooding. • The water inlet hose has a safety valve and a sheath with an inner mains cable. 5 2.5 Internal light WARNING! Risk of injury. • This appliance has an internal lamp that comes on when you open the door and goes off when the door is closed. • The lamp in this appliance is not suitable for household room illumination. • To replace the lamp, contact the Service. 2.
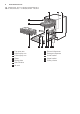
www.electrolux.com 3.
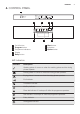
ENGLISH 4. CONTROL PANEL 1 P1 ECO P2 AutoSense P3 Intensiv / Intensif P4 Kurz 30 min / Bref P5 ProZone P6 Gläser / Verre 2 8 1 2 3 4 5 On/off button Program button Programme indicators Display Delay button 50º 45-70º 70º 60º 50-65º 45º P7 ExtraSilent P8 Vorspülen / Prélavage TimeSaver XtraDry XtraHygiene MyFavourite 3 50º Zeitvorwahl / Départ Différé Salz / Sel Klarspüler / Produit de rinçage 4 7 5 6 6 Start button 7 Indicators 8 Option button 4.
www.electrolux.com 5.
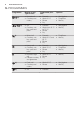
ENGLISH Programme 6) Degree of soil Type of load Programme phases Options • Normal soil • Crockery and cutlery • • • • • XtraDry Prewash Wash 50 °C Rinses Dry 1) With this programme you have the most efficient use of water and energy consumption for crockery and cutlery with normal soil. (This is the standard programme for test institutes). 2) The appliance senses the degree of soil and the quantity of items in the baskets .
www.electrolux.com 6. SETTINGS 6.1 Programme selection mode and user mode When you activate the appliance, usually it is in programme selection mode. However, if this does not happen, you can set the programme selection mode in the following way: When the appliance is in programme selection mode it is possible to set a programme and to enter the user mode. In user mode, the following settings can be changed: • The level of the water softener according to the water hardness.
ENGLISH Whether you use a standard detergent or multi-tabs (with or without salt), set the proper water hardness level to keep the salt refill indicator active. Multi-tabs containing salt are not effective enough to soften hard water. How to set the water softener level The appliance must be in programme selection mode. 1. To enter the user mode, press and hold simultaneously Delay and Start until the indicators , , and start to flash and the display is blank. 2. Press Program.
www.electrolux.com • The indicators go off. , and continues • The indicator to flash. • The display shows the current setting: = the rinse aid empty notification is activated (factory setting). 3. Press Option to change the setting. = the rinse aid empty notification is deactivated. 4. Press the on/off button to confirm the setting. 6.4 MyFavourite With this option you can set and save the programme that you use more frequently. You can only save 1 programme. A new setting cancels the previous one.
ENGLISH 13 7. OPTIONS Desired options must be activated every time before you start a programme. It is not possible to activate or deactivate options while a programme is running. Not all options are compatible with each other. If you have selected non compatible options, the appliance will automatically deactivate one or more of them. Only the indicators of the options still active will stay on. 7.1 XtraDry Activate this option when you want to boost the drying performance.
www.electrolux.com 8. BEFORE FIRST USE 1. Make sure that the current level of the water softener agrees with the hardness of the water supply. If not, adjust the level of the water softener. 2. Fill the salt container. 3. Fill the rinse aid dispenser. 4. Open the water tap. 5. Start a programme to remove any processing residuals that can still be inside the appliance. Do not use detergent and do not load the baskets.
ENGLISH Fill the rinse aid dispenser when the indicator (A) becomes clear. 15 If you use multi-tablets and the drying performance is satisfactory, the rinse aid refill indication can be disabled. We recommend to always use rinse aid for better drying performance, also in combination with multitablets containing rinsing agent. 9. DAILY USE 1. Open the water tap. 2. Press the on/off button to activate the appliance. Make sure that the appliance is in programme selection mode.
www.electrolux.com Starting a programme with delay start Cancelling the delay start while the countdown operates 1. Set a programme. 2. Press Delay again and again until the display shows the delay time you want to set (from 1 to 24 hours). 3. Press Start to start the countdown. • The delay indicator comes on to confirm the start of the countdown. • The countdown starts to decrease with steps of 1 hour. Only the last hour will decrease with steps of 1 minute.
ENGLISH • • • • (if available) or select a programme with a prewash phase. Always use the whole space of the baskets. When loading the appliance, make sure that the dishes can be completely reached and washed by the water released from the spray arm nozzles. Make sure that items do not touch or cover each other. You can use dishwasher detergent, rinse aid and salt separately or you can use the multi-tablets (e.g. ''3in1'', ''4in1'', ''All in 1''). Follow the instructions written on the packaging.
www.electrolux.com • The correct quantity of detergent is used. 10.6 Unloading the baskets 1. Let the tableware cool down before you remove it from the appliance. Hot items can be easily damaged. 2. First remove items from the lower basket, then from the upper basket. At the end of the program water can still remain on the sides and on the door of the appliance. 11. CARE AND CLEANING WARNING! Before maintenance, deactivate the appliance and disconnect the mains plug from the main socket.
ENGLISH 7. Reassemble the filters (B) and (C). 8. Put back the filter (B) in the flat filter (A). Turn it clockwise until it locks. CAUTION! An incorrect position of the filters can cause bad washing results and damage to the appliance. 11.2 Cleaning the upper spray arm 19 3. Wash the spray arm under running water. Use a thin pointed tool, e.g. toothpick, to remove particles of soil from the holes. 4.
www.electrolux.com 11.4 Internal cleaning • Carefully clean the appliance, including the rubber gasket of the door, with a soft damp cloth. • If you use short duration programmes regularly, these can leave deposits of grease and limescale inside the appliance. To prevent this, we recommend running long duration programmes at least twice a month. • To maintain the performance of your appliance at its best, we recommend using a specific cleaning product for dishwashers (at least once a month).
ENGLISH 21 Problem and alarm code Possible cause and solution The anti-flood device is on. • Close the water tap and contact an Authorised Service Centre. The display shows . The appliance stops and starts more times during operation. • It is normal. It provides optimal cleaning results and energy savings. The program lasts too long. • Select the TimeSaver option to shorten the program time. • If the delayed start option is set, cancel the delay setting or wait for the end of the countdown.
www.electrolux.com 12.1 The washing and drying results are not satisfactory Problem Possible cause and solution Poor washing results. • Refer to "Daily use", "Hints and tips" and basket loading leaflet. • Use more intensive washing programmes. • Clean spray arm jets and filter. Refer to "Care and Cleaning". Poor drying results. • Tableware has been left for too long inside a closed appliance. • There is no rinse aid or the dosage of rinse aid is not enough.
ENGLISH 23 Problem Possible cause and solution There are residues of detergent in the dispenser at the end of the programme. • The detergent tablet got stuck in the dispenser and therefore was not completely washed away by water. • Water cannot wash away the detergent from the dispenser. Make sure that the spray arm is not blocked or clogged. • Make sure that items in the baskets do not impede the lid of the detergent dispenser from opening. Odours inside the appliance.
www.electrolux.com Power consumption Off-mode (W) 0.10 1) Refer to the rating plate for other values. 2) If the hot water comes from alternative source of energy, (e.g. solar panels, aeolian energy), use the hot water supply to decrease energy consumption. 14. CH GUARANTEE Customer Service Centres Point of Service Industriestrasse 10 5506 Mägenwil Le Trési 6 1028 Préverenges Via Violino 11 6928 Manno Morgenstrasse 131 3018 Bern Zürcherstrasse 204E 9000 St.
DEUTSCH 25 INHALTSVERZEICHNIS 1. SICHERHEITSHINWEISE................................................................................... 26 2. SICHERHEITSANWEISUNGEN..........................................................................27 3. GERÄTEBESCHREIBUNG................................................................................. 29 4. BEDIENFELD..................................................................................................... 30 5. PROGRAMME.................................
1. www.electrolux.com SICHERHEITSHINWEISE Lesen Sie die mitgelieferte Gebrauchsanleitung sorgfältig vor Montage und Inbetriebnahme des Geräts. Bei Verletzungen oder Schäden infolge nicht ordnungsgemäßer Montage oder Verwendung des Geräts übernimmt der Hersteller keine Haftung. Bewahren Sie die Anleitung immer an einem sicheren und zugänglichen Ort zum späteren Nachschlagen auf. 1.
DEUTSCH • • • • • • • • • 27 Der Betriebswasserdruck (Mindest- und Höchstdruck) muss zwischen 0.5 (0.05) / 8 (0.8) bar (MPa) liegen Beachten Sie, dass die Höchstzahl an Maßgedecken 15 beträgt. Wenn das Netzkabel beschädigt ist, muss es vom Hersteller, seinem autorisierten Kundenservice oder einer gleichermaßen qualifizierten Person ausgetauscht werden, um Gefahrenquellen zu vermeiden.
www.electrolux.com • Schließen Sie das Gerät unbedingt an eine sachgemäß installierte Schutzkontaktsteckdose an. • Verwenden Sie keine Mehrfachsteckdosen oder Verlängerungskabel. • Achten Sie darauf, Netzstecker und Netzkabel nicht zu beschädigen. Falls das Netzkabel des Geräts ersetzt werden muss, lassen Sie diese Arbeit durch unseren autorisierten Kundendienst durchführen. • Stecken Sie den Netzstecker erst nach Abschluss der Montage in die Steckdose.
DEUTSCH • Die Lampe in diesem Gerät eignet sich nicht zur Raumbeleuchtung. • Für den Austausch der Lampe wenden Sie sich an den Kundendienst. Produkt-Nummer (PNC): Seriennummer: 2.7 Entsorgung 2.6 Service • Wenden Sie sich zur Reparatur des Geräts an den autorisierten Kundendienst. Wir empfehlen nur Originalersatzteile zu verwenden. • Wenn Sie sich an den autorisierten Kundendienst wenden, sollten Sie folgende Angaben, die Sie auf dem Typenschild finden, zur Hand haben.
www.electrolux.com 4. BEDIENFELD 1 P1 ECO P2 AutoSense P3 Intensiv / Intensif P4 Kurz 30 min / Bref P5 ProZone P6 Gläser / Verre 2 50º 45-70º 70º 60º 50-65º 45º P7 ExtraSilent P8 Vorspülen / Prélavage TimeSaver XtraDry XtraHygiene MyFavourite 3 8 1 2 3 4 5 50º Zeitvorwahl / Départ Différé Salz / Sel Klarspüler / Produit de rinçage 4 7 Taste „Ein/Aus“ Taste Program Programmkontrolllampen Display Taste Delay 5 6 6 Taste Start 7 Kontrolllampen 8 Taste Option 4.
DEUTSCH 5.
www.electrolux.com Programm 6) Verschmutzungsgrad Beladung Programmphasen Optionen • Normaler Verschmutzungsgrad • Geschirr und Besteck • Vorspülen • Hauptspülgang 50 °C • Spülen • Trocknen • XtraDry 1) Dieses Programm gewährleistet den wirtschaftlichsten Wasser- und Energieverbrauch für normal verschmutztes Geschirr und Besteck. (Dies ist das Standardprogramm für Prüfinstitute.) 2) Das Gerät erkennt den Verschmutzungsgrad und die Anzahl der Geschirrteile in den Körben.
DEUTSCH 5.2 Informationen für Prüfinstitute 33 info.test@dishwasher-production.com Notieren Sie die Produktnummer (PNC), die Sie auf dem Typenschild finden. Möchten Sie Informationen zum Leistungstest erhalten, schicken Sie eine E-Mail an: 6. EINSTELLUNGEN 6.1 Programmwahlmodus und Benutzermodus Wenn Sie das Gerät einschalten, befindet es sich normalerweise im Programmwahlmodus.
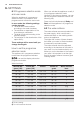
www.electrolux.com Deutsche Wasserhärtegrade (°dH) Französische Wasserhärtegrade (°fH) mmol/l Clarke Wasserhärtegrade Einstellung für den Wasserenthärter 19 - 22 33 - 39 3.3 - 3.9 23 - 27 5 1) 15 - 18 26 - 32 2.6 - 3.2 18 - 22 4 11 - 14 19 - 25 1.9 - 2.5 13 - 17 3 4 - 10 7 - 18 0.7 - 1.8 5 - 12 2 <4 <7 <0.7 <5 1 2) 1) Werkseitige Einstellung. 2) Verwenden Sie kein Salz bei diesen Werten.
DEUTSCH • Im Display wird die aktuelle Einstellung angezeigt: Z. B. = Stufe 4. – Die Klarspülmittelstufen reichen von 0A bis 6A. – Stufe 0 = Es wird kein Klarspülmittel zugegeben. 3. Drücken Sie Delay wiederholt, um die Einstellung zu ändern. 4. Drücken Sie die Taste Ein/Aus zur Bestätigung der Einstellung. 6.3 Klarspülmittelnachfüllanzeige Das Klarspülmittel ermöglicht das Trocknen des Geschirrs ohne Streifen und Flecken. Das Klarspülmittel wird automatisch während der heißen Spülphasen abgegeben.
www.electrolux.com Zur Verbesserung der Trocknungsleistung beachten Sie die XtraDry-Option oder schalten Sie AirDry ein. So schalten Sie AirDry aus Das Gerät muss sich im Programmwahlmodus befinden. 1. Halten Sie zum Aufrufen des Benutzermodus gleichzeitig Delay und Start gedrückt, bis die , Kontrolllampen Während der Trockenphase wird die Gerätetür durch eine Vorrichtung geöffnet. Die Tür bleibt dann einen Spaltbreit geöffnet.
DEUTSCH 37 verwendet. Sie können diese Konfiguration jederzeit ändern. manuell einzuschalten. Diese Option kann nicht mit XtraDry kombiniert werden. Durch das Einschalten der Option XtraDry wird TimeSaver ausgeschaltet. So schalten Sie TimeSaver ein So schalten Sie XtraDry ein Drücken Sie Option, bis die Kontrolllampe leuchtet. Ist die Option nicht mit dem Programm kombinierbar, leuchtet die entsprechende Kontrolllampe nicht oder sie blinkt ein paar Sekunden schnell und erlischt dann.
www.electrolux.com So füllen Sie den Salzbehälter: 1. Drehen Sie den Deckel des Salzbehälters gegen den Uhrzeigersinn und entfernen Sie ihn. 2. Füllen Sie 1 Liter Wasser in den Salzbehälter (nur beim ersten Mal). 3. Füllen Sie den Salzbehälter mit Geschirrspülsalz. 8.2 Füllen des KlarspülmittelDosierers A B C 4. Entfernen Sie das Salz, das sich um die Öffnung des Salzbehälters herum angesammelt hat. 5. Drehen Sie den Deckel des Salzbehälters im Uhrzeigersinn, um den Salzbehälter zu schließen.
DEUTSCH 39 9. TÄGLICHER GEBRAUCH 1. Öffnen Sie den Wasserhahn. 2. Drücken Sie die Taste Ein/Aus, um das Gerät einzuschalten. Stellen Sie sicher, dass sich das Gerät im Programmwahlmodus befindet. • Füllen Sie den Salzbehälter auf, wenn die Kontrolllampe Salz leuchtet. • Leuchtet die Kontrolllampe Klarspülmittel, füllen Sie den Klarspülmittel-Dosierer. 3. Beladen Sie die Körbe. 4. Füllen Sie Reinigungsmittel ein. 5. Stellen Sie je nach Beladung und Verschmutzungsgrad das passende Programm ein. 9.
www.electrolux.com • Die Zeitvorwahl nimmt in Schritten von jeweils 1 Stunde ab. Nur in der letzten Stunde wird die Zeit minutenweise heruntergezählt. Nach dem Ablauf der Zeitvorwahl startet das Programm und die Anzeige der laufenden Phase leuchtet. Die Anzeige „Zeitvorwahl“ erlischt. Öffnen der Tür während eines laufenden Programms Wenn Sie die Tür während eines laufenden Programms öffnen, stoppt das Gerät. Dies kann sich auf den Energieverbrauch und die Programmdauer auswirken.
DEUTSCH Befolgen Sie die Anweisungen auf der Verpackung. • Stellen Sie je nach Beladung und Verschmutzungsgrad das passende Programm ein. Mit dem Programm ECO erhalten Sie den wirtschaftlichsten Energie- und Wasserverbrauch für Geschirr und Besteck mit normaler Verschmutzung. 10.2 Gebrauch von Salz, Klarspül- und Reinigungsmittel • Verwenden Sie nur Salz, Klarspülmittel und Reinigungsmittel für Geschirrspüler. Andere Produkte können das Gerät beschädigen.
www.electrolux.com • Die Geschirrteile sind richtig in den Körben angeordnet. • Das Programm eignet sich für die Beladung und den Verschmutzungsgrad. • Die Reinigungsmittelmenge stimmt. 2. Entladen Sie zuerst den Unter- und dann den Oberkorb. Am Programmende kann sich noch Wasser an den Seitenwänden und der Gerätetür befinden. 10.6 Entladen der Körbe 1. Lassen Sie das Geschirr abkühlen, bevor Sie es aus dem Gerät nehmen. Heißes Geschirr ist stoßempfindlich. 11.
DEUTSCH 43 VORSICHT! Eine falsche Anordnung der Filter führt zu schlechten Spülergebnissen und kann das Gerät beschädigen. 11.2 Reinigen des oberen Sprüharms Wir empfehlen den oberen Sprüharm regelmäßig zu reinigen, um zu verhindern, dass Verunreinigungen die Löcher verstopfen. 5. Achten Sie darauf, dass sich keine Lebensmittelreste oder Verschmutzungen in oder um den Rand der Wanne befinden. 6. Setzen Sie den flachen Filter (A) wieder ein.
www.electrolux.com 11.3 Reinigen der Außenseiten • Reinigen Sie das Gerät mit einem weichen, feuchten Tuch. • Verwenden Sie ausschließlich Neutralreiniger. • Benutzen Sie keine Scheuermittel, scheuernde Reinigungsschwämmchen oder Lösungsmittel. 11.4 Reinigung des Geräteinnenraums 4. Um den Sprüharm wieder am Korb einzurasten, drücken Sie den Sprüharm nach oben in Richtung des unteren Pfeils und drehen Sie ihn gleichzeitig entgegen dem Uhrzeigersinn, bis er einrastet.
DEUTSCH 45 Störung und Alarmcode Mögliche Ursache und Abhilfe Das Gerät lässt sich nicht einschalten. • Vergewissern Sie sich, dass der Netzstecker in die Netzsteckdose eingesteckt ist. • Vergewissern Sie sich, dass im Sicherungskasten keine Sicherung ausgelöst hat. Das Programm startet nicht. • Achten Sie darauf, dass die Gerätetür geschlossen ist. • Wenn die Zeitvorwahl eingestellt ist, brechen Sie diese ab, oder warten Sie, bis sie abgelaufen ist.
www.electrolux.com Störung und Alarmcode Mögliche Ursache und Abhilfe Aus der Gerätetür tritt ein wenig Wasser aus. • Das Gerät ist nicht ausgerichtet. Schrauben Sie die Schraubfüße weiter hinein oder weiter heraus (falls vorhanden). • Die Gerätetür ist nicht mittig zur Wanne positioniert. Stellen Sie den hinteren Fuß ein (sofern vorhanden). Die Gerätetür ist schwer zu schließen. • Das Gerät ist nicht ausgerichtet. Schrauben Sie die Schraubfüße weiter hinein oder weiter heraus (falls vorhanden).
DEUTSCH 47 Störung Mögliche Ursache und Abhilfe Nicht zufriedenstellende Trocknungsergebnisse. • Das Geschirr stand zu lange im geschlossenen Gerät. • Es ist kein Klarspülmittel vorhanden oder die Klarspülmittelmenge ist nicht ausreichend. Stellen Sie den Klarspülmittel-Dosierer auf eine höhere Einstellung. • Kunststoffteile müssen eventuell mit einem Tuch abgetrocknet werden. • Schalten Sie die Option XtraDry ein, und stellen Sie AirDry ein, um die beste Trocknungsleistung zu erzielen.
www.electrolux.com Störung Mögliche Ursache und Abhilfe Am Ende des Programms befinden sich Reinigungsmittelreste im Behälter. • Das Reinigungsmittel-Tab blieb im Behälter stecken und wurde daher nicht vollständig vom Wasser mitgenommen. • Das Wasser kann das Reinigungsmittel nicht aus dem Behälter ausspülen. Achten Sie darauf, dass der Sprüharm nicht blockiert oder verstopft ist.
DEUTSCH Wasserversorgung Kalt- oder Warmwasser 2) max. 60 °C Fassungsvermögen Maßgedecke 15 Leistungsaufnahme Ein-Zustand (W) 5.0 Leistungsaufnahme Aus-Zustand (W) 0.10 49 1) Weitere Angaben finden Sie auf dem Typenschild. 2) Wenn Sie Heißwasser mit umweltfreundlichen, alternativen Energiequellen (z. B. Solaranlagen oder Windkraft) aufbereiten, können Sie durch den Anschluss des Geräts an die Heißwasserversorgung Energie sparen. 14.
www.electrolux.com Für die Schweiz: Wohin mit den Altgeräten? Überall dort wo neue Geräte verkauft werden oder Abgabe bei den offiziellen SENSSammelstellen oder offiziellen SENS-Recyclern. Die Liste der offiziellen SENSSammelstellen findet sich unter www.erecycling.
DEUTSCH 51
117888940-A-222016 www.electrolux.