Profiline GK38TSIO ................................................ .............................................
electrolux Electrolux. Thinking of you. Share more of our thinking at www.electrolux.com CONTENTS Safety information Safety instructions Product description Daily use Helpful hints and tips 2 3 5 6 9 Care and cleaning 10 Troubleshooting 11 Installation 12 Environment concerns 14 Garantie, Garanzia, Guarantee 14 Subject to change without notice. SAFETY INFORMATION Before the installation and use of the appliance, carefully read the supplied instructions.
electrolux 3 • Unattended cooking on a hob with fat or oil can be dangerous and may result in fire. • Never try to extinguish a fire with water, but switch off the appliance and then cover flame e.g. with a lid or a fire blanket. • Do not store items on the cooking surfaces. • Do not use a steam cleaner to clean the appliance. • Metallic objects such as knives, forks, spoons and lids should not be placed on the hob surface since they can get hot.
electrolux • Make sure that a shock protection is installed. • Use the strain relief clamp on cable. • Make sure not to cause damage to the mains plug (if applicable) or to the mains cable. Contact the Service or an electrician to change a damaged mains cable. • The electrical installation must have an isolation device which lets you disconnect the appliance from the mains at all poles. The isolation device must have a contact opening width of minimum 3 mm.
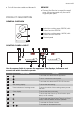
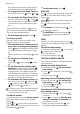
electrolux 5 • Cut off the mains cable and discard it. SERVICE • Contact the Service to repair the appliance. We recommend only the use of original spare parts. PRODUCT DESCRIPTION 2 m 10 m GENERAL OVERVIEW 1 1 Induction cooking zone 2300W, with Power function 3600W 2 Induction cooking zone 1400W, with Power function 2500W 3 Control panel 1 m 45 m 2 3 CONTROL PANEL LAYOUT 1 2 3 4 13 5 12 6 7 8 11 10 9 Use the sensor fields to operate the appliance.
electrolux Sensor field Function 11 To set the cooking zone for Timer functions. 12 To set the Timer functions. 13 Control bar To set the heat setting.
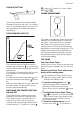
electrolux 7 THE HEAT SETTING comes on. To switch off, touch a heat setting . P POWER MANAGEMENT Touch the control bar at the heat setting. Change to the left or the right, if it is necessary. Do not release before you have a correct heat setting. The display shows the heat setting. THE AUTOMATIC HEAT UP The power management divides the power between two cooking zones in a pair (see the figure).
electrolux the cooking zone starts to flash quickly. The display shows the remaining time. • To change the Count Down Timer:set touch or the cooking zone with . • To deactivate the Count Down Time: set the cooking zone with . Touch . The remaining time counts back to 00 . The indicator of the cooking zone goes out. When the timer countdown comes to an end, the sound operates and 00 flashes. The cooking zone deactivates.
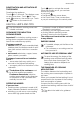
electrolux 9 DEACTIVATION AND ACTIVATION OF THE SOUNDS Deactivate the appliance. for 3 seconds. The displays come Touch for 3 secon and come down. Touch onds. comes on, the sound is on. Touch , comes on, the sound is off. Touch again to activate the sounds. When the sounds are off, you can hear sounds only when: • you touch , • the Minute Minder comes down, • the Count Down Timer comes down, • you put something on the control panel.
electrolux Hea t setting Use to: Time Hints Nominal power consumption Keep warm the food you cooked as required Put a lid on a cookware 3% 1-3 Hollandaise sauce, melt: butter, chocolate, gelatine 5 - 25 min Mix from time to time 3–8% 1-3 Solidify: fluffy omelettes, baked eggs 10 - 40 min Cook with a lid on 3–8% 3-5 Simmer rice and milkbased dishes, heating up readycooked meals 25 - 50 min Add the minimum twice as much liquid as rice, mix milk dishes part procedure through 8 – 13 %
electrolux 11 TROUBLESHOOTING Problem Possible cause and remedy You cannot activate the appliance or operate it. • You touched 2 or more sensor fields at the same time. Only touch one sensor field. • There is water or fat stains on the control panel. Clean the control panel • Activate the appliance again and set the heat setting in 7 seconds. • The child safety device or the lock or STOP+GO operates. See the chapter Daily use. A sound operates when the appliance is deactivated.
electrolux INSTALLATION Warning! Refer to the Safety chapters. Before the installation, note down the serial number (Ser. Nr.) from the rating plate.The rating plate of the appliance is on its lower casing. Modell GK38TSIO Prod.Nr. 941 560 812 01 Typ 55 FED 03 AU 220 – 240 V 50 – 60 Hz Induction 3.6 kW Made in Switzerland Ser. Nr. .................... 3.
electrolux 13 ASSEMBLY min. 500mm min. 50mm min. 2mm R 5mm 55mm 50 mm 490+1mm 360+1mm 50 mm min. 12 mm min. 2 mm min. 38 mm min.
electrolux BUILT-IN INSTALLATION R10mm min. 12 mm R5mm 8mm min. 2 mm 13mm 55mm 360+1 490+1 516+1mm mm mm 386+1mm min. 38 mm min. 2 mm ENVIRONMENT CONCERNS Recycle the materials with the symbol . Put the packaging in applicable containers to recycle it. Help protect the environment and human health and to recycle waste of electrical and electronic appliances. Do not dispose appliances marked with the symbol with the household waste.
electrolux 15 Servicestellen Points de Service Servizio dopo vendita Point of Service 9000 St. Gallen Zürcherstrasse 204e 4052 Basel St. Jakob-Turm Birsstrasse 320B 6020 Emmenbrücke Seetalstrasse 11 7000 Chur Comercialstrasse 19 Ersatzteilverkauf/Points de vente de rechange/Vendita pezzi di ricambio/ spare parts service: 5506 Mägenwil, Industriestrasse 10, Tel. 0848 848 111 Fachberatung/Verkauf/Demonstration/ Vente/Consulente (cucina)/Vendita 8048 Zürich, Badenerstrasse 587, Tel.
www.electrolux.