GK58DKG4O EN Hob User Manual
www.electrolux.com CONTENTS 1. SAFETY INFORMATION....................................................................................2 2. SAFETY INSTRUCTIONS..................................................................................4 3. PRODUCT DESCRIPTION................................................................................ 7 4. DAILY USE......................................................................................................... 7 5. HINTS AND TIPS.........................
ENGLISH 3 injuries and damages. Always keep the instructions with the appliance for future reference. 1.1 Children and vulnerable people safety • • • • • • • This appliance can be used by children aged from 8 years and above and persons with reduced physical, sensory or mental capabilities or lack of experience and knowledge if they have been given supervision or instruction concerning use of the appliance in a safe way and understand the hazards involved. Do not let children play with the appliance.
www.electrolux.com • • • • • If the glass ceramic surface / glass surface is cracked, switch off the appliance to avoid the possibility of electric shock. In case of hotplate glass breakage: – shut immediately off all burners and any electrical heating element and isolate the appliance from the power supply, – do not touch the appliance surface, – do not use the appliance.
ENGLISH • The bottom of the appliance can get hot. Make sure to install a noncombustile separation panel under the appliance to prevent access to the bottom. 2.2 Electrical Connection WARNING! Risk of fire and electrical shock. • • • • • • • • • • • • • • All electrical connections should be made by a qualified electrician. The appliance must be earthed. Before carrying out any operation make sure that the appliance is disconnected from the power supply.
www.electrolux.com • • • • • • Do not let the appliance stay unattended during operation. Set the cooking zone to “off” after each use. Do not put cutlery or saucepan lids on the cooking zones. They can become hot. Do not operate the appliance with wet hands or when it has contact with water. Do not use the appliance as a work surface or as a storage surface. When you place food into hot oil, it may splash.
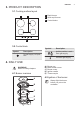
ENGLISH 3. PRODUCT DESCRIPTION 3.1 Cooking surface layout 1 1 Rapid burner 2 Semi-rapid burner 3 Control knobs 2 3 3.2 Control knob Symbol Symbol Description Description ignition position / maxi‐ mum gas supply no gas supply / off posi‐ tion minimum gas supply 4. DAILY USE WARNING! Refer to Safety chapters. 4.1 Burner overview A B C D E A) B) C) D) E) Burner cap Brass burner crown Burner crown Ignition candle Thermocouple 4.
www.electrolux.com WARNING! Be very careful when you use open fire in the kitchen environment. The manufacturer declines any responsibility in case of the flame misuse. 1. Push the control knob down and turn it counterclockwise to the maximum gas supply position ( ). 2. Keep the control knob pushed for equal or less than 10 seconds. This lets the thermocouple warm up. If not, the gas supply is interrupted. 3. Adjust the flame after it is regular.
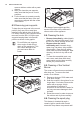
ENGLISH WARNING! Do not put the same pan on two burners. WARNING! Do not put unstable or damaged pots on the burners to prevent from spill and injury. CAUTION! Make sure that the bottoms of pots do not stand above the control knobs, otherwise the flame heats the control knobs up. CAUTION! Make sure that pot handles are not above the front edge of the cooktop. CAUTION! Make sure that the pots are placed centrally on the burners in order to get maximum stability and to get lower gas consumption.
www.electrolux.com remove stubborn stains with a paste cleaner. 3. After you clean the pan supports, make sure that they are in correct positions. 4. For the burners to operate correctly make sure that the arms of the pan supports are aligned with the centre of the burner. 6.3 Removing pan supports To keep the pan supports in the correct position, they are put on metal pins installed in the lateral sides of the hob. For easier cleaning, pan supports can be removed from the hob.
ENGLISH clean to prevent difficult lighting and check that the burner crown holes are not obstructed. 11 conditions of the gas supply pipe and the pressure adjuster, if fitted. 6.7 Periodic maintenance Speak to your local Authorised Service Centre periodically to check the 7. TROUBLESHOOTING WARNING! Refer to Safety chapters. 7.1 What to do if... Problem Possible cause Remedy There is no spark when you try to activate the spark generator.
www.electrolux.com 7.3 Labels supplied with the accessories bag Stick the adhesive labels as indicated below: A B MOD. MOD. PROD.NO. PROD.NO. SER.NO SER.NO DATA DATA C MOD. PROD.NO. SER.NO. 0049 TYPE IP20 03 IT MADE IN ITALY A) Stick it on Guarantee Card and send this part (if applicable). B) Stick it on Guarantee Card and keep this part (if applicable). C) Stick it on instruction booklet. 8. INSTALLATION WARNING! Refer to Safety chapters. 8.
ENGLISH Choose fixed connections or use a flexible pipe in stainless steel in compliance with the regulation in force. If you use flexible metallic pipes, be careful they do not come in touch with mobile parts or they are not squeezed. Also be careful when the hob is put together with an oven. Make sure that the gas supply pressure of the appliance obeys the recommended values. The adjustable connection is fixed to the comprehensive ramp by means of a threaded nut G 1/2".
www.electrolux.com Make sure that you connect the blue neutral cable to the terminal with a letter "N" on it. Connect the brown (or black) phase cable to the terminal which has a letter "L". Keep the phase cable connected at all times. A 5. If you change: • from natural gas G20 20 mbar to liquid gas, fully tighten the bypass screw in. • from liquid gas to natural gas G20 20 mbar, undo the bypass screw approximately 1/4 of a turn.
ENGLISH 15 access in case a technical assistance intervention is necessary. Kitchen unit with door A 30 mm A 60 mm min 20 mm (max 150 mm) B B A) supplied seal B) supplied brackets CAUTION! Install the appliance only on a worktop with flat surface. 8.
www.electrolux.com 9.4 Gas burners for NATURAL GAS G20 20 mbar BURNER NORMAL POWER kW MINIMUM POWER kW Rapid 2,2 0,95 Semi-rapid 1,65 0,55 INJECTOR MARK 1/100 mm 9.5 Gas burners for LPG G30/G31 50/50 mbar BURNER NORMAL POWER kW MINIMUM POWER kW INJECTOR MARK 1/100 mm NOMINAL GAS FLOW g/h Rapid 2,1 0,95 153 Semi-rapid 1,6 0,55 116 10. ENERGY EFFICIENCY 10.
ENGLISH 17 Point of Service Morgenstrasse 131 3018 Bern Zürcherstrasse 204E 9000 St. Gallen Seetalstrasse 11 6020 Emmenbrücke St. Jakob-Turm Birsstrasse 320B 4052 Basel Comercialstrasse 19 7000 Chur Spare parts service Industriestrasse 10, 5506 Mägenwil, Tel. 0848 848 111 Specialist advice/Sale Badenerstrasse 587, 8048 Zürich, Tel.
www.electrolux.
ENGLISH 19
867305089-D-262015 www.electrolux.