GK58TSILO EN Hob User Manual
www.electrolux.com CONTENTS 1. SAFETY INFORMATION....................................................................................2 2. SAFETY INSTRUCTIONS..................................................................................4 3. PRODUCT DESCRIPTION................................................................................ 7 4. DAILY USE......................................................................................................... 8 5. HINTS AND TIPS.........................
ENGLISH 3 result of incorrect installation or usage. Always keep the instructions in a safe and accessible location for future reference. 1.1 Children and vulnerable people safety • • • • • • • • This appliance can be used by children aged from 8 years and above and persons with reduced physical, sensory or mental capabilities or lack of experience and knowledge if they have been given supervision or instruction concerning the use of the appliance in a safe way and understand the hazards involved.
www.electrolux.com • • • • • • • • • NEVER try to extinguish a fire with water, but switch off the appliance and then cover flame e.g. with a lid or a fire blanket. CAUTION: The cooking process has to be supervised. A short term cooking process has to be supervised continuously. WARNING: Danger of fire: Do not store items on the cooking surfaces. Metallic objects such as knives, forks, spoons and lids should not be placed on the hob surface since they can get hot.
ENGLISH • • • • • • Always take care when moving the appliance as it is heavy. Always use safety gloves and enclosed footwear. Seal the cut surfaces with a sealant to prevent moisture to cause swelling. Protect the bottom of the appliance from steam and moisture. Do not install the appliance adjacent to a door or under a window. This prevents hot cookware falling from the appliance when the door or the window is opened. Each appliance has cooling fans on the bottom.
www.electrolux.com • • • • • • • Do not rely on the pan detector. Do not put cutlery or saucepan lids on the cooking zones. They can become hot. Do not operate the appliance with wet hands or when it has contact with water. Do not use the appliance as a work surface or as a storage surface. If the surface of the appliance is cracked, disconnect immediately the appliance from the power supply. This to prevent an electrical shock.
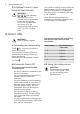
ENGLISH 7 3. PRODUCT DESCRIPTION 3.1 Cooking surface layout 1 1 Induction cooking surface 2 Control panel 1 1 1 2 3.2 Control panel layout 1 2 3 4 5 6 7 8 9 10 13 1 To activate and deactivate the hob. 2 To activate and deactivate the Lock or the Child Safety Device. 3 The cooking zone indicator. 4 CountUp Timer indicator. 5 Count Down Timer indicator. 6 Timer display: 00 - 99 minutes. 7 To activate and deactivate the Bridge function. 8 To set the timer function.
www.electrolux.com 3.3 OptiHeat Control (3 step Residual heat indicator) WARNING! / / The indicators show the level of the residual heat for the cooking zones you are currently using. The indicators may also come on for the neighbouring cooking zones even if you are not using them. The induction cooking zones produce the heat necessary for the cooking process directly in the bottom of the cookware. The glass ceramic is heated by the heat of the cookware.
ENGLISH 9 Once you place a pot on the zone and set the heat setting it remains the same for 2 minutes after you remove the pot. The control bar and the cooking zone indicator blink for 2 minutes. If you place the pot on the cooking zone again within this time the heat setting reactivates, otherwise, the cooking zone deactivates. 4.5 Bridge function Place the cookware in the centre of the selected zone. Induction cooking zones adapt to the dimension of the bottom of the cookware automatically.
www.electrolux.com 4.6 PowerBoost This function activates more power for the appropriate induction cooking zone, and it depends on the cookware size. The function can be activated only for a limited period of time. to activate the function for the Touch cooking zone. The symbol turns red. The function deactivates automatically. For maximum duration values, refer to "Technical data". Count Down Timer 1. Touch to activate the function or change the time.
ENGLISH When the function is active, symbols can be used. 4.11 and The function does not stop the timer functions. to activate the function. Touch The symbol turns red. The heat setting is lowered to 1. To deactivate the function, touch . The symbol turns white. The previous heat setting comes on. 4.9 Lock You can lock the control panel while the hob operates. It prevents an accidental change of the heat setting. Set the heat setting first. Touch to activate the function.
www.electrolux.com Auto‐ Boil‐ matic ing1) light Frying2) Mode H5 On Fan speed 1 Fan speed 2 Mode H6 On Fan speed 2 Fan speed 3 When you press , you raise the fan speed by one. When you reach an again, you intensive level and press set the fan speed to 0 which deactivates the hood fan. To start the fan again with the fan speed 1 touch . To activate an automatic operation of the function, deactivate the hob and activate it again.
ENGLISH • • • 13 zones connected to a single phase exceeds 3700 W. The function decreases the power of the other cooking zones connected to the same phase. For cooking zones that have a reduced power, the control panel shows the maximum possible heat settings. The activation of the function depends on the number and size of pots. 5. HINTS AND TIPS WARNING! Refer to Safety chapters. 5.1 Cookware For induction cooking zones a strong electro-magnetic field creates the heat in the cookware very quickly.
www.electrolux.com 5.4 Examples of cooking applications The correlation between the heat setting of a zone and its consumption of power is not linear. When you increase the heat setting, it is not proportional to the increase of the consumption of power. It means that a cooking zone with the medium heat setting uses less than a half of its power. The data in the table is for guidance only. Heat setting Use to: Time (min) 1 Keep cooked food warm. as nec‐ Put a lid on the cookware.
ENGLISH 15 Cooker hoods with the Hob²Hood function To find the full range of cooker hoods which work with this function refer to our consumer website. The Electrolux cooker hoods that work with this function must have the symbol . Other remotely controlled appliances may block the signal. Do not use any remotely controlled appliances at the time when you use the function on the hob. 6. CARE AND CLEANING WARNING! Refer to Safety chapters. 6.1 General information • • • • • Clean the hob after each use.
www.electrolux.com 7.1 What to do if... Problem Possible cause Remedy You cannot activate or op‐ erate the hob. The hob is not connected to an electrical supply or it is connected incorrectly. Check if the hob is correct‐ ly connected to the electri‐ cal supply. Refer to the connection diagram. The fuse is blown. Make sure that the fuse is the cause of the malfunc‐ tion. If the fuse is blown again and again, contact a qualified electrician. You touched 2 or more sensor fields at the same time.
ENGLISH Problem Possible cause Remedy There is no sound when The sounds are deactiva‐ you touch the panel sensor ted. fields. comes on. 17 Child Safety Device or Lock operates. and a number come on. There is an error in the hob. Activate the sounds. Refer to "Daily use". Refer to "Daily use". Deactivate the hob and ac‐ tivate it again after 30 sec‐ onds. If comes on again, disconnect the hob from the electrical supply. After 30 seconds, connect the hob again.
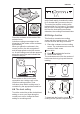
www.electrolux.com home electrical system must include an isolating device with at least a 3 mmcontact separation to enable a simultaneous and all-pole cut off from the mains (according to NIN SEV 1000). 400 L1 L2 8.5 Attaching the seal to the rabbet 1. Clean the rabbets in the worktop. 2. Cut the supplied seal stripe into 4 stripes. The stripes must have the same length as the rabbets. 3. Cut the ends of the stripes at an angle of 45°. They should fit in the corners of the rabbets accurately. 4.
ENGLISH 2. min. 60mm If the appliance is installed above a drawer, the hob ventilation can warm up the items stored in the drawer during the cooking process. 3. min. 28 mm ON-TOP INSTALLATION 1. R 5mm min. 55mm 490+1mm 560+1mm 4. min. 12 mm min.
www.electrolux.com INTEGRATED INSTALLATION 1. 3. R10 mm R5 mm min. 12 mm 8 mm 13 mm 490+1 mm 516+1 mm min.55mm 560+1 mm 586+1 mm 2. min. 28 mm 9. TECHNICAL DATA 9.1 Rating plate Model GK58TSILO Typ 61 B4A 04 AA Induction 7.35 kW Ser.Nr. ................. ELECTROLUX PNC 949 596 678 00 220 - 240 V / 400 V 2N 50 - 60 Hz Made in Germany 7.
ENGLISH 21 9.2 Cooking zones specification Cooking zone Nominal pow‐ er (maximum heat setting) [W] PowerBoost [W] PowerBoost maximum du‐ ration [min] Cookware di‐ ameter [mm] Left front 2300 3200 10 125 - 210 Left rear 2300 3200 10 125 - 210 Right front 2300 3200 10 125 - 210 Right rear 2300 3200 10 125 - 210 The power of the cooking zones can be different in some small range from the data in the table. It changes with the material and dimensions of the cookware.
www.electrolux.com • 11. CH Put the cookware directly in the centre of the cooking zone. • Use the residual heat to keep the food warm or to melt it. GUARANTEE Customer Service Centres Point of Service Industriestrasse 10 5506 Mägenwil Le Trési 6 1028 Préverenges Via Violino 11 6928 Manno Morgenstrasse 131 3018 Bern Zürcherstrasse 204E 9000 St.
ENGLISH 23
867333767-C-082018 www.electrolux.