GK58TSIO EN HOB USER MANUAL
www.electrolux.com CONTENTS 1. SAFETY INFORMATION............................................................................................ 3 2. SAFETY INSTRUCTIONS.......................................................................................... 4 3. PRODUCT DESCRIPTION.........................................................................................6 4. DAILY USE................................................................................................................ 8 5.
ENGLISH 1. 3 SAFETY INFORMATION Before the installation and use of the appliance, carefully read the supplied instructions. The manufacturer is not responsible if an incorrect installation and use causes injuries and damages. Always keep the instructions with the appliance for future reference. 1.
www.electrolux.com • • • • • Metallic objects such as knives, forks, spoons and lids should not be placed on the hob surface since they can get hot. Do not use a steam cleaner to clean the appliance. After use, switch off the hob element by its control and do not rely on the pan detector.
ENGLISH • Make sure the mains cable or plug (if applicable) does not touch the hot appliance or hot cookware, when you connect the appliance to the near sockets • Do not use multi-plug adapters and extension cables. • Make sure not to cause damage to the mains plug (if applicable) or to the mains cable. Contact an Authorised Service Centre or an electrician to change a damaged mains cable.
www.electrolux.com • This appliance is for cooking purposes only. It must not be used for other purposes, for example room heating. not use abrasive products, abrasive cleaning pads, solvents or metal objects. 2.4 Care and cleaning 2.5 Disposal • Clean regularly the appliance to prevent the deterioration of the surface material. • Deactivate the appliance and let it cool down before you clean it. • Disconnect the appliance from the electrical supply before maintenance.
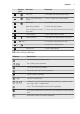
ENGLISH Sensor field Function Comment 1 ON / OFF To activate and deactivate the hob. 2 Lock / The Child Safety Device To lock / unlock the control panel. 3 STOP+GO To activate and deactivate the function. - Heat setting display To show the heat setting. - Timer indicators of cook- To show for which zone you set the time. ing zones - Timer display To show the time in minutes. Power function To activate and deactivate the function. - To increase or decrease the time.
www.electrolux.com 3.4 OptiHeat Control (3 step Residual heat indicator) The induction cooking zones make the heat necessary for cooking process directly in the bottom of the cookware. The glass ceramic is heated by the heat of the cookware. WARNING! / / There is a risk of burns from residual heat. The indicator shows the level of the residual heat. 4. DAILY USE 4.4 Power function WARNING! Refer to Safety chapters. 4.
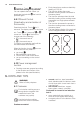
ENGLISH To change the time: set the cooking zone with . Touch or The function has no effect on the operation of the cooking zones. . To deactivate the function: set the cooking zone with and touch . The remaining time counts back to 00. The indicator of the cooking zone goes out. To deactivate the function you can also touch and at the same time. This function sets all cooking zones that operate to the lowest heat setting. The function does not stop the timer functions.
www.electrolux.com comes on. Touch for 4 seconds. Set the heat setting in 10 seconds. You can operate the hob. When you deactivate the hob with operates again. the function 4.9 OffSound Control (Deactivation and activation of the sounds) Deactivate the hob. Touch for 3 seconds. The display comes on and goes out. Touch for 3 seconds. or • Each phase has a maximum electricity loading of 3700 W. • The function divides the power between cooking zones connected to the same phase.
ENGLISH The bottom of the cookware must be as thick and flat as possible. Cookware dimensions Induction cooking zones adapt to the dimension of the bottom of the cookware automatically to some limit. The cooking zone efficiency is related to the diameter of the cookware. The cookware with a smaller diameter than the minimum receives only a part of the power generated by the cooking zone. Refer to “Technical information” chapter. 5.
www.electrolux.com Heat setting Use to: Time (min) Hints 7-9 Steam potatoes. 20 - 60 Use max. ¼ l water for 750 g of potatoes. 7-9 Cook larger quantities of food, 60 stews and soups. 150 Up to 3 l liquid plus ingredients. 9 - 12 Gentle fry: escalope, veal cor- as necdon bleu, cutlets, rissoles, essary sausages, liver, roux, eggs, pancakes, doughnuts. Turn halfway through. 12 - 13 Heavy fry, hash browns, loin steaks, steaks. Turn halfway through.
ENGLISH 13 7.1 What to do if... Problem Possible cause Remedy You cannot activate or operate the hob. The hob is not connected to an electrical supply or it is connected incorrectly. Check if the hob is correctly connected to the electrical supply. Refer to the connection diagram. The fuse is released. Make sure that the fuse is the cause of the malfunction. If the fuse releases again and again, contact a qualified electrician.
www.electrolux.com Problem Possible cause Remedy There is no signal when you The signals are deactivated. Activate the signals. touch the panel sensor Refer to "Daily use" chapter. fields. comes on. Automatic Switch Off operates. Deactivate the hob and activate it again. comes on. The Child Safety Device or the Lock function operates. Refer to "Daily use" chapter. comes on. There is no cookware on the zone. Put cookware on the zone. The cookware is incorrect. Use the correct cookware.
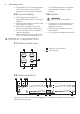
ENGLISH 15 8. INSTALLATION Association of Cantonal Fire Insurance shall be strictly adhered to. WARNING! Refer to Safety chapters. 8.3 Connection cable 8.1 Before the installation Before you install the hob, write down the information bellow from the rating plate. The rating plate is on the bottom of the hob. Serial number ........................... • The hob is supplied with a connection cable. • Replace the damaged mains cable with a special cable (type H05VV-F or higher).
www.electrolux.com Do not extend it. Make sure that the ends of the seal stripe are located in the middle of one side of the hob. 3. Add some mm when you cut the seal stripe to the length. 4. Push the two ends of seal stripe together. 8.7 Assembly ON-TOP INSTALLATION min. 500mm min. 50mm min. 2mm A min. 2 mm B < 20 mm min. 2 mm > 20 mm min. 500 mm B A 12 mm 57 mm 28 mm 41 mm 38 mm 31 mm A B min 30 mm min.
ENGLISH R 5mm min. 55mm min. 12 mm min. 2 mm 490+1mm 560+1mm min. 38 mm min. 2 mm INTEGRATED INSTALLATION R10mm R5mm 7mm min. 12 mm 12mm min. 55mm 490+1mm 560+1mm 514+1mm 584+1mm min.
www.electrolux.com min. 38 mm min. 2 mm 9. TECHNICAL INFORMATION 9.1 Rating plate Modell GK58TSIO Typ 58 GAD D5 AU Induction 7.4 kW Ser.Nr. ................. ELECTROLUX PNC 941 591 753 02 220 - 240 V 50 - 60 Hz 7.4 kW 9.
ENGLISH Servicestellen Points de Service Servizio dopo ven- Point of Service dita 5506 Mägenwil/ Zürich Industriestrasse 10 3018 Bern Morgenstrasse 131 1028 Préverenges Le Trési 6 19 6928 Manno Via Violino 11 9000 St. Gallen Zürcherstrasse 204e 4052 Basel St. Jakob-Turm Birsstrasse 320B 6020 Emmenbrücke Seetalstrasse 11 7000 Chur Comercialstrasse 19 Ersatzteilverkauf/Points de vente de rechange/Vendita pezzi di ricambio/ spare parts service: 5506 Mägenwil, Industriestrasse 10, Tel.
www.electrolux.com 11. ENVIRONMENTAL CONCERNS Recycle the materials with the symbol . Put the packaging in applicable containers to recycle it. Help protect the environment and human health and to recycle waste of electrical and electronic appliances. Do not dispose appliances marked with the symbol with the household waste. Return the product to your local recycling facility or contact your municipal office.
ENGLISH 21
www.electrolux.
ENGLISH 23
867301291-A-052014 www.electrolux.