user manual Ceramic glass induction hob GK69TSIO
electrolux Electrolux. Thinking of you. Share more of our thinking at www.electrolux.com Contents Safety Information Description of the appliance Operating the appliance Tips on cooking and frying Cleaning and care 2 3 5 10 11 Disposal What to do if ... Installation Instructions Service 12 12 14 17 Subject to change without notice Safety Information Warning! Please comply with these instructions. If you do not, any damage resulting is not covered by the warranty.
electrolux 3 Safety when cleaning • For cleaning, the appliance must be switched off and cooled down. • For safety reasons, the cleaning of the appliance with steam jet or high-pressure cleaning equipment is not permitted. How to avoid damage to the appliance • The glass ceramic can be damaged by objects falling onto it. • The edge of the glass ceramic can be damaged by being knocked by the cookware.
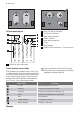
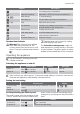
electrolux Control panel layout 9 1 2 8 3 7 4 5 2 3 4 5 6 7 8 9 Stop+Go with a pilot light On/Off with indicator Heat setting indicator Power function Heat setting selection Timer Timer display Cooking zone indicators - Timer function 6 1 Child lock with a pilot light Touch Control sensor fields The appliance is operated using Touch Control sensor fields. Functions are controlled by touching sensor fields and confirmed by displays and acoustic signals.
electrolux 5 Display Description The cooking zone is switched off - + digit Keep Warm settings Keep Warm / STOP+GO function is switched on Heat settings To set heat settings Auto Warm-up The Auto Warm-up function is switched on Fault Malfunction has occurred Pan detection Cookware is unsuitable or too small or no cookware has been placed on the cooking zone Residual heat Cooking zone is still hot Child safety device Lock/Child safety device is set Power Power function is switched on Auto
electrolux When you switch the appliance off, the locking function is automatically switched off. Turning the STOP+GO function on and off The STOP+GO function simultaneously toggles all active cooking zones to keep-warm Control panel To switch on Touch To switch off Touch mode then back to the heat setting they were at before Display Previous heat setting (not automatic warm-up or power function) STOP+GO does not stop timer functions. STOP+GO controls the entire control .
electrolux 7 Using the child safety device The child safety device prevents unintentional use of the appliance. Switching on the child safety device Step Control panel 1. Display/Signal Switch on appliance. Do not set a heat setting. 2. Touch for 4 seconds The child safety device is switched on. Switching off the child safety device Step Control panel 1. Display/Signal Switch on appliance. Do not set a heat setting. 2. Touch 3. for 4 seconds lights up Switch appliance off.
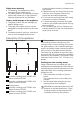
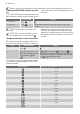
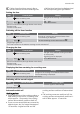
electrolux Power Management The cooking zones of the cooking surface have a maximum power. The maximum power is reached when the heat setting 13 has been set for all cooking zones. Two cooking zones generate a pair (see figure) and therefore, the power management shares the maximum available power between these cooking zones.
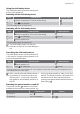
electrolux 9 If other timer functions are set, after a few seconds the shortest remaining time Setting the time Step 1. 2. of all the timer functions is displayed and the corresponding pilot light flashes. Control panel Display Pilot light for the cooking zone selected flashes Select a cooking zone Touch 00 to 99 minutes or After a few seconds the pilot light flashes more slowly. The time is set. The time counts down. Switching off the timer function Step 1. 2.
electrolux Control panel • When the appliance is switched off, if one or more of the sensor fields on the control panel are covered for more than 10 seconds, an acoustic signal sounds. The acoustic signal switches itself off automatically when the sensor fields are no longer covered. Induction cooking zones • In the case of overheating (e.g. when a saucepan boils dry) the cooking zone automatically switches itself off. is displayed.
electrolux 11 Tips on energy saving Place cookware on the cooking zone before it is switched on. Examples of cooking applications The information given in the following table is for guidance only. If possible, always place a lid on the cookware. Heat setting Cooking process 0 suitable for Cook time Tips/Hints Off position Keeping food warm Keeping cooked foods warm as required Cover 1-3 Melting Hollandaise sauce, melting butter, chocolate, gelatine 5-25 mins.
electrolux Scratches or dark stains on the glass ceramic that cannot be removed do not affect the functioning of the appliance. Cleaning the appliance after each use 1. Food containing sugar, plastics, tin foil residues should be removed at once using a scraper. Place a scraper on the glass ceramic surface at an angle and remove residues by sliding the blade over the surface. Wipe the appliance with a damp cloth and a little washing up liquid. Finally, rub the appliance dry using a clean cloth . 2.
electrolux 13 Problem/Display Possible Cause Remedy Unsuitable cookware Use suitable cookware No cookware on the cooking zone Put cookware on zone Diameter of the base of the cookware is too small for the cooking zone Move to smaller cooking zone Use suitable cookware lights up Automatic switch-off has been triggered Switch appliance off.
electrolux • Hissing, buzzing 3 The device is fitted with a fan for cooling the electrics. A whiring noise can be heard when operating the fan which may deviate depending on the performance and may continue for a while after the appliance is switched off. The noises described are normal and do not refer to any defects.
electrolux 15 • For the four corners of the rabbet the ends of the sealing tapes must be cut into mitres. Do not stick the ends over one another. • Stick the sealing tape flush into the corner of the rabbet, so that no silicon compound can get under the glass ceramic when grouting. • Don’t stretch the tapes when sticking them on. Assembly Mounting on the top 600 = 680 +1 490 +1 = min. 5 R5 min. 20 min.
electrolux min. 25 min. 38 min. 5 min. 5 min. 20 Integrated mounting R10 R5 7 min. 25 min. 5 13 min. 600 490 516 +1 min. 20 680 706 +1 min. 38 min. 5 Rating Plate Modell GK69TSIO Typ 55GDD D4 AU Electrolux Prod. Nr.
electrolux 17 Service In the event of technical faults, please first check whether you can remedy the problem yourself with the help of the operating instructions (section “What to do if…”). If you were not able to remedy the problem yourself, please contact the Customer Care Department or one of our service partners.
electrolux
electrolux 19
www.electrolux.com www.electrolux.