GK69TSO EN HOB USER MANUAL
www.electrolux.com CONTENTS 1. SAFETY INFORMATION...................................................................................... 2 2. SAFETY INSTRUCTIONS.....................................................................................4 3. PRODUCT DESCRIPTION................................................................................... 6 4. DAILY USE.......................................................................................................... 8 5. HINTS AND TIPS...............
ENGLISH 3 of incorrect installation or usage. Always keep the instructions in a safe and accessible location for future reference. 1.1 Children and vulnerable people safety • • • • • • • This appliance can be used by children aged from 8 years and above and persons with reduced physical, sensory or mental capabilities or lack of experience and knowledge if they have been given supervision or instruction concerning the use of the appliance in a safe way and understand the hazards involved.
www.electrolux.com • • • • • • • CAUTION: The cooking process has to be supervised. A short term cooking process has to be supervised continuously. WARNING: Danger of fire: Do not store items on the cooking surfaces. Metallic objects such as knives, forks, spoons and lids should not be placed on the hob surface since they can get hot. Do not use a steam cleaner to clean the appliance. If the glass ceramic surface / glass surface is cracked, switch off the appliance and unplug it from the mains.
ENGLISH • The bottom of the appliance can get hot. Make sure to install a separation panel made from plywood, kitchen carcass material or other nonflammable materials under the appliance to prevent access to the bottom. 2.2 Electrical Connection WARNING! Risk of fire and electrical shock. • All electrical connections should be made by a qualified electrician. • The appliance must be earthed. • Before carrying out any operation make sure that the appliance is disconnected from the power supply.
www.electrolux.com heated objects away from fats and oils when you cook with them. • The vapours that very hot oil releases can cause spontaneous combustion. • Used oil, that can contain food remnants, can cause fire at a lower temperature than oil used for the first time. • Do not put flammable products or items that are wet with flammable products in, near or on the appliance. WARNING! Risk of damage to the appliance. • Do not keep hot cookware on the control panel.
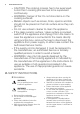
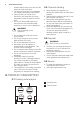
ENGLISH 3.2 Control panel layout 1 2 3 4 5 6 7 8 9 10 11 Use the sensor fields to operate the appliance. The displays, indicators and sounds tell which functions operate. Sensor field Function Comment 1 ON / OFF To activate and deactivate the hob. 2 Lock / The Child Safety Device To lock / unlock the control panel. 3 - To activate and deactivate the outer ring. Heat setting and timer display To show the heat setting and time in minutes. - To set the timer function.
www.electrolux.com 3.3 Heat setting displays Display Description The cooking zone is deactivated. The cooking zone operates. - STOP+GO operates. Automatic Heat Up operates. + digit There is a malfunction. / OptiHeat Control (3 step Residual heat indicator): continue cooking / keep warm / residual heat. / Lock / The Child Safety Device operates. Automatic Switch Off operates. 3.4 OptiHeat Control (3 step Residual heat indicator) WARNING! / / There is a risk of burns from residual heat.
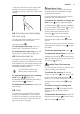
ENGLISH Touch the control bar at the correct heat setting or move your finger along the control bar until you reach the correct heat setting. Count Down Timer Use this function to specify how long a cooking zone should operate during a single cooking session. First set the heat setting for the cooking zone and then set the function. To activate the function or change the time: touch quickly again and again until the indicator of a given zone lights up on the display.
www.electrolux.com 4.9 The Child Safety Device Minute Minder You can use this function as a Minute Minder when the hob is activated but the cooking zones do not operate. This function prevents an accidental operation of the hob. To activate the function: touch hob with quickly again and again until the indicator of a given zone lights up on the display. Touch or to set the time. The function . Do not set the heat setting. for 4 seconds. Deactivate the hob with comes on. . .
ENGLISH 11 5. HINTS AND TIPS WARNING! Refer to Safety chapters. 5.1 Cookware The bottom of the cookware must be as thick and flat as possible. Cookware made of enamelled steel and with aluminium or copper bottoms can cause the colour change on the glass-ceramic surface. Heat setting 5.2 Öko Timer (Eco Timer) To save energy, the heater of the cooking zone deactivates before the count down timer sounds.
www.electrolux.com 6. CARE AND CLEANING WARNING! Refer to Safety chapters. 6.1 General information • Clean the hob after each use. • Always use cookware with clean bottom. • Scratches or dark stains on the surface have no effect on how the hob operates. • Use a special cleaner applicable for the surface of the hob. • Use a special scraper for the glass. 6.2 Cleaning the hob If not, the dirt can cause damage to the hob. Take care to avoid burns.
ENGLISH Problem 13 Possible cause Remedy There is water or fat stains on the control panel. Clean the control panel. An acoustic signal sounds and the hob deactivates. An acoustic signal sounds when the hob is deactivated. You put something on one or more sensor fields. Remove the object from the sensor fields. The hob deactivates. You put something on the Remove the object from the sensor field. sensor field Residual heat indicator does not come on. .
www.electrolux.com Problem Possible cause Remedy E6 comes on. The second phase of the power supply is missing. Check if the hob is correctly connected to the electrical supply. Remove the fuse, wait one minute, and insert the fuse again. 7.2 If you cannot find a solution... If you cannot find a solution to the problem yourself, contact your dealer or an Authorised Service Centre. Give the data from the rating plate.
ENGLISH 2. Cut the supplied seal stripe into 4 stripes. The stripes must have the same length as the rabbets. 3. Cut the ends of the stripes at an angle of 45°. They should fit in the corners of the rabbets accurately. 4. Attach the stripes to the rabbets. Do not extend the stripes. Do not bond ends of stripes one over another. After you assemble the hob, seal the remaining gap between glass ceramic and the worktop with silicone. Make sure the silicone does not get under the glass ceramic. 8.
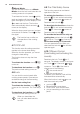
www.electrolux.com min. 12 mm min. 20 mm min. 28 mm 4. INTEGRATED INSTALLATION 2. R10mm R5mm min. 12 mm 7mm min.55mm 12mm 490+1mm 680+1mm 514+1mm min. 20 mm 704+1mm 3. 1. 9. TECHNICAL DATA 9.1 Rating plate Model GK69TSO Typ 60 HDD 77 XO PNC 949 596 537 01 400 V 50 Hz Made in Germany 7.0 kW Ser.Nr. ................. ELECTROLUX 9.
ENGLISH Cooking zone Nominal Power (Max heat setting) [W] 17 Cooking zone diameter [mm] Right front 1200 145 Right rear 1000 / 2200 140 / 210 For optimal cooking results use cookware not larger than the diameter of the cooking zone. 10. ENERGY EFFICIENCY 10.
11. www.electrolux.com CH GUARANTEE Customer Service Centres Point of Service Industriestrasse 10 5506 Mägenwil Le Trési 6 1028 Préverenges Via Violino 11 6928 Manno Morgenstrasse 131 3018 Bern Zürcherstrasse 204E 9000 St. Gallen Seetalstrasse 11 6020 Emmenbrücke Schlossstrasse 1 4133 Pratteln Comercialstrasse 19 7000 Chur Spare parts service Industriestrasse 10, 5506 Mägenwil, Tel. 0848 848 111 Specialist advice/Sale Badenerstrasse 587, 8048 Zürich, Tel.
ENGLISH 19
867332291-A-292017 www.electrolux.