GK78TSIFO EN Hob User Manual
www.electrolux.com CONTENTS 1. SAFETY INFORMATION....................................................................................2 2. SAFETY INSTRUCTIONS..................................................................................4 3. PRODUCT DESCRIPTION................................................................................ 7 4. DAILY USE......................................................................................................... 9 5. FLEXIBLE INDUCTION COOKING AREA........
ENGLISH 3 responsible for any injuries or damages that are the result of incorrect installation or usage. Always keep the instructions in a safe and accessible location for future reference. 1.
www.electrolux.com • • • • • • • • • NEVER try to extinguish a fire with water, but switch off the appliance and then cover flame e.g. with a lid or a fire blanket. CAUTION: The cooking process has to be supervised. A short term cooking process has to be supervised continuously. WARNING: Danger of fire: Do not store items on the cooking surfaces. Metallic objects such as knives, forks, spoons and lids should not be placed on the hob surface since they can get hot.
ENGLISH • • • • • • Always take care when moving the appliance as it is heavy. Always use safety gloves and enclosed footwear. Seal the cut surfaces with a sealant to prevent moisture to cause swelling. Protect the bottom of the appliance from steam and moisture. Do not install the appliance adjacent to a door or under a window. This prevents hot cookware falling from the appliance when the door or the window is opened. Each appliance has cooling fans on the bottom.
www.electrolux.com • • • • • • • Do not rely on the pan detector. Do not put cutlery or saucepan lids on the cooking zones. They can become hot. Do not operate the appliance with wet hands or when it has contact with water. Do not use the appliance as a work surface or as a storage surface. If the surface of the appliance is cracked, disconnect immediately the appliance from the power supply. This to prevent an electrical shock.
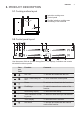
ENGLISH 7 3. PRODUCT DESCRIPTION 3.1 Cooking surface layout 3 1 Induction cooking zone 2 Control panel 3 Flexible induction cooking area consisting of four sections 1 1 2 3.2 Control panel layout 2 3 1 4 5 6 13 7 12 8 11 10 9 Use the sensor fields to operate the appliance. The displays, indicators and sounds tell which functions operate. Sen‐ sor field Function Comment 1 ON / OFF To activate and deactivate the hob. 2 Lock / Child Safety De‐ vice To lock / unlock the control panel.
www.electrolux.com Sen‐ sor field 9 10 - 11 / 12 13 - Function Comment PowerBoost To activate and deactivate the function. Control bar To set a heat setting. - To select the cooking zone. - To increase or decrease the time. Control bar To set the heat setting for flexible induc‐ tion cooking area. 3.3 Heat setting displays Display Description The cooking zone is deactivated. The cooking zone operates. - Pause operates. Automatic Heat Up operates. PowerBoost operates.
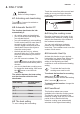
ENGLISH 9 4. DAILY USE WARNING! Refer to Safety chapters. 4.1 Activating and deactivating Touch the control bar at the correct heat setting or move your finger along the control bar until you reach the correct heat setting. Touch for 1 second to activate or deactivate the hob. P 4.
www.electrolux.com To activate the function: touch Refer to “Technical information” chapter. To activate the function for a cooking zone: touch . comes on. To deactivate the function: change the heat setting. 4.7 Timer Count Down Timer You can use this function to set how long the cooking zone should operate for a single cooking session. First set the heat setting for the cooking zone then set the function.
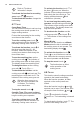
ENGLISH 4.9 Lock You can lock the control panel while cooking zones operate. It prevents an accidental change of the heat setting. When the function is set to hear the sounds only when: Set the heat setting first. To activate the function: touch . comes on for 4 seconds. The Timer stays on. To deactivate the function: touch . The previous heat setting comes on. • • • • • • 4.10 Child Safety Device • This function prevents an accidental operation of the hob.
www.electrolux.com For most of the hoods the remote system is originally deactivated. Activate it before you use the function. For more information refer to hood user manual. Operating the function automatically To operate the function automatically set the automatic mode to H1 – H6. The hob is originally set to H5. The hood reacts whenever you operate the hob. The hob recognizes temperature of the cookware automatically and adjusts the speed of the fan.
ENGLISH 13 5. FLEXIBLE INDUCTION COOKING AREA WARNING! Refer to Safety chapters. 5.1 FlexiBridge function The flexible induction cooking area consists of four sections. The sections can be combined into two cooking zones with different size, or into one large cooking area. You choose the combination of the sections by choosing the mode applicable to the size of the cookware you want to use. There are three modes: Standard (activated automatically when you activate the hob), Big Bridge and Max Bridge.
www.electrolux.com Incorrect cookware position: Incorrect cookware position: 5.3 FlexiBridge Big Bridge mode To activate the mode press until you see the correct mode indicator . This mode connects three rear sections into one cooking zone. The one front section is not connected and operates as a separate cooking zone. You can set the heat setting for each zone separately. Use two left side control bars. 5.
ENGLISH 15 Incorrect cookware position: 6. HINTS AND TIPS WARNING! Refer to Safety chapters. 6.1 Cookware For induction cooking zones a strong electro-magnetic field creates the heat in the cookware very quickly. Use the induction cooking zones with correct cookware. The bottom of the cookware must be as thick and flat as possible. Cookware dimensions Induction cooking zones adapt to the dimension of the bottom of the cookware automatically to some limit.
www.electrolux.com count down timer sounds. The difference in the operation time depends on the heat setting level and the length of the cooking operation. 6.4 Examples of cooking applications is not linear. When you increase the heat setting, it is not proportional to the increase of the consumption of power. It means that a cooking zone with the medium heat setting uses less than a half of its power. The data in the table is for guidance only.
ENGLISH The hood in the picture is only exemplary. 17 Other remotely controlled appliances may block the signal. Do not use any remotely controlled appliances at the time when you use the function on the hob. Cooker hoods with the Hob²Hood function To find the full range of cooker hoods which work with this function refer to our consumer website. The Electrolux cooker hoods that work with this function must have the symbol . 7. CARE AND CLEANING WARNING! Refer to Safety chapters. 7.
www.electrolux.com 8.1 What to do if... Problem Possible cause Remedy You cannot activate or op‐ erate the hob. The hob is not connected to an electrical supply or it is connected incorrectly. Check if the hob is correct‐ ly connected to the electri‐ cal supply. Refer to the connection diagram. The fuse is blown. Make sure that the fuse is the cause of the malfunc‐ tion. If the fuse is blown again and again, contact a qualified electrician. You do not set the heat setting for 10 seconds.
ENGLISH Problem Possible cause There is no sound when The sounds are deactiva‐ you touch the panel sensor ted. fields. 19 Remedy Activate the sounds. Refer to "Daily use". The flexible induction The cookware is in a Place the cookware in the cooking area does not heat wrong position on the flexi‐ correct position on the flex‐ up the cookware. ble induction cooking area. ible induction cooking area. The position of the cookware depends on the activated function or func‐ tion mode.
www.electrolux.com Problem Possible cause Remedy and a number come on. There is an error in the hob. Deactivate the hob and ac‐ tivate it again after 30 sec‐ onds. If comes on again, disconnect the hob from the electrical supply. After 30 seconds, connect the hob again. If the prob‐ lem continues, speak to an Authorised Service Centre. You can hear a constant beep noise. The electrical connection is Disconnect the hob from incorrect. the electrical supply.
ENGLISH 400 L1 L2 9.5 Attaching the seal to the rabbet 1. Clean the rabbets in the worktop. 2. Cut the supplied seal stripe into 4 stripes. The stripes must have the same length as the rabbets. 3. Cut the ends of the stripes at an angle of 45°. They should fit in the corners of the rabbets accurately. 4. Attach the stripes to the rabbets. Do not extend the stripes. Do not bond ends of stripes one over another.
www.electrolux.com ON-TOP INSTALLATION 1. 4. min. 12 mm min. 20 mm R 5mm min. 55mm +1 490+1mm 750 mm INTEGRATED INSTALLATION 1. 2. R10mm R5mm 8mm 13mm min. 600mm 490+1mm 750+1mm 516+1mm 776+1mm 2. 3. min. 28 mm min.
ENGLISH 23 3. min. 12 mm 10. TECHNICAL DATA 10.1 Rating plate Model GK78TSIFO Typ 62 D4A 05 AA Induction 7.35 kW Ser.Nr. ................. ELECTROLUX PNC 949 596 624 00 220 - 240 V / 400 V 2N 50 - 60 Hz Made in Germany 7.35 kW 10.
www.electrolux.com 11. ENERGY EFFICIENCY 11.1 Product information according to EU 66/2014 Model identification GK78TSIFO Type of hob Built-In Hob Number of cooking zones 2 Number of cooking areas 1 Heating technology Induction Diameter of circular cook‐ Middle rear ing zones (Ø) Right front 21.0 cm 18.0 cm Lenght (L) and width (W) of the cooking area L 42.0 cm W 21.4 cm Left Energy consumption per Middle rear cooking zone (EC electric Right front cooking) 177.0 Wh / kg 174.
ENGLISH 25 Point of Service Morgenstrasse 131 3018 Bern Zürcherstrasse 204E 9000 St. Gallen Seetalstrasse 11 6020 Emmenbrücke Schlossstrasse 1 4133 Pratteln Comercialstrasse 19 7000 Chur Spare parts service Industriestrasse 10, 5506 Mägenwil, Tel. 0848 848 111 Specialist advice/Sale Badenerstrasse 587, 8048 Zürich, Tel.
www.electrolux.
ENGLISH 27
867333733-A-352017 www.electrolux.