GK906TSIDO EN HOB USER MANUAL
www.electrolux.com CONTENTS 1. SAFETY INFORMATION...................................................................................... 2 2. SAFETY INSTRUCTIONS.....................................................................................4 3. PRODUCT DESCRIPTION................................................................................... 7 4. DAILY USE.......................................................................................................... 9 5. HINTS AND TIPS...............
ENGLISH 3 of incorrect installation or usage. Always keep the instructions in a safe and accessible location for future reference. 1.1 Children and vulnerable people safety • • • • • • • This appliance can be used by children aged from 8 years and above and persons with reduced physical, sensory or mental capabilities or lack of experience and knowledge if they have been given supervision or instruction concerning the use of the appliance in a safe way and understand the hazards involved.
www.electrolux.com • • • • • • • • CAUTION: The cooking process has to be supervised. A short term cooking process has to be supervised continuously. WARNING: Danger of fire: Do not store items on the cooking surfaces. Metallic objects such as knives, forks, spoons and lids should not be placed on the hob surface since they can get hot. Do not use a steam cleaner to clean the appliance. After use, switch off the hob element by its control and do not rely on the pan detector.
ENGLISH • Make sure that the ventilation space of 2 mm, between the worktop and the front of the below unit, is free. The warranty does not cover damages caused by the lack of an adequate ventilation space. 2.2 Electrical Connection WARNING! Risk of fire and electrical shock. • All electrical connections should be made by a qualified electrician. • The appliance must be earthed. • Before carrying out any operation make sure that the appliance is disconnected from the power supply.
www.electrolux.com WARNING! Risk of fire and explosion • Fats and oil when heated can release flammable vapours. Keep flames or heated objects away from fats and oils when you cook with them. • The vapours that very hot oil releases can cause spontaneous combustion. • Used oil, that can contain food remnants, can cause fire at a lower temperature than oil used for the first time. • Do not put flammable products or items that are wet with flammable products in, near or on the appliance.
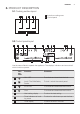
ENGLISH 3. PRODUCT DESCRIPTION 3.1 Cooking surface layout 1 1 1 1 1 Induction cooking zone 2 Control panel 1 1 2 3.2 Control panel layout 1 2 3 4 5 17 6 7 16 15 14 8 9 10 11 12 13 Use the sensor fields to operate the appliance. The displays, indicators and sounds tell which functions operate. Sensor field Function Comment 1 ON / OFF To activate and deactivate the hob. 2 Lock / The Child Safety Device To lock / unlock the control panel.
www.electrolux.com Sensor field Function Comment 8 CountUp Timer To show that the function operates. 9 Count Down Timer / Minute Minder To show that the function operates. Cooking zone indicator. To show for which zone you set the heat setting. - To show that there is no cookware on the cooking zone, the cookware is not correct or the bottom of the cookware is too small. 12 Bridge To activate and deactivate the function. 13 - To select the Timer function.
ENGLISH 3.4 OptiHeat Control (3 step Residual heat indicator) WARNING! / / There is a risk of burns from residual heat. The indicator shows the level of the residual heat. The induction cooking zones make the heat necessary for cooking process directly in the bottom of the cookware. The glass ceramic is heated by the heat of the cookware. 4. DAILY USE WARNING! Refer to Safety chapters. Heat setting The hob deactivates after 4.
www.electrolux.com You can use this function for cookware larger than 260 mm. First set the heat setting for one of the cooking zones. To activate the function: touch . To set or change the heat setting touch one of the control sensors. To deactivate the function: touch . The cooking zones operate independently. When you use only one cooking zone of the pair we recommend that you use the rear cooking zone. Also when you use large cookware we recommend that you put it near to the rear cooking zone. 4.
ENGLISH necessary cooking zone comes on. When this function is active, comes on. of To activate the function: touch the timer to set the time (00 - 99 minutes). When the indicator of the cooking zone starts to flash slowly the time counts down. To see the remaining time: set the . The indicator of the cooking zone with cooking zone starts to flash quickly. The display shows the remaining time. To change the time: set the cooking zone with . Touch or .
www.electrolux.com To confirm your selection wait until the hob deactivates automatically. When you deactivate the hob, you also deactivate this function. When the function is set to hear the sounds only when: 4.12 The Child Safety Device • • • • This function prevents an accidental operation of the hob. To activate the function: activate the hob with Touch . Do not set the heat setting. for 4 seconds. Deactivate the hob with comes on. . To deactivate the function: activate the .
ENGLISH Cookware material • correct: cast iron, steel, enamelled steel, stainless steel, the bottom made of multi-layer (with correct mark from a manufacturer). • not correct: aluminium, copper, brass, glass, ceramic, porcelain. Cookware is correct for an induction hob if: • some water boils very quickly on a zone set to the highest heat setting. • a magnet pulls on to the bottom of the cookware. The bottom of the cookware must be as thick and flat as possible.
www.electrolux.com Heat setting Use to: Time (min) Hints 3-5 Simmer rice and milkbased dishes, heating up readycooked meals. 25 - 50 Add the minimum twice as much liquid as rice, mix milk dishes part procedure through. 5-7 Steam vegetables, fish, meat. 20 - 45 Add some tablespoons of liquid. 7-9 Steam potatoes. Use max. ¼ l water for 750 g of potatoes. 7-9 Cook larger quantities of food, 60 stews and soups. 150 Up to 3 l liquid plus ingredients.
ENGLISH 15 7.1 What to do if... Problem Possible cause Remedy You cannot activate or operate the hob. The hob is not connected to an electrical supply or it is connected incorrectly. Check if the hob is correctly connected to the electrical supply. Refer to the connection diagram. The fuse is blown. Make sure that the fuse is the cause of the malfunction. If the fuse is blown again and again, contact a qualified electrician. Activate the hob again and set the heat setting in less than 10 seconds.
www.electrolux.com Problem Possible cause Remedy There is no signal when you The signals are deactivated. Activate the signals. touch the panel sensor Refer to "Daily use" chapter. fields. comes on. Automatic Switch Off operates. Deactivate the hob and activate it again. comes on. The Child Safety Device or the Lock function operates. Refer to "Daily use" chapter. comes on. There is no cookware on the zone. Put cookware on the zone. The cookware is incorrect. Use the correct cookware.
ENGLISH Problem Possible cause Remedy comes on. The cooling fan is blocked. Check if objects block the comes on. The electrical connection is incorrect. The hob is connected only to one phase. 17 cooling fan. If comes on again, speak to an Authorised Service Centre. 7.2 If you cannot find a solution... If you cannot find a solution to the problem yourself, contact your dealer or an Authorised Service Centre. Give the data from the rating plate.
www.electrolux.com 16A 230V 3 25A 400 grey A011 335 07 18 L1 L3 L2 PE N L3 L2 L1 PE 8.5 Attaching the seal to the rabbet silicone does not get under the glass ceramic. 1. Clean the rabbets in the worktop. 2. Cut the supplied seal stripe into 4 stripes. The stripes must have the same length as the rabbets. 3. Cut the ends of the stripes at an angle of 45°. They should fit in the corners of the rabbets accurately. 4. Attach the stripes to the rabbets. Do not extend the stripes.
ENGLISH 8.7 Assembly ON-TOP INSTALLATION min. 500mm min. 50mm min. 2mm min. 2 mm A min. 2 mm B < 20 mm B 57 mm 41 mm 31 mm B > 20 mm min. 500 mm A 12 mm 28 mm 38 mm A min 30 mm min. 500 mm A 12 mm 28 mm 38 mm B 57 mm 41 mm 31 mm R 5mm min.
www.electrolux.com min. 12 mm min. 2 mm min. 38 mm min. 2 mm INTEGRATED INSTALLATION R10mm R5mm 7mm min. 12 mm min.55mm 490+1mm880+1mm 514+1mm 904+1mm min. 38 mm min. 2 mm min.
ENGLISH 8.8 Protection box 21 If you use a protection box (an additional accessory), the front airflow space of 2 mm and the protective floor directly below the hob are not necessary. The protection box accessory may not be available in some countries. Please contact your local supplier. You can not use the protection box if you install the hob above an oven. 9. TECHNICAL DATA 9.1 Rating plate Model GK906TSIDO Typ 60 GCD E9 AU Induction 11.1 kW Ser.Nr. .................
www.electrolux.com 10. ENERGY EFFICIENCY 10.1 Product information according to EU 66/2014 Model identification GK906TSIDO Type of hob Built-In Hob Number of cooking areas 3 Heating technology Induction Lenght (L) and width (W) of the cooking area Left L 39.3 cm W 21.6 cm Lenght (L) and width (W) of the cooking area Middle L 39.3 cm W 21.6 cm Lenght (L) and width (W) of the cooking area Right L 39.3 cm W 21.6 cm Energy consumption of Left the cooking area (EC electric cooking) 182.
ENGLISH 23 Point of Service Morgenstrasse 131 3018 Bern Zürcherstrasse 204E 9000 St. Gallen Seetalstrasse 11 6020 Emmenbrücke Schlossstrasse 1 4133 Pratteln Comercialstrasse 19 7000 Chur Spare parts service Industriestrasse 10, 5506 Mägenwil, Tel. 0848 848 111 Specialist advice/Sale Badenerstrasse 587, 8048 Zürich, Tel.
867331934-B-082017 www.electrolux.