GME263 EN Hob User Manual
www.electrolux.com CONTENTS 1. SAFETY INFORMATION....................................................................................2 2. SAFETY INSTRUCTIONS..................................................................................4 3. PRODUCT DESCRIPTION................................................................................ 7 4. DAILY USE......................................................................................................... 7 5. HINTS AND TIPS.........................
ENGLISH 3 injuries and damages. Always keep the instructions with the appliance for future reference. 1.1 Children and vulnerable people safety • • • • • • • This appliance can be used by children aged from 8 years and above and persons with reduced physical, sensory or mental capabilities or lack of experience and knowledge if they have been given supervision or instruction concerning use of the appliance in a safe way and understand the hazards involved. Do not let children play with the appliance.
www.electrolux.com • • • If the supply cord is damaged, it must be replaced by the manufacturer, an authorized Service or similarly qualified persons in order to avoid a hazard. Where the appliance is directly connected to the power supply, an all-pole isolating switch with a contact gap is required. Complete disconnection in compliance with the conditions specified in overvoltage category III must be guaranteed. The earth cable is excluded from this.
ENGLISH • • • • • • • • • • Use the strain relief clamp on the cable. Make sure the mains cable or plug (if applicable) does not touch the hot appliance or hot cookware, when you connect the appliance to the near sockets Do not use multi-plug adapters and extension cables. Make sure not to cause damage to the mains plug (if applicable) or to the mains cable. Contact our Authorised Service Centre or an electrician to change a damaged mains cable.
www.electrolux.com • • • • • • • • • • • • • Do not let cookware to boil dry. Be careful not to let objects or cookware fall on the appliance. The surface can be damaged. Do not activate the cooking zones with empty cookware or without cookware. Do not put aluminium foil on the appliance. Use only stable cookware with the correct shape and diameter larger than the dimensions of the burners. Make sure cookware is centrally positioned on the burners.
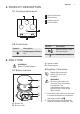
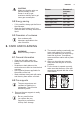
ENGLISH 7 3. PRODUCT DESCRIPTION 3.1 Cooking surface layout 1 1 2 3 4 2 Semi-rapid burner Rapid burner Auxiliary burner Control knobs 3 4 3.2 Control knob Symbol Symbol Description no gas supply / off posi‐ tion Description ignition position / maxi‐ mum gas supply minimum gas supply 4. DAILY USE C) Ignition candle D) Thermocouple WARNING! Refer to Safety chapters. 4.2 Ignition of the burner 4.1 Burner overview Always light the burner before you put on the cookware.
www.electrolux.com lets the thermocouple warm up. If not, the gas supply is interrupted. 3. Adjust the flame after it is regular. If after some tries the burner does not light, check if the crown and its cap are in correct positions. WARNING! Do not keep the control knob pushed for more than 15 seconds. If the burner does not light after 15 seconds, release the control knob, turn it into off position and try to light the burner again after minimum 1 minute.
ENGLISH CAUTION! Make sure that the pots are placed centrally on the burner in order to get maximum stability and to get lower gas consumption. 5.2 Energy saving • • If it is possible, always put the lids on the cookware. When the liquid starts to boil, turn down the flame to barely simmer the liquid. Burner Diameter of cookware (mm) Rapid 180 - 260 Semi-rapid (rear) 140 - 180 Semi-rapid (left) 140 - 260 Auxiliary 100 - 160 9 5.
www.electrolux.com • discoloration. Clean the hob with a moist cloth and non-abrasive detergent. After cleaning, wipe the hob dry with a soft cloth. To clean the enamelled parts, cap and crown, wash them with warm soapy water and dry them carefully before you put them back on. 6.4 Cleaning the spark plug This feature is obtained through a ceramic ignition candle with a metal electrode.
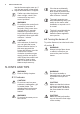
ENGLISH 7.2 If you cannot find a solution... If you cannot find a solution to the problem yourself, contact your dealer or an Authorised Service Centre. Give the data from the rating plate. Make sure, you operated the hob correctly. If not the servicing by a service technician or dealer will not be free of charge, also A 7.3 Labels supplied with the accessories bag Stick the adhesive labels as indicated below: B MOD. MOD. PROD.NO. PROD.NO. SER.NO SER.NO DATA DATA 11 during the warranty period.
www.electrolux.com they do not come in touch with mobile parts or they are not squeezed. Also be careful when the hob is put together with an oven. Make sure that the gas supply pressure of the appliance obeys the recommended values. The adjustable connection is fixed to the comprehensive ramp by means of a threaded nut G 1/2". Screw the parts without force, adjust the connection in the necessary direction and tighten everything.
ENGLISH • • • • • from natural gas G20 13 mbar or natural gas G20 20 mbar to liquid gas, fully tighten the bypass screw in. from liquid gas to natural gas G20 13 mbar, undo the bypass screw about 1/2 of a turn. from liquid gas to natural gas G20 20 mbar, undo the bypass screw about 1/4 of a turn. from natural gas G20 13 mbar to natural gas G20 20 mbar, undo the bypass screw about 1/4 of a turn. from natural gas G20 20 mbar to natural gas G20 13 mbar, tighten the bypass screw about 1/4 of a turn.
www.electrolux.com Kitchen unit with door 30 mm A A 60 mm min 20 mm (max 150 mm) B B A) supplied seal B) supplied brackets CAUTION! Install the appliance only on a worktop with flat surface. 8.8 Possibilities for insertion The panel installed below the hob must be easy to remove and let an easy access in case a technical assistance intervention is necessary.
ENGLISH Gas connection: G 1/2" Appliance class: 3 15 9.4 Gas burners for NATURAL GAS G20 13 mbar BURNER NORMAL POWER kW MINIMUM POWER kW INJECTOR MARK 1/100 mm Rapid 3,0 0,75 149 Semi-rapid 2,0 0,45 111 Auxiliary 1,0 0,33 82 9.5 Gas burners for NATURAL GAS G20 20 mbar BURNER NORMAL POWER MINIMUM POWER kW kW INJECTOR MARK 1/100 mm Rapid 3,0 0,75 119 Semi-rapid 2,0 0,45 96 Auxiliary 1,0 0,33 70 9.
867321591-B-182015 www.electrolux.