Kühlschrank integrierbar Réfrigérateur intégrables Frigorifero integrabili Refrigerator for integrated use GEBRAUCHSANWEISUNG MODE D'EMPLOI ISTRUZIONE D'USO OPERATING INSTRUCTIONS IK 225 10 RE IK 225 10 LI IK 227 10 RE IK 227 10 LI Seite 2 D Page 8 F Pagina 14 Page 20 7083 443-01 I GB
Entsorgungshinweis Sicherheits- und Warnhinweise Das ausgediente Gerät beim Abtransport am Kältekreislauf nicht beschädigen, damit das enthaltene Kältemittel (Angaben auf dem Typenschild) und das Öl nicht unkontrolliert entweichen können. • Bei Schäden am Gerät umgehend - vor dem Anschließen - beim Lieferanten rückfragen. WARNUNG Erstickungsgefahr durch Verpackungsmaterial und Folien! Kinder nicht mit Verpackungsmaterial spielen lassen. Das Verpackungsmaterial zu einer offiziellen Sammelstelle bringen.
• Lagern Sie keine explosiven Stoffe oder Sprühdosen mit brennbaren Treibmitteln, wie z. B. Propan, Butan, Pentan usw., im Gerät. Eventuell austretende Gase könnten durch elektrische Bauteile entzündet werden. Sie erkennen solche Sprühdosen an der aufgedruckten Inhaltsangabe oder einem Flammensymbol. • Keine elektrischen Geräte innerhalb des Gerätes benutzen. • Die LED-Lichtleiste im Gerät dient der Beleuchtung des Geräteinnenraumes. Sie ist nicht zur Raumbeleuchtung geeignet.
Gerät ein- und ausschalten Ausstattung • Einschalten: Ein/Austaste drücken, so dass die Temperaturanzeige leuchtet/blinkt. Glasplatte anheben, Aussparung über Auflage ziehen und höher oder tiefer einsetzen. Es empfiehlt sich das Gerät vor Inbetriebnahme innen zu reinigen (Näheres unter "Reinigen"). • Ausschalten: Ein/Austaste ca. zwei Sekunden lang drücken, so dass die Temperaturanzeige dunkel ist. Die Abstellflächen sind je nach Kühlguthöhe versetzbar.
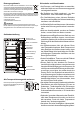
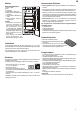
Kühlen Einordnungsbeispiel 1Butter, Käse 2Eier 3Flaschen 4Tiefkühlkost, Eiswürfel 5Backwaren, fertige Speisen, Getränke 6Fleisch, Wurst, Molkereiprodukte 7Obst, Gemüse, Salate, frische Kräuter Hinweis • Lebensmittel, die leicht Geruch oder Geschmack abgeben oder annehmen, so wie Flüssigkeiten, immer in geschlossenen Gefäßen oder abgedeckt aufbewahren; hochprozentigen Alkohol nur dicht verschlossen und stehend lagern. • Obst, Gemüse und Salate können unverpackt in den Schubfächern gelagert werden.
Abtauen Kühlteil Der Kühlraum taut automatisch ab. Das Tauwasser verdunstet durch die Kompressorwärme. Achten Sie lediglich darauf, dass das Tauwasser durch die Abflussöffnung oberhalb der Gemüseschalen unbehindert abfließen kann. Gefrierfach Im Gefrierfach bildet sich nach längerer Betriebszeit eine dickere Reif- bzw. Eisschicht. Sie erhöht den Energieverbrauch. Deshalb regelmäßig abtauen.
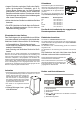
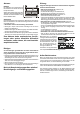
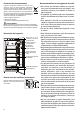
D Einbaumaße (mm) Abdeckteile 3 abheben. Befestigungsschrauben 1 am Gerätekörper nur lösen. Tür aushängen. Alle Befestigungsschrauben 1 auf Gegenseite umsetzen und kurz einschrauben. 5. Türbefestigungsschrauben 2 herausdrehen und die Scharniere diagonal umschlagen. 6. Gerätetür in vormontierte Schrauben 1 einhängen und Schrauben festziehen. 7. Mit den Abdeckteilen 3 alle freien Befestigungslöcher verschließen. 1. 2. 3. 4.
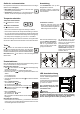
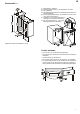
Einbau in den Küchenschrank • Je nach Griffseite das Befestigungsteil, links oder rechts, griffseitig in die Bodenschiene einschieben. Mit der Schraube 3,5 x 17 festschrauben. • Gerät in die Nische einschieben. Möbeltür montieren 1. Montagehilfen nach oben herausziehen und in die danebenliegenden Aufnahmeöffnungen gedreht einschieben. Befestigung im Küchenschrank Gerät in der Nische befestigen. - oben durch Befestigungsprofil A1, - seitlich durch Scharniere A2, - unten durch Befestigungsteil A3. 2.
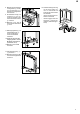
D 8. Möbeltür auf die Gerätetür/ Justagebolzen 2 einhängen, Kontermuttern 3 locker auf die Justagebolzen aufschrauben. 9. Die Möbeltür bündig und fluchtend zu den umliegenden Möbelfronten ausrichten.Kontermuttern 3 anziehen. 10. Möbeltür in der Tiefe Z ausrichten:die Schrauben 7 lösen. 16. Die Endanschlag-Federung der Tür kann justiert werden.
Protection de l'environnement L'appareil contient des matériaux de valeur et est à amener à un lieu de recyclage spécial. L'élimination d'anciens appareils est à réaliser correctement en respectant les prescriptions et lois locales en vigueur. Veiller à ne pas endommager le circuit frigorifique de l'appareil lors du transport pour empêcher au réfrigérant y contenu (indications sur la plaquette signalétique) et à l'huile de s'échapper accidentellement. • Rendre l'appareil inopérant. • Débrancher l'appareil.
• Pour éviter tout risque d'intoxication alimentaire, ne pas consommer d'aliments stockés au-delà de leur date limite de conservation. • Ne pas conserver de matières explosives ni de produits en bombe à gaz propulseur inflammable (butane, propane, pentane, etc.) dans votre appareil. En cas de fuite éventuelle, ces gaz risquent en effet de s'enflammer au contact d'éléments électriques de votre appareil.
Mise en marche et arrêt de l'appareil Il est recommandé de nettoyer l'intérieur de l'appareil avant la mise en service (voir chapitre "Nettoyage" pour de plus amples détails). • Mise en marche : appuyer sur la touche Marche-Arrêt pour que l'affichage de température s'allume/clignote. Réglage de la température . Abaisser la température Appuyer sur la touche de réglage . Les surfaces de rangement peuvent être déplacées suivant la place nécessaire.
Réfrigération Exemple de rangement 1Beurre, fromage 2Œufs 3Bouteilles 4Produits surgelés, glaçons 5Pâtisseries, plats cuisinés, boissons 6Viandes, charcuterie, produits laitiers 7Fruits, légumes, salades, herbes aromatiques fraîches Conseils • Les aliments qui ont tendance à dégager ou à absorber les odeurs ou les saveurs d'autres aliments, ainsi que les liquides, doivent toujours être conservés dans des récipients hermétiques ou recouverts d'une protection.
Dégivrage Compartiment réfrigérateur Le compartiment réfrigérateur de votre appareil est à dégivrage automatique. L'eau de dégivrage s'évapore sous l'effet de la chaleur dissipée par le compresseur. Veillez seulement à ce que l'eau de dégivrage puisse s'écouler sans entrave par l'orifice d'écoulement situé au-dessus des bacs à légumes. Compartiment congélateur Après un certain temps, une couche de givre ou de glace se forme dans le compartiment.
Dimensions d'encastrement (mm) F Inversion du sens d'ouverture de la porte Enlever les caches 3. Dévisser légèrement les vis de fixation 1 de la carrosserie. Décrocher la porte. Revisser légèrement toutes les vis de fixation 1 sur le côté opposé. 5. Dévisser les vis de fixation de la porte 2 et échanger la position des charnières en diagonale. 6. Accrocher la porte de l'appareil sur les vis prémontées 1 et serrer les vis. 7. Boucher tous les orifices de fixation restés libres à l'aide des caches 3. 1. 2.
Encastrement dans l'élément de cuisine • Selon le côté poignée choisi (droite ou gauche), engager la pièce d'accouplement dans le rail du bas côté poignée et la visser au moyen d'une vis 3,5 x 17. • Pousser l'appareil dans la niche. Fixation dans l'élément de cuisine Fixation de l'appareil dans la niche: - en haut par le profilé de fixation (A1), - sur le côté par les charnières (A2), - en bas par la pièce de fixation (A3). Montage de la porte du meuble 1.
F 8. Accrocher la porte du meuble sur la porte de l'appareil et sur les pièces d'ajustement 2, visser légèrement les contreécrous 3 sur les pièces d'ajustement. 9. Aligner la porte du meuble et la mettre d'équerre par rapport aux autres panneaux de façade. Visser les contre-écrous 3. 10. Régler le jeu de la porte du meuble en profondeur Z: Dévisser les vis 7. 16. Le ressort de butée de fin de - course de la porte peut être ajusté.
Indicazioni per lo smaltimento Indicazioni ed avvertenze per la sicurezza Durante il trasporto non danneggiare il circuito raffreddante dell'apparecchio fuori uso per evitare che il refrigerante in esso contenuto (dati riportati sulla targhetta dati) e l'olio possano fuoriuscire senza controllo. • In caso di danni all'apparecchio, informare immediatamente la ditta fornitrice, prima di procedere all'allacciamento.
• Non conservare nell'apparecchio materiali esplosivi o bombolette spray a base di sostanze infiammabili come p. es. butano, propano, pentano ecc. A contatto con le parti elettriche, le eventuali perdite di gas possono infiammarsi. Le bombolette spray contenenti tali sostanze sono riconoscibili dal simbolo della fiamma o dai dati riportati sull'etichetta del prodotto. • Non utilizzare apparecchi elettrici all'interno dell'apparecchio.
Inserire e disinserire l'apparecchio Dotazioni • Inserimento: premere il tasto di avvio/arresto, il display della temperatura si accende/lampeggia. Sollevare la lastra di vetro, sfilare i fori dagli appoggi e infilarla più in alto o più in basso. Si consiglia di pulire l'apparecchio prima di metterlo in funzione (vedi capitolo "Pulizia"). • Disinserimento: premere il tasto di avvio/arresto per circa due secondi, in modo che il display della temperatura si spegne.
Raffreddamento Esempio di sistemazione degli alimenti 1burro, formaggi 2uove 3bottiglie 4surgelati, cubetti di ghiaccio 5dolci, cibi precotti, bibite 6carni, salumi, latticini 7frutta, verdura, insalata, aromi Indicazioni • Gli alimenti che cedono, ovvero assorbono facilmente odori e sapori ed i liquidi devono sempre essere conservati in recipienti chiusi o coperti; i prodotti ad alta gradazione alcoolica devono essere conservati sempre ben chiusi ed in piedi.
Sbrinamento Vano frigorifero Il vano frigorifero si scongela automaticamente. L'acqua di sbrinamento evapora grazie al calore sviluppato dal compressore. Si deve unicamente fare attenzione che l'acqua di sbrinamento possa fluire liberamente attraverso il foro di scarico, posto sulla parete posteriore, sopra i cassetti per la verdura. Vano congelatore Nello vano congelatore, dopo un funzionamento prolungato, si forma uno spesso strato di brina o di ghiaccio che fa aumentare il consumo energetico.
Dimensioni d'incasso (mm) I Modificare l'incernieratura sportello 1. Sollevare i coperchietti 3. 2. Allentare le viti di fissaggio 1 sul corpo dell'apparecchio, sopra e sotto. 3. Sfilare lo sportello. 4. Rimettere tutte le viti di fissaggio 1 sul lato opposto, avvitare in modo lento. 5. Svitare le viti di fissaggio dello sportello 2 e montare le cerniere sul lato diagonalmente opposto. 6. Appendere il sportello sulle viti premontate 1 e stringere tutte le viti. 7.
Incasso nel mobile da cucina • Infilare il pezzo di fissaggio nella guida sul fondo dalla parte dell'impugnatura, a sinistra o a destra a seconda della posizione di quest'ultima. Fissare saldamente con la vite 3,5 x 17. • Spingere l'apparecchio nella nicchia. Fissaggio nel mobile di cucina Avvitare/fissare l'apparecchio nella nicchia • in alto attraverso la lamierina di fissaggio (A1), • di lato attraverso le cerniere (A2), • in basso attraverso il pezzo di fissaggio (A3).
I 8. Appendere lo sportello del mobile sui perni di registrazione dello sportello dell'apparecchio 2. Avvitare in modo lento i controdadi 3 sui perni di registrazione. 9. Allineare lo sportello del mobile a filo ed in linea con il fronte dei mobili adiacenti. Serrare i controdadi 3. 10. Allineare lo sportello del mobile in profondità Z: allentare le viti 7. 16. Si può regolare l'elasticità - dell'arresto di fine corsa dello sportello.
Disposal notes Safety instructions and warnings When disposing of the appliance, ensure that the refrigerant circuit is not damaged to prevent uncontrolled escape of the refrigerant it contains (data on type plate) and oil. • In the event that the appliance is damaged on delivery, contact the supplier immediately before connecting to the mains. The appliance contains reusable materials and should be disposed of properly - not simply with unsorted household refuse.
• Do not store explosives or sprays using combustible propellants such as butane, propane, pentane, etc. in the appliance. Electrical components might cause leaking gas to ignite. You may identify such sprays by the printed contents or a flame symbol. • Do not use electrical appliances inside the appliance. GB Climate rating The climate rating indicates the room temperature at which the appliance may be operated in order to achieve full refrigeration performance.
Switching the appliance on and off Equipment Switching on: Press the On / Off button so that the temperature display lights up/flashes. Lift the glass shelf, align the recess over the support and replace the shelf in a higher or lower position. You are recommended to clean the appliance before switching it on for the first time (see „Cleaning“). Switching off: Press the On / Off button for approx. two seconds so that the temperature display goes out. You can re-arrange the storage shelves as required.
Cooling Storage example 1butter, cheese 2eggs 3bottles 4frozen food, ice cubes 5baked goods, pre-cooked meals, drinks 6meat, sausage products, dairy products 7salad, fruit, vegetables, fresh herbs Note • Food which gives off or absorbs odours and flavours as well as liquids should always be stored covered or in closed containers. High- percentage alcohols should be tightly sealed and stored upright. • Fruit, vegetables and salad can be stored unpacked in the drawers.
Defrosting Refrigerator compartment The refrigerator compartment defrosts automatically. The condensate evaporates automatically through the compressor heat. Ensure that the water can flow without hindrance through the hole above the vegetable bins. Freezer compartment After a long period of operation, a layer of frost or ice can build up inside the freezer compartment. This increases energy consumption. You should therefore defrost the freezer compartment regularly.
Installation dimensions (mm) Changing over door hinges GB Lift off covers 3. Loosen attachment screws 1 on the appliance. Remove the door. Replace all attachment screws 1 on the other side and screw in a little way. 5. Unscrew door attachment screws 2 and transfer the hinges to the diagonally opposite corner. 6. Suspend the appliance door on the screws 1inserted previously and tighten the screws. 7. Cover all open attachment holes with covers 3. 1. 2. 3. 4. Max.
Installing in a kitchen unit • Slide the attachment element into the rail underneath the appliance on the handle side on the left or right, depending on which side the handle is. Screw into place with screw 3.5 x 11. • Slide the appliance into the recess. Fastening in the recess Fasten the appliance in the recess - with the attachment profile at the top A1, - with the hinges at the side A2, - with the attachment element at the bottom A3. Fitting a unit door 1.
GB 8. Suspend the unit door on the door of the appliance/ adjusting pins 2. Screw the counternuts 3 loosely onto the adjusting pins. 9. Align the unit door flush with the surrounding unit fronts. Tighten counternuts 3. 16. The opening resilience of the door can be adjusted. Adjust using the Allen key provided: - Turn clockwise for stronger resilience. Turn anticlockwise for weaker resilience (factory setting). 10. Adjust the depth of the unit door Z: loosen the screws 7. 11.