SANTO K 98840-4 i K 91240-4 i Refrigerator Operating Instructions PERFEKT IN FORM UND FUNKTION
Dear customer, Before switching on your new appliance please read these operating instructions carefully. They contain important information for safe use, for installation and for care of the appliance. Please keep these operating instructions for future reference. Pass them on to possible new owners of the appliance. These operating instructions are for use with several technically comparable models with varying accessories. Please observe the notes which apply to your model.
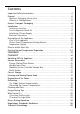
Contents Important Safety Instructions . . . . . . . . . . . . . . . . . . . . . . . . . . . . . . . . .4 Disposal . . . . . . . . . . . . . . . . . . . . . . . . . . . . . . . . . . . . . . . . . . . . . . . . . .6 Appliance Packaging Information . . . . . . . . . . . . . . . . . . . . . . . . . . . . . . . . .6 Disposal of Old Appliances . . . . . . . . . . . . . . . . . . . . . . . . . . . . . . . . . . . . . .6 Remove Transport Packaging . . . . . . . . . . . . . . . . . . . . . . . . . . . . . . . . .
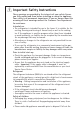
Important Safety Instructions These warnings are provided in the interests of your safety. Ensure you fully understand them before installing or using the appliance. Your safety is of paramount importance. If you are unsure about the meaning of these warnings contact the Customer Care Department for assistance. Intended use • The refrigerator is intended for use in the home. It is suitable for the cooling, freezing and storing of frozen food, as well as for making ice.
Important Safety Instructions mains plug, cut off the mains cable, break or remove spring or bolt catches, if fitted. By doing this you ensure that children cannot lock themselves in the appliance when playing (there is risk of suffocation!) or get themselves into other dangerous situations. • Often children cannot recognise the hazards present in household appliances.
Disposal Appliance Packaging Information All materials are environmentally sound! They can be disposed of or burned at an incinerating plant without danger. About the materials: The plastics can be recycled and are identified as follows: >PE< for polyethylene, e.g. the outer covering and the bags in the interior. >PS< for polystyrene foam, e.g. the pads, which are all free of chlorofluorocarbon.
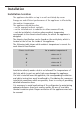
Installation Installation Location The appliance should be set up in a well ventilated, dry room. Energy use and efficient performance of the appliance is affected by the ambient temperature. The appliance should therefore – not be exposed to direct sunlight; – not be installed next to radiators or other sources of heat; – only be installed at a location whose ambient temperature corresponds to the climate classification, for which the appliance is designed.
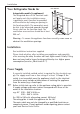
Installation Your Refrigerator Needs Air Integratable models (i-appliances) The integrated door of the furniture cabinet largely seals the installation recess. i-appliances must therefore be provided with ventilation by having an opening in the furniture plinth. The warmed air must be able to be exhausted upwards through the air shaft on the furniture back. The ventilation cross-sections should be at least 200 cm2. min. 200 cm2 50 min.
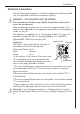
Installation Electrical Connection Any electrical work required to install this appliance should be carried out by a qualified electrician or competent person. 13 AMP WARNING – THIS APPLIANCE MUST BE EARTHED The manufacturer declines any liability should these safety measures not be observed. Before switching on, make sure the electricity supply voltage is the same as that indicated on the appliance rating plate. The rating plate is inside, on the left.
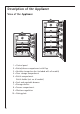
Description of the Appliance View of the Appliance 1 = Control panel 2 = Butter/cheese compartment with flap 3 = Variable storage box (not included with all models) 4 = Door storage compartment 5 = Bottle compartment Bottle holder (not on all models) 6 = Fruit and vegetable drawers 7 = Storage shelves 8 = Freezer compartment 9 = Moisture regulation 10 = Rating plate 10
Description of the Appliance Control Panel 1 2 3 4 5 6 7 8 9 Pilot light (green) ON/OFF switch Temperature setting buttons (for warmer temperatures) Temperature display Temperature setting buttons (for colder temperatures) FROSTMATIC indicator light (yellow) Push button for FROSTMATIC COOLMATIC indicator light (yellow) Push button for COOLMATIC Temperature Setting Buttons The temperature is adjusted using the „+“ (WARMER) and „-“ (COLDER) buttons. These buttons are connected to the temperature display.
ACTUAL temperature means: The temperature display indicates the temperature that is currently present in the refrigerator. The ACTUAL temperature is indicated by continuously illuminated numbers. Temperature Display The temperature display can indicate several pieces of information. • During normal operation, the temperature currently present in the refrigerator (ACTUAL temperature) is displayed. • When the temperature is being adjusted, the temperature currently set flashes (DESIRED temperature).
the current ACTUAL temperature inside the fridge. The display will change from flashing to continuous illumination. The compressor will start and then run automatically. Information! When the setting is changed, the compressor does not start immediately if automatic defrosting is currently taking place. As the storage temperature within the fridge is reached quickly you can store food immediately after switching on.
COOLMATIC COOLMATIC Button The COOLMATIC function is suited for quick cooling of large quantities of goods in the refrigerator, e.g. drinks and salads for a party. COOLMATIC function is switched on by pressing the COOLMATIC ☞1. The button. The yellow light illuminates. 2. The COOLMATIC function now ensures intensive cooling. A DESIRED temperature of +2°C is automatically selected. The COOLMATIC function is ended automatically after a period of 6 hours.
Interior Accessories Storage Shelves/Glass Shelves ☞ Various glass or plastic storage shelves and wire trays are included with your appliance - different models have different combinations. You should always slide one of the full size glass storage shelves into the lowest set of guides, above the vegetable drawers, and keep it in this position. The height of the storage shelves can be adjusted: 1. To do this pull the storage shelf forward until it can be swivelled upwards or downwards and removed. 2.
Interior Accessories Humidity Control On some models, there is an adjustable air grill in front of the shelf above the fruit and vegetable compartments. The opening in the ventilation slots can be adjusted with a slider. Slider in right position: Ventilation slots opened. Slider in left position: Ventilation slots closed. With the ventilation slots open, the stronger air circulation results in a lower air moisture content in the fruit and vegetable compartments.
Bottle Holder Some models are equipped with a bottle holder in the bottle compartment. This is used to prevent individual bottles from falling over and can be slid sideways. Correct Storage For physical reasons, there are different temperature regions in the fridge. The coldest region is on the lowest storage shelf. Warmer regions are the top storage shelf, the vegetable drawer and the storage compartments on the door.
Freezing and Storing Frozen Food • Allow warm food to cool down before freezing. The warmth will cause increased ice formation and increase the power consumption. • Please note the maximum storage times specified by the manufacturer. • Thawed foods which have not been processed further (cooked into meals) may not under any circumstances be frozen a second time. 1.
Preparation of Ice Cubes the ice cube tray 3/4 full with cold water, place it in the freezer ☞1. Fill compartment and leave to freeze. 2. To loosen the frozen cubes, either bend the ice cube tray or hold it under running water for a few seconds. Important! Never try to free an ice tray that is frozen to the freezer compartment using pointed or sharp edged objects, since you may damage the refrigerating circuit. Use the plastic scraper.
on the FROSTMATIC function a few hours before defrosting to ☞1. Switch make sure frozen food remains sufficiently frozen. 2. Remove frozen food, wrap it in several layers of newspaper and store it, covered, in a cool place. 3. Switch off the appliance and unplug it, or disconnect from the electricity supply. 4. Remove the stopper from the meltwater outlet and place a bowl underneath it to catch the meltwater.
Do not allow such substances to come into contact with appliance parts. • Do not use any abrasive cleansers. frozen food and the food from the refrigerator. Wrap frozen ☞1. Remove food in several layers of newspaper. Store it in a cool place, well covered. 2. Defrost the freezer compartment prior to cleaning (see “Defrosting” section). 3. Switch the appliance off and remove the plug from the mains, or disconnect from the electricity supply. 4.
What to do if ... Correcting Malfunctions A malfunction may be caused by only a minor fault that you can rectify yourself using the following instructions. Do not perform any other work on the appliance if the following information does not provide assistance in your specific case. Important! Repairs to refrigerators/freezers may only be performed by competent service engineers. Improper repairs can give rise to significant hazards for the user.
What to do if... Symptom Possible Cause Remedy Temperature display shows There is a function fault. a square. Please inform your local Service Force Centre. Do not open the door of the appliance again. Heavy build up of frost, possibly also on the door seal. Door seal is not air tight (possibly after reversing the door). Carefully warm the leaking sections of the door seal with a hair dryer (on a cool setting). At the same time shape the warmed door seal by hand such that it sits correctly.
Changing the Light Bulb Warning! There is a risk of electric shocks! Before changing the light bulb, switch off the appliance and unplug it, or disconnect from the mains supply. Light bulb data: 220-240 V, max. 25 W 1. To switch off, press the ON/OFF button until the mains power light goes out. 2. Unplug the mains plug. 3. To change the light bulb, undo the screw. 4. Press the light bulb cover as shown and slide it towards the rear of the appliance. 5. Change the faulty light bulb. ☞ 6.
Regulations, Standards, Guidelines This appliance was designed for household use and was manufactured in accordance with the appropriate standards. The necessary measures in accordance with appliance safety legislation regulations (GSG), accident prevention regulations for refrigeration appliances (VBG 20) and the regulations of the German Society of Electrical Engineers (VDE) were observed in the manufacture of this appliance. The refrigerant circuit has been checked for leaks.
Technical Terminology • Refrigerant Liquids that can be used to a generate a cooling effect are known as refrigerants. They have a relatively low boiling-point, indeed so low, that the warmth from the food stored in the fridge or freezer can cause the refrigerant to boil and vaporise. • Refrigerant Circuit Closed circulation system that contains the refrigerant. The refrigerant circuit comprises primarily of an evaporator, a compressor, a condenser and pipe work.
AEG Hausgeräte GmbH Postfach 1036 D-90327 Nürnberg http://www.aeg.hausgeraete.