KGS7566SX EN Hob User Manual
www.electrolux.com CONTENTS 1. SAFETY INFORMATION....................................................................................2 2. SAFETY INSTRUCTIONS..................................................................................5 3. INSTALLATION.................................................................................................. 7 4. PRODUCT DESCRIPTION.............................................................................. 11 5. DAILY USE...................................
ENGLISH 3 instructions in a safe and accessible location for future reference. 1.1 Children and vulnerable people safety • • • • • • • • This appliance can be used by children aged from 8 years and above and persons with reduced physical, sensory or mental capabilities or lack of experience and knowledge if they have been given supervision or instruction concerning the use of the appliance in a safe way and understand the hazards involved.
www.electrolux.com • • • • • • • • • • CAUTION: The cooking process has to be supervised. A short term cooking process has to be supervised continuously. WARNING: Danger of fire: Do not store items on the cooking surfaces. Metallic objects such as knives, forks, spoons and lids should not be placed on the hob surface since they can get hot. Do not use a steam cleaner to clean the appliance.
ENGLISH 5 2. SAFETY INSTRUCTIONS This appliance is suitable for the following markets: IT • 2.1 Installation • WARNING! Only a qualified person must install this appliance. WARNING! Risk of injury or damage to the appliance. • • • • • • • • • • Remove all the packaging. Do not install or use a damaged appliance. Follow the installation instructions supplied with the appliance. Keep the minimum distance from other appliances and units. Always take care when moving the appliance as it is heavy.
www.electrolux.com mains at all poles. The isolation device must have a contact opening width of minimum 3 mm. 2.3 Gas connection • • • • • All gas connections should be made by a qualified person. Before installation, make sure that the local distribution conditions (nature of the gas and gas pressure) and the adjustment of the appliance are compatible. Make sure that there is air circulation around the appliance. The information about the gas supply is on the rating plate.
ENGLISH • • • This appliance is for cooking purposes only. It must not be used for other purposes, for example room heating. Do not let acid liquids, for example vinegar, lemon juice or limescale remover, touch the hob. This can cause matt patches. Discoloration of the enamel or stainless steel has no effect on the performance of the appliance. 2.5 Care and cleaning WARNING! Do not remove the buttons, knobs or gaskets from the control panel. Water may get inside the appliance and cause damage.
www.electrolux.com parts or they are not squeezed. Also be careful when the hob is put together with an oven. Make sure that the gas supply pressure of the appliance obeys the recommended values. If the supplied pressure has not the specified value, it is necessary to assemble a proper pressure regulator in compliance with the standard UNI EN 88. For Liquid Gas (LPG) the use of pressure regulator is allowed only if they are in compliance with UNI EN 12864.
ENGLISH 9 • A 5. If you change: • from natural gas G20 20 mbar to liquid gas, fully tighten the bypass screw in. • from liquid gas to natural gas G20 20 mbar, undo the bypass screw approximately 1/4 of a turn (1/2 of a turn for Multi Crown burner). 6. Reassemble the gasket and the knob. Always use a correctly installed shockproof socket. • Make sure that there is an access to the mains plug after the installation. • Do not pull the mains cable to disconnect the appliance. Always pull the mains plug.
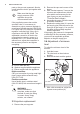
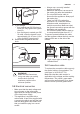
www.electrolux.com 3.7 Assembly 5. 1. 6. 2. 7. 3. A min. 170 mm min. 650 mm min. 55 mm 8. A) supplied bracket 30 mm 480+02 mm 560+02 mm 4. CAUTION! Install the appliance only on a worktop with flat surface.
ENGLISH 3.8 Installing hob under the hood If you install the hob under a hood, please see the installation instructions of the hood for the minimum distance between the appliances. Kitchen unit with oven The electrical connection of the hob and the oven must be installed separately for safety reasons and to let easy remove oven from the unit. 3.
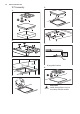
www.electrolux.com Symbol Description minimum gas supply 5. DAILY USE 5.2 Ignition of the burner WARNING! Refer to Safety chapters. Always light the burner before you put on the cookware. 5.1 Burner overview $ % & ' $ % & ' A. B. C. D. Burner cap Burner crown Ignition candle Thermocouple WARNING! Be very careful when you use open fire in the kitchen environment. The manufacturer declines any responsibility in case of the flame misuse. 1.
ENGLISH CAUTION! In the absence of electricity you can ignite the burner without electrical device; in this case approach the burner with a flame, turn the control knob counterclockwise to maximum gas supply position and push it down. Keep the control knob pushed for equal or less than 10 seconds to let the thermocouple warm up. If the burner accidentally goes out, turn the control knob to the off position and try to light the burner again after minimum 1 minute.
www.electrolux.com • Burner Diameter of cookware (mm) Semi-rapid (rear) 120 - 240 or 220 (lid) Auxiliary 80 - 180 • • • The lid protects the hob from dust when closed and collects splashes of grease when opened. Do not use it for other functions. Keep the lid clean all the time. Make sure that the hob is cold before you close the lid. Glass lids can shatter when hot. 6.3 Lid (separated kit only for predisposed hobs) 7. CARE AND CLEANING WARNING! Refer to Safety chapters. 7.
ENGLISH • • 15 otherwise, the dirt can cause damage to the hob. Take care to avoid burns. Remove when the hob is sufficiently cool: limescale rings, water rings, fat stains, shiny metallic discoloration. Clean the hob with a moist cloth and a non-abrasive detergent. After cleaning, wipe the hob dry with a soft cloth. To clean the enamelled parts, caps and crowns, wash them with warm soapy water and dry them carefully before you put them back on. 7.
www.electrolux.com Problem Possible cause Remedy The flame extinguishes im‐ Thermocouple is not heat‐ mediately after ignition. ed up sufficiently. After lightning the flame, keep the knob pushed for equal or less than 10 sec‐ onds. The flame ring is uneven. Make sure that the injector is not blocked and the burner crown is clean. Burner crown is blocked with food residues. 8.2 If you cannot find a solution... during the warranty period.
ENGLISH Depth 17 510 mm 9.2 Bypass diameters BURNER Ø BYPASS 1/100 mm Multi Crown 57 Rapid 52 Semi-rapid 35 Auxiliary 28 9.3 Other technical data TOTAL POW‐ ER: Electric supply: Gas original: G20 (2H) 20 mbar 11,65 kW Gas replace‐ ment: G30 (3+) 28-30 mbar 832 g/h G31 (3+) 37 mbar 818 g/h 220-240 V ~ 50-60 Hz Appliance cate‐ II2H3+ gory: Gas connec‐ tion: G 1/2" Appliance class: 3 9.
www.electrolux.com BURNER NORMAL POWER kW MINIMUM POWER kW INJECTOR MARK Semi-rapid 2,0 0,6 Auxiliary 1,0 0,33 NOMINAL GAS FLOW g/h G30 28-30 mbar G31 37 mbar 71 145 143 50 73 71 10. ENERGY EFFICIENCY 10.1 Product information according to EU 66/2014 Model identification KGS7566SX Type of hob Built-in hob Number of gas burners 5 Energy efficiency per gas burner (EE gas burner) Left middle - Multi Crown 52.3% Centre rear - Semi-rapid 58.7% Right rear - Rapid 59.
ENGLISH 19
867345228-D-032019 www.electrolux.