KGU64361X EN DE Hob Kochfeld User Manual Benutzerinformation Get the most out of your appliance For quick access to manuals, how-to guides, support and more through our photo registration visit electrolux.
www.electrolux.com CONTENTS 1. SAFETY INFORMATION....................................................................................2 2. SAFETY INSTRUCTIONS..................................................................................4 3. INSTALLATION.................................................................................................. 7 4. PRODUCT DESCRIPTION.............................................................................. 11 5. DAILY USE...................................
ENGLISH 3 instructions in a safe and accessible location for future reference. 1.1 Children and vulnerable people safety • • • • • • • • This appliance can be used by children aged from 8 years and above and persons with reduced physical, sensory or mental capabilities or lack of experience and knowledge if they have been given supervision or instruction concerning the use of the appliance in a safe way and understand the hazards involved.
www.electrolux.com • • • • • • • • • • NEVER try to extinguish a fire with water, but switch off the appliance and then cover flame e.g. with a lid or a fire blanket. CAUTION: The cooking process has to be supervised. A short term cooking process has to be supervised continuously. WARNING: Danger of fire: Do not store items on the cooking surfaces. Metallic objects such as knives, forks, spoons and lids should not be placed on the hob surface since they can get hot.
ENGLISH 2.1 Installation WARNING! Only a qualified person must install this appliance. WARNING! Risk of injury or damage to the appliance. • • • • • • • • • • Remove all the packaging. Do not install or use a damaged appliance. Follow the installation instructions supplied with the appliance. Keep the minimum distance from other appliances and units. Always take care when moving the appliance as it is heavy. Always use safety gloves and enclosed footwear.
www.electrolux.com • • • the gas and gas pressure) and the adjustment of the appliance are compatible. Make sure that there is air circulation around the appliance. The information about the gas supply is on the rating plate. This appliance is not connected to a device, which evacuates the products of combustion. Make sure to connect the appliance according to current installation regulations. Pay attention to requirements regarding adequate ventilation. 2.
ENGLISH • remover, touch the hob. This can cause matt patches. Discoloration of the enamel or stainless steel has no effect on the performance of the appliance. 2.5 Care and cleaning WARNING! Do not remove the buttons, knobs or gaskets from the control panel. Water may get inside the appliance and cause damage. • • • • • Clean the appliance regularly to prevent the deterioration of the surface material. Deactivate the appliance and let it cool down before you clean it.
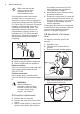
www.electrolux.com Make sure that the gas supply pressure of the appliance obeys the recommended values. If the supplied pressure has not the specified value, it is necessary to assemble a proper pressure regulator in compliance with the standard UNI EN 88. For Liquid Gas (LPG) the use of pressure regulator is allowed only if they are in compliance with UNI EN 12864. The adjustable connection is fixed to the comprehensive ramp by means of a threaded nut G 1/2".
ENGLISH • from natural gas G20 20 mbar to liquid gas, fully tighten the bypass screw in. • from liquid gas to natural gas G20 20 mbar, undo the bypass screw approximately 1/4 of a turn (1/2 of a turn for Multi Crown burner). 6. Reassemble the gasket and the knob. 9 the ground connection agrees with the standards and regulations. • Do not let the power cable to heat up to a temperature higher than 90° C.
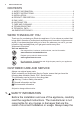
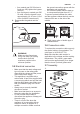
www.electrolux.com 2. 7. A) supplied seal B) supplied brackets 3. min. 100 mm min. 650 mm min. 55 mm 30 mm 480+02 mm 560+02 mm 4. CAUTION! Install the appliance only on a worktop with flat surface. 3.8 Installing hob under the hood If you install the hob under a hood, please see the installation instructions of the hood for the minimum distance between the appliances. 3.
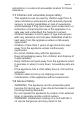
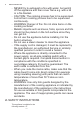
ENGLISH 4. PRODUCT DESCRIPTION 4.1 Cooking surface layout 1 2 1 2 3 4 Semi-rapid burner Multi Crown burner Auxiliary burner Control knobs 3 4 4.2 Control knob Symbol Symbol Description Description minimum gas supply no gas supply / off posi‐ tion 1-9 power levels ignition position / maxi‐ mum gas supply 5. DAILY USE WARNING! Refer to Safety chapters. $ 5.1 Burner overview % $ & ' % & ' A. B. C. D.
www.electrolux.com 5.2 Ignition of the burner Always light the burner before you put on the cookware. WARNING! Be very careful when you use open fire in the kitchen environment. The manufacturer declines any responsibility in case of the flame misuse. 1. Push the control knob down and turn it counterclockwise to the maximum gas supply position ( ). 2. Keep the control knob pushed for equal or less than 10 seconds. This lets the thermocouple warm up. If not, the gas supply is interrupted. 3.
ENGLISH CAUTION! Make sure that the bottoms of pots do not stand too close to the control knob, otherwise the flame heats the control knob up. CAUTION! Make sure that pot handles are not above the front edge of the cooktop. CAUTION! Make sure that the pots are placed centrally on the burner in order to get the maximum stability and a lower gas consumption. 6.2 Diameters of cookware Use cookware with diameters applicable to the size of burners.
www.electrolux.
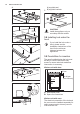
ENGLISH with disinfectants, stain or rust removers and immersion cleaners. 7.2 Pan supports The pan supports are not resistant to washing in a dishwasher. They must be washed by hand. 15 the hob. For easier cleaning, pan supports can be removed from the hob. Lift up the pan supports keeping them in horizontal position as shown in the graphic. Do not lift the pan supports at an angle, as this will put strain on the metal pins. This can cause damage to the pins and cause them to break. 1.
www.electrolux.com • • Remove when the hob is sufficiently cool: limescale rings, water rings, fat stains, shiny metallic discoloration. Clean the hob with a moist cloth and a non-abrasive detergent. After cleaning, wipe the hob dry with a soft cloth. To clean the enamelled parts, caps and crowns, wash them with warm soapy water and dry them carefully before you put them back on. electrode.
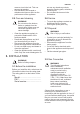
ENGLISH 8.3 Labels supplied with the accessories bag Stick the adhesive labels as indicated below: A B MOD. MOD. PROD.NO. PROD.NO. SER.NO SER.NO DATA DATA C MOD. PROD.NO. SER.NO. 0049 TYPE IP20 03 IT MADE IN ITALY A. Stick it on Guarantee Card and send this part (if applicable). B. Stick it on Guarantee Card and keep this part (if applicable). C. Stick it on instruction booklet. 9. TECHNICAL DATA 9.1 Hob dimensions Width 595 mm Depth 525 mm 9.
www.electrolux.com 9.3 Other technical data TOTAL POW‐ ER: Electric supply: Gas original: G20 (2H) 20 mbar 8,7 kW Gas replace‐ ment: G30 (3+) 28-30 mbar 629 g/h G31 (3+) 37 mbar 618 g/h 220-240 V ~ 50-60 Hz Appliance cate‐ II2H3+ gory: Gas connec‐ tion: G 1/2" Appliance class: 3 9.4 Gas burners for NATURAL GAS G20 20 mbar BURNER NORMAL POWER MINIMUM POWER kW kW INJECTOR MARK Multi Crown 4,0 1,4 146 Semi-rapid 1,85 0,6 92 Auxiliary 1,0 0,33 70 9.
ENGLISH Energy efficiency per gas burner (EE gas burner) Left rear - Semi-rapid 59.9% Right rear - Semi-rapid 59.9% Left front - Multi Crown 59.4% Right front - Auxiliary not applicable Energy efficiency for the gas hob (EE gas hob) 19 59.7% EN 30-2-1: Domestic cooking appliances burning gas - Part 2-1 : Rational use of energy - General 10.2 Energy saving • • • • • • • Before use, make sure that the burners and pan supports are assembled correctly.
www.electrolux.com INHALTSVERZEICHNIS 1. SICHERHEITSHINWEISE................................................................................20 2. SICHERHEITSANWEISUNGEN...................................................................... 23 3. MONTAGE........................................................................................................26 4. GERÄTEBESCHREIBUNG.............................................................................. 30 5. TÄGLICHER GEBRAUCH........................
DEUTSCH 21 oder Verwendung des Geräts übernimmt der Hersteller keine Haftung. Bewahren Sie die Anleitung immer an einem sicheren und zugänglichen Ort zum späteren Nachschlagen auf. 1.
www.electrolux.com • • • • • • • • • • • Sie vorsichtig und berühren Sie niemals die Heizelemente. Schalten Sie das Gerät nicht über eine externe Zeitschaltuhr oder eine separate Fernsteuerung ein. WARNUNG: Kochen mit Fett oder Öl auf einem unbeaufsichtigten Kochfeld ist gefährlich und kann zu einem Brand führen. Versuchen Sie NIEMALS, ein Feuer mit Wasser zu löschen, sondern schalten Sie das Gerät aus und decken Sie die Flamme ab, z.B. mit einem Deckel oder einer Feuerlöschdecke.
DEUTSCH • 23 über der Raumtemperatur liegen. (Verwenden Sie ansonsten Isolierschläuche). WARNUNG: Verwenden Sie nur Schutzabdeckungen des Herstellers des Kochgeräts, von ihm in der Bedienungsanleitung als geeignete und empfohlene Schutzabdeckungen oder die im Gerät enthaltene Schutzabdeckung. Es besteht Unfallgefahr durch die Verwendung ungeeigneter Schutzabdeckungen. 2. SICHERHEITSANWEISUNGEN Dieses Gerät ist für folgende Märkte geeignet: IT • 2.
www.electrolux.com • • • • • • • • • • • • Achten Sie darauf, dass das Netzkabel nicht lose hängt oder sich verheddert. Sorgen Sie dafür, dass ein Berührungsschutz installiert wird. Verwenden Sie die Zugentlastung für das Kabel. Stellen Sie beim elektrischen Anschluss des Gerätes sicher, dass das Netzkabel oder ggf. der Netzstecker nicht mit dem heißen Gerät oder heißem Kochgeschirr in Berührung kommt. Verwenden Sie keine Mehrfachsteckdosen oder Verlängerungskabel.
DEUTSCH WARNUNG! Brand- und Explosionsgefahr • • • • Erhitzte Öle und Fette können brennbare Dämpfe freisetzen. Halten Sie Flammen und erhitzte Gegenstände beim Kochen mit Fetten und Ölen von diesen fern. Die von sehr heißem Öl freigesetzten Dämpfe können eine Selbstzündung verursachen. Bereits verwendetes Öl kann Lebensmittelreste enthalten und schon bei niedrigeren Temperaturen eher einen Brand verursachen als frisches Öl.
www.electrolux.com • Sie ausschließlich Neutralreiniger. Benutzen Sie keine Scheuermittel, scheuernde Reinigungsschwämmchen, Lösungsmittel oder Metallgegenstände. Reinigen Sie die Brenner nicht im Geschirrspüler. 2.6 Service • • Wenden Sie sich zur Reparatur des Geräts an einen autorisierten Kundendienst. Verwenden Sie ausschließlich Originalersatzteile. • • • • Für Informationen zur ordnungsgemäßen Entsorgung des Geräts wenden Sie sich an die zuständige kommunale Behörde vor Ort.
DEUTSCH Achten Sie darauf, dass der Gasdruck des Geräts den empfohlenen Werten entspricht. Entspricht der gelieferte Druck nicht dem angegebenen Wert, muss ein geeigneter Druckregler gemäß der Norm UNI EN 88 installiert werden. Im Fall von Flüssiggas (LPG) ist die Verwendung eines Druckreglers nur erlaubt, wenn er der Norm UNI EN 12864 entspricht. Das verstellbare Anschlussstück wird an dem Gasanschluss mit einer G 1/2" Gewindemutter befestigt.
www.electrolux.com A 5. Bei Umstellung: • Von Erdgas G20 20 mbar auf Flüssiggas, ziehen Sie die Bypass-Schraube bis zum Anschlag an. • Von Flüssiggas auf Erdgas G20 20 mbar, drehen Sie die BypassSchraube um ca. 1/4 Umdrehung (1/2 Umdrehung für den Multikronen-Brenner zurück. 6. Bringen Sie die Dichtung und den Knopf wieder an. auf dem Typenschild angegebene Gesamtstromaufnahme ausgelegt ist. Achten Sie darauf, den Stecker in eine passende Steckdose zu stecken.
DEUTSCH 3.7 Montage 5. 1. 6. A 2. B 7. A) Mitgelieferte Dichtung B) Mitgelieferte Klammern 3. min. 100 mm min. 650 mm min. 55 mm 30 mm 480+02 mm 4. 560+02 mm VORSICHT! Montieren Sie das Gerät nur in einer flachen Arbeitsplatte. 3.8 Montage des Kochfelds unter der Dunstabzugshaube Wird das Kochfeld unter einer Abzugshaube montiert, sehen Sie in der Montageanleitung der Abzugshaube nach, welcher Mindestabstand zwischen den Geräten eingehalten werden muss.
www.electrolux.com 3.9 Einbaumöglichkeiten Die unter dem Kochfeld eingebaute Platte muss sich leicht entfernen lassen und einen einfachen Zugang ermöglichen, falls eine Reparatur erforderlich wird. Küchenschrank mit Tür A. Entfernbare Platte B. Raum für Anschlüsse Küchenschrank mit Backofen Kochfeld und Backofen müssen aus Sicherheitsgründen über separate elektrische Anschlüsse verfügen. Der Backofen muss sich leicht aus dem Küchenschrank entfernen lassen.
DEUTSCH 31 5. TÄGLICHER GEBRAUCH WARNUNG! Siehe Kapitel Sicherheitshinweise. 5.1 Brennerübersicht $ % & ' $ % & ' A. B. C. D. Brennerdeckel Brennerkrone Zündkerze Thermoelement 5.2 Zünden des Brenners Zünden Sie den Brenner stets vor dem Aufsetzen des Kochgeschirrs. WARNUNG! Seien Sie bei der Verwendung von offenem Feuer in der Küche besonders vorsichtig. Der Hersteller übernimmt bei Missachtung der Sicherheitsbestimmungen beim Umgang mit offenem Feuer keinerlei Haftung. 1.
www.electrolux.com VORSICHT! Wenn kein Strom zur Verfügung steht, können Sie den Brenner auch ohne Strom zünden. Bringen Sie eine Flamme in die Nähe des Brenners, drehen Sie den entsprechenden Knopf entgegen dem Uhrzeigersinn auf die höchste Stufe und drücken Sie ihn dann hinein. Halten Sie den Einstellknopf höchstens 10 Sekunden gedrückt, um das Thermoelement zu erwärmen.
DEUTSCH 6.2 Durchmesser des Kochgeschirrs Verwenden Sie nur Kochgeschirr mit einem Durchmesser, der der Größe der Brenner entspricht. Brenner Durchmesser des Kochge‐ schirrs (mm) Multikronen-Brenner 180 - 260 Brenner Durchmesser des Kochge‐ schirrs (mm) Normalbrenner 120 - 220 Hilfsbrenner 80 - 180 6.
www.electrolux.
DEUTSCH • • • • 35 Reinigen Sie Edelstahlteile mit Wasser und wischen Sie sie mit einem weichen Tuch trocken. Um eingebrannte Speisereste, Fett und hartnäckige Flecken zu entfernen, weichen Sie diese vor der Reinigung einige Minuten mit etwas mildem Reinigungsmittel ein. Verwenden Sie speziell für Edelstahl vorgesehene Reinigungsmittel, um die Stahloberflächen zu schützen.
www.electrolux.com • • Plastikfolie, Zucker und zuckerhaltige Lebensmittel. Anderenfalls können die Verschmutzungen das Kochfeld beschädigen. Achten Sie darauf, dass sich niemand Verbrennungen zuzieht. Folgendes kann nach ausreichender Abkühlung des Kochfelds entfernt werden: Kalkund Wasserränder, Fettspritzer und metallisch schimmernde Verfärbungen. Reinigen Sie das Kochfeld mit einem feuchten Tuch und nicht scheuernden Reinigungsmittel.
DEUTSCH 37 8.1 Was tun, wenn... Störung Mögliche Ursache Abhilfe Es wird kein Funke er‐ zeugt, wenn Sie versu‐ chen, den Funkenerzeuger zu verwenden. Das Kochfeld ist nicht oder nicht ordnungsgemäß an die Spannungsversorgung angeschlossen. Prüfen Sie, ob das Koch‐ feld ordnungsgemäß an die Spannungsversorgung angeschlossen ist. Die Sicherung ist durchge‐ brannt. Vergewissern Sie sich, dass die Sicherung der Grund für die Störung ist.
www.electrolux.com 8.3 Im Zubehörbeutel mitgelieferte Aufkleber Bringen Sie die Aufkleber, wie unten gezeigt, an: A B MOD. MOD. PROD.NO. PROD.NO. SER.NO SER.NO DATA DATA C MOD. PROD.NO. SER.NO. 0049 TYPE IP20 03 IT MADE IN ITALY A. Kleben Sie ihn auf die Garantiekarte und verschicken Sie diesen Teil (falls vorhanden). B. Kleben Sie ihn auf die Garantiekarte und behalten Sie diesen Teil (falls vorhanden). C. Kleben Sie ihn auf die Gebrauchsanleitung. 9. TECHNISCHE DATEN 9.
DEUTSCH 39 9.3 Sonstige technische Daten GESAMTLEIS‐ TUNG: Gas - Origi‐ nal: G20 (2H) 20 mbar 8,7 kW Gas - Ersatz: G30 (3+) 28-30 mbar 629 g/h G31 (3+) 37 mbar Netzanschluss: 220 - 240 V ~ 50 - 60 Hz Gerätekatego‐ rie: II2H3+ Gasanschluss: G 1/2" Geräteklasse: 3 618 g/h 9.4 Gasbrenner für ERDGAS G20 20 mbar BRENNER NORMALLEIS‐ TUNG kW MINDESTLEIS‐ TUNG kW INJEKTORMARKE Multikronen-Bren‐ ner 4,0 1,4 146 Normalbrenner 1,85 0,6 92 Hilfsbrenner 1,0 0,33 70 9.
www.electrolux.com Energieeffizienz pro Gasbrenner (EE gas burner) Hinten links - Normalbrenner 59.9% Hinten rechts – Normalbren‐ ner 59.9% Vorne links - MultikronenBrenner 59.4% Vorne rechts – Hilfsbrenner nicht zutreffend Energieeffizienz des Gaskoch‐ felds (EE gas hob) 59.7% EN 30-2-1: Haushalt-Kochgeräte für gasförmige Brennstoffe - Teil 2-1: Rationelle Energienutzung - Allgemeines 10.
DEUTSCH 41
www.electrolux.
DEUTSCH 43
867356101-A-172019 www.electrolux.