KODEC70X EN Oven User Manual
www.electrolux.com CONTENTS 1. SAFETY INFORMATION....................................................................................3 2. SAFETY INSTRUCTIONS..................................................................................4 3. PRODUCT DESCRIPTION................................................................................ 7 4. CONTROL PANEL............................................................................................. 7 5. BEFORE FIRST USE...............................
ENGLISH 1. 3 SAFETY INFORMATION Before the installation and use of the appliance, carefully read the supplied instructions. The manufacturer is not responsible for any injuries or damages that are the result of incorrect installation or usage. Always keep the instructions in a safe and accessible location for future reference. 1.
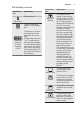
www.electrolux.com • • • • • • • Always use oven gloves to remove or put in accessories or ovenware. Before carrying out any maintenance, disconnect the appliance from the power supply. Ensure that the appliance is switched off before replacing the lamp to avoid the possibility of electric shock. Do not use a steam cleaner to clean the appliance.
ENGLISH • • • • • • • • be replaced, this must be carried out by our Authorised Service Centre. Do not let mains cables touch or come near the appliance door, especially when the door is hot. The shock protection of live and insulated parts must be fastened in such a way that it cannot be removed without tools. Connect the mains plug to the mains socket only at the end of the installation. Make sure that there is access to the mains plug after the installation.
www.electrolux.com 2.4 Care and cleaning WARNING! Risk of injury, fire, or damage to the appliance. • • • • • • • • Before maintenance, deactivate the appliance and disconnect the mains plug from the mains socket. Make sure the appliance is cold. There is the risk that the glass panels can break. Replace immediately the door glass panels when they are damaged. Contact the Authorised Service Centre. Be careful when you remove the door from the appliance.
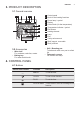
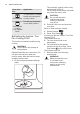
ENGLISH 7 3. PRODUCT DESCRIPTION 3.1 General overview 1 2 3 4 5 6 7 8 5 9 4 13 3 10 2 1 11 12 3.2 Accessories • • 1 2 3 4 5 6 7 8 9 10 11 12 13 • Wire shelf For cookware, cake tins, roasts. Baking tray For cakes and biscuits.
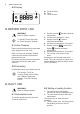
www.electrolux.com 4.2 Display A B C A. Clock functions B. Timer C. Clock function 5. BEFORE FIRST USE WARNING! Refer to Safety chapters. 1. Set the function .Set the maximum temperature. 2. Let the oven operate for 1 hour. To set the Time of day refer to "Clock functions" chapter. 3. Set the function . Set the maximum temperature. 4. Let the oven operate for 15 minutes. 5.1 Initial Cleaning Remove all accessories and removable shelf supports from the oven. Refer to "Care and cleaning" chapter.
ENGLISH 6.3 Heating functions Oven func‐ tion Application The oven is off. Off position Light True Fan Cooking / True Fan Cooking PLUS Oven func‐ tion Moist Fan Baking To turn on the lamp without a cooking func‐ tion. To bake on up to three shelf positions at the same time and to dry food. Set the temperature 20 - 40 °C lower than for Conventional Cooking. To add humidity during the cooking. To get the right colour and crispy crust during baking. To give more juiciness dur‐ ing reheating.
www.electrolux.com Oven func‐ tion Application To bake pizza. To make intensive browning and Pizza Setting a crispy bottom. To bake and roast food on one shelf position. Conventional Cooking (Top / Bottom Heat) 6.4 Setting the function: True Fan Cooking PLUS This function increases humidity during cooking. WARNING! Risk of burns and damage to the appliance. Released humidity can cause burns. Do not open the oven door when the function works. After the function stops, carefully open the door. 1.
ENGLISH 11 7. CLOCK FUNCTIONS 7.1 Clock functions table Clock function Application TIME OF DAY To set, change or check the time of day. DURATION To set how long the appliance operates. END To set when the appliance deactivates. TIME DELAY To combine DURATION and END function. MINUTE MIND‐ ER To set countdown time. This function has no effect on the operation of the appliance. You can set the MINUTE MINDER at any time, also when the appliance is off. 7.2 Setting the time.
www.electrolux.com Appliance turns on automatically later on, works for the set DURATION time and stops at the set END time. At the set time an acoustic signal sounds. 7. The appliance deactivates automatically. Press any button to stop the signal. 8. Turn the knob for the oven functions and the knob for the temperature to the off position. 7.6 Setting the MINUTE MINDER 1. Press again and again until starts to flash. 2. Press time.
ENGLISH Small indentation at the top increase safety. The indentations are also anti-tip devices. The high rim around the shelf prevents cookware from slipping of the shelf. 13 2. Put the wire shelf on the telescopic runners and carefully push them into the oven. °C 8.2 Telescopic Runners Keep the installation instructions for the telescopic runners for future use. With telescopic runners you can put in and remove the shelves more easily. CAUTION! Do not clean the telescopic runners in the dishwasher.
www.electrolux.com 10. HINTS AND TIPS WARNING! Refer to Safety chapters. The temperature and baking times in the tables are guidelines only. They depend on the recipes and the quality and quantity of the ingredients used. 10.1 Cooking recommendations The oven has five shelf positions. Count the shelf positions from the bottom of the oven floor. Your oven may bake or roast differently to the oven you had before.
ENGLISH Food Water in the cavity embossment (ml) Temperature (°C) Time (min) Plum cake, apple pie, cinnamon rolls baked in a cake mould. 100 - 150 160 - 180 30 - 60 15 Frozen ready meals Preheat the empty oven for 10 minutes. Use the second shelf position. Food Water in the cavity embossment (ml) Temperature (°C) Time (min) Pizza 150 200 - 210 10 - 20 Croissants 150 170 - 180 15 - 25 Lasagna 200 180 - 200 35 - 50 Food regeneration Use the second shelf position. Use 100 ml of water.
www.electrolux.
ENGLISH Food Top / Bottom Heat True Fan Cooking Tempera‐ ture (°C) Shelf po‐ sition Tempera‐ Shelf po‐ ture (°C) sition Biscuits / pastry stripes two levels - 140 - 150 2 and 4 Biscuits / pastry stripes three lev‐ els - Meringues 120 - one level Merin‐ gues- two levels1) 17 Time (min) Com‐ ments 35 - 40 In a baking tray 140 - 150 1, 3 and 5 35 - 45 In a baking tray 3 120 3 80 - 100 In a baking tray - - 120 2 and 4 80 - 100 In a baking tray Buns1) 190 3 190 3 12 - 20 In
www.electrolux.com Food Top / Bottom Heat True Fan Cooking Tempera‐ Shelf po‐ ture (°C) sition Tempera‐ Shelf po‐ ture (°C) sition Time (min) Com‐ ments Rye bread 190 1 180 1 30 - 45 In a bread tin Bread rolls 1) 190 2 180 2 (2 and 4) 25 - 40 6 - 8 rolls in a bak‐ ing tray Pizza1) 230 - 250 1 230 - 250 1 10 - 20 In a bak‐ ing tray or a deep pan Scones1) 200 3 190 3 10 - 20 In a bak‐ ing tray Time (min) Com‐ ments 1) Preheat the oven for 10 minutes.
ENGLISH Food Top / Bottom Heat True Fan Cooking Tempera‐ Shelf po‐ ture (°C) sition Tempera‐ Shelf po‐ ture (°C) sition Time (min) Com‐ ments 19 English 210 roast beef, rare 2 200 2 50 - 60 On a wire shelf English 210 roast beef, medium 2 200 2 60 - 70 On a wire shelf English 210 roast beef, well done 2 200 2 70 - 75 On a wire shelf Shoulder of pork 180 2 170 2 120 - 150 With rind Shin of pork 180 2 160 2 100 - 120 2 pieces Lamb 190 2 175 2 110 - 130 Leg Chick
www.electrolux.com Food Quantity Time (min) Pieces Quantity (kg) 1st side 2nd side Fillet steaks 4 0.8 12 - 15 12 - 14 Beef steaks 4 0.6 10 - 12 6-8 Sausages 8 - 12 - 15 10 - 12 Pork chops 4 0.6 12 - 16 12 - 14 Chicken (cut in 2) 2 1 30 - 35 25 - 30 Kebabs 4 - 10 - 15 10 - 12 Breast of chicken 4 0.4 12 - 15 12 - 14 Hamburger 6 0.6 20 - 30 - Fish fillet 4 0.4 12 - 14 10 - 12 Toasted sandwiches 4-6 - 5-7 - Toast 4-6 - 2-4 2-3 10.
ENGLISH Food Tempera‐ ture (°C) Time (min) Food Tempera‐ ture (°C) Time (min) Knuckle of veal, 1.5 - 2 kg 160 - 180 120 - 150 Chicken, poulard, 1 1.5 kg 190 - 210 50 - 70 Duck, 1.5 2 kg 180 - 200 80 - 100 Lamb Food Tempera‐ ture (°C) Time (min) Leg of lamb, 150 - 170 roast lamb, 1 - 1.5 kg 100 - 120 Saddle of 160 - 180 lamb, 1 - 1.5 kg 40 - 60 Goose, 3.5 - 160 - 180 5 kg 120 - 180 Turkey, 2.5 - 160 - 180 3.
www.electrolux.com Food Accessories Temperature Shelf po‐ (°C) sition Time (min) Sponge flan base flan base tin on wire shelf 180 2 35 - 45 Victoria Sand‐ wich baking dish on wire shelf 170 2 35 - 50 Poached fish, 0.3 kg baking tray or dripping pan 180 2 35 - 45 Whole fish, 0.2 baking tray or dripping kg pan 180 3 25 - 35 Fish fillet, 0.3 kg pizza pan on wire shelf 170 3 30 - 40 Poached meat, baking tray or dripping 0.25 kg pan 180 3 35 - 45 Shashlik, 0.
ENGLISH 23 10.7 Defrost Food Quantity Defrosting (kg) time (min) Further defrost‐ Comments ing time (min) Chicken 1.0 100 - 140 20 - 30 Place chicken on an up‐ turned saucer placed on a large plate. Turn half‐ way through. Meat 1.0 100 - 140 20 - 30 Turn halfway through. 0.5 90 - 120 Trout 0.15 25 - 35 10 - 15 - Strawberries 0.3 30 - 40 10 - 20 - Butter 0.25 30 - 40 10 - 15 - Cream 2 x 0.2 80 - 100 10 - 15 Cream can also be whipped when still slightly frozen in places.
www.electrolux.com Food Temperature (°C) Time (h) Apple slices 60 - 70 Pears 60 - 70 Shelf position 1 position 2 positions 6-8 3 1/4 6-9 3 1/4 10.9 Information for test institutes Tests according to IEC 60350-1. Food Function Small cake Acces‐ sories Shelf posi‐ tion Tem‐ pera‐ ture (°C) Time (min) Comments Conven‐ Baking tional Cook‐ tray ing 3 170 20 - 30 Put 20 small cakes per one baking tray.
ENGLISH 25 Food Function Acces‐ sories Shelf posi‐ tion Tem‐ pera‐ ture (°C) Time (min) Comments Fatless‐ ponge cake True Fan Cooking / Fan Cook‐ ing Wire shelf 2 and 4 160 40 - 60 Use a cake mould (26 cm di‐ ameter). Diago‐ nally shifted. Preheat the oven for 10 minutes.
www.electrolux.com Clean stubborn dirt with a special oven cleaner. Do not apply oven cleaner on the catalytic surfaces. If you have nonstick accessories, do not clean them using aggressive agents, sharp-edged objects or a dishwasher. It can cause damage to the nonstick coating. To clean the door gasket, refer to the general information about cleaning. 11.5 Removing the shelf supports / catalytic panels To clean the oven, remove the shelf supports / catalytic panels.
ENGLISH • 27 clean the inner door glass with warm water and soft cloth. 1. Set the function . 2. Set the oven temperature to 250 °C and let the oven operate for 1 hour. 3. Turn off the oven. 4. When the oven cools down, clean the cavity with a wet soft cloth. Spots or discolouration of the catalytic coating have no effect on Catalytic cleaning. 11.7 Removing and installing door The oven door has two glass panels. You can remove the oven door and the internal glass panel to clean it.
www.electrolux.com 7. Hold the door trim (B) on the top edge of the door at the two sides and push inwards to release the clip seal. When installed correctly the door trim clicks. Make sure that you install the internal glass panel in the seats correctly. A 2 B 1 8. Pull the door trim to the front to remove it. 9. Hold the door glass panel by its top edge and carefully pull it out. Make sure the glass slides out of the supports completely. 10. Clean the glass panels with water and soap.
ENGLISH 29 Problem Possible cause Remedy The oven does not heat up. The necessary settings are Make sure that the settings not set. are correct. The oven does not heat up. The fuse is blown. Make sure that the fuse is the cause of the malfunc‐ tion. If the fuse is blown again and again, contact a qualified electrician. The lamp does not oper‐ ate. The lamp is defective. Replace the lamp. Steam and condensation settle on the food and in the cavity of the oven.
www.electrolux.com 12.2 Service data If you cannot find a solution to the problem yourself, contact your dealer or an Authorised Service Centre. plate is on the front frame of the oven cavity. Do not remove the rating plate from the oven cavity. The necessary data for the service centre is on the rating plate. The rating We recommend that you write the data here: Model (MOD.) ......................................... Product number (PNC) ......................................... Serial number (S.
ENGLISH 548 70 60 31 21 min. 550 20 520 18 590 114 min. 560 589 594 198 60 595+-1 5 3 523 20 13.2 Securing the appliance to the cabinet A B 13.3 Electrical installation The manufacturer is not responsible if you do not follow the safety precautions from the Safety chapters. 13.4 Cable Cable types applicable for installation or replacement: H07 RN-F, H05 RN-F, H05 RRF, H05 VV-F, H05 V2V2-F (T90), H05 BB-F For the section of the cable refer to the total power on the rating plate.
www.electrolux.com Energy Efficiency Index 95.3 Energy efficiency class A Energy consumption with a standard load, con‐ ventional mode 0.95 kWh/cycle Energy consumption with a standard load, fanforced mode 0.81 kWh/cycle Number of cavities 1 Heat source Electricity Volume 72 l Type of oven Built-In Oven Mass 30.5 kg EN 60350-1 - Household electric cooking appliances - Part 1: Ranges, ovens, steam ovens and grills - Methods for measuring performance. 14.
ENGLISH 33
www.electrolux.
ENGLISH 35
867355513-A-482018 www.electrolux.