KOIGH00KA EN Oven User Manual
www.electrolux.com CONTENTS 1. SAFETY INFORMATION....................................................................................3 2. SAFETY INSTRUCTIONS..................................................................................4 3. INSTALLATION.................................................................................................. 7 4. PRODUCT DESCRIPTION................................................................................ 9 5. CONTROL PANEL..............................
ENGLISH 1. 3 SAFETY INFORMATION Before the installation and use of the appliance, carefully read the supplied instructions. The manufacturer is not responsible for any injuries or damage that are the result of incorrect installation or usage. Always keep the instructions in a safe and accessible location for future reference. 1.
www.electrolux.com • • • • • • • • Disconnect the appliance from the power supply before carrying out any maintenance. If the mains power supply cable is damaged, it must be replaced by the manufacturer, its Authorised Service Centre or similarly qualified persons to avoid an electrical hazard. WARNING: Ensure that the appliance is switched off before replacing the lamp to avoid the possibility of electric shock. WARNING: The appliance and its accessible parts become hot during use.
ENGLISH Height of the front of the appliance 594 mm Height of the back of the appliance 576 mm Width of the front of the appliance 595 mm Width of the back of the appliance 559 mm Depth of the appli‐ ance 569 mm Built in depth of the appliance 548 mm Depth with open door 1022 mm Ventilation opening minimum size. Opening placed on the bottom rear side 560x20 mm Mains supply cable length.
www.electrolux.com 2.3 Use WARNING! Risk of injury, burns and electric shock or explosion. • • • • • • • • • • • • This appliance is for household (indoors) use only. Do not change the specification of this appliance. Make sure that the ventilation openings are not blocked. Do not let the appliance stay unattended during operation. Deactivate the appliance after each use. Be careful when you open the appliance door while the appliance is in operation. Hot air can release.
ENGLISH 2.5 Internal lighting • • Use original spare parts only. 2.7 Disposal WARNING! Risk of electric shock. • 7 Concerning the lamp(s) inside this product and spare part lamps sold separately: These lamps are intended to withstand extreme physical conditions in household appliances, such as temperature, vibration, humidity, or are intended to signal information about the operational status of the appliance.
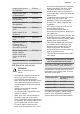
www.electrolux.com (*mm) 70 60 548 min. 550 20 520 18 590 21 114 min. 560 589 594 198 60 595+-1 5 3 20 3.
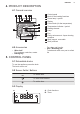
ENGLISH 9 4. PRODUCT DESCRIPTION 4.1 General overview 1 2 3 4 5 6 7 5 8 4 12 3 9 2 1 10 11 4.2 Accessories • • Wire shelf For cookware, cake tins, roasts. Baking tray Control panel Knob for the heating functions Power lamp / symbol Display Control knob (for the temperature) Temperature indicator / symbol Heating element Lamp Fan Cavity embossment - Aqua cleaning container 11 Shelf support, removable 12 Shelf positions 1 2 3 4 5 6 7 8 9 10 • For cakes and biscuits.
www.electrolux.com 6. BEFORE FIRST USE WARNING! Refer to Safety chapters. 6.1 Before first use The oven can emit an odour and smoke during preheating. Make sure that the room is ventilated. 1. Step 1 Step 2 Step 3 Set the clock Clean the oven Preheat the empty oven 1. Set the maximum tem‐ , - press to set the 1. Remove all accesso‐ ries and removable perature for the func‐ time. After approxi‐ shelf supports from the mately 5 sec., the tion: . oven. flashing stops and the Time: 1 h. 2.
ENGLISH Heating function Application Heating function This function is designed to save energy during Moist Fan cooking. When you use this function, the tempera‐ Baking ture in the cavity may differ from the set temperature. The heating power may be reduced. For more infor‐ mation refer to "Daily Use" chapter, Notes on: Moist Fan Baking. Conven‐ tional Cooking / Aqua Clean To bake and roast food on one shelf position. Refer to "Care and clean‐ ing" chapter for more infor‐ mation about: Aqua Clean.
www.electrolux.com How to set: Time of Day , - press to set the time. After approximately 5 sec., the flashing stops and the display shows the time. How to change: Time of Day Step 1 Step 2 - press repeatedly to change the time of day. - starts to flash. , - press to set the time. After approximately 5 sec., the flashing stops and the display shows the time. How to set: Duration Step 1 Set an oven function and the temperature. Step 2 - press repeatedly. Step 3 , - starts to flash.
ENGLISH 9.1 Inserting accessories A small indentation at the top increases safety. The indentations are also anti-tip 13 devices. The high rim around the shelf prevents cookware from slipping of the shelf. Wire shelf: Push the shelf between the guide bars of the shelf support and make sure that the feet point down. Baking tray / Deep pan: Push the tray between the guide bars of the shelf support.
www.electrolux.com 11. HINTS AND TIPS If you use two baking trays at the same time, keep one empty level between them. Refer to Safety chapters. 11.1 Cooking recommendations The oven has five shelf positions. Count the shelf positions from the bottom of the oven floor. Your oven may bake or roast differently to the oven you had before. The below tables provide you with the standard settings for temperature, cooking time and shelf position.
ENGLISH Conventional Cooking 15 Fan Cooking CAKES (min) (°C) (°C) Christmas 160 cake, preheat the empty oven 2 150 2 90 - 120 Cake mould, Ø 20 cm Plum cake, preheat the empty oven 175 1 160 2 50 - 60 Bread tin Biscuits 140 3 140 - 150 3 30 - 35 Baking tray Biscuits, two levels - - 140 - 150 2 and 4 35 - 40 Baking tray Biscuits, three levels 120 3 120 3 80 - 100 Baking tray Meringues 190 3 180 3 15 - 20 Baking tray Buns, pre‐ heat the empty oven 190 3 170 3
www.electrolux.com Conventional Cooking Fan Cooking BREAD AND PIZZA (min) (°C) Rye bread, 190 preheating is not needed (°C) 1 180 1 30 - 45 Bread tin Bread rolls, 6 230 - 250 1 - 8 rolls 230 - 250 1 10 - 20 Baking tray Pizza 200 3 190 3 10 - 20 Baking tray / Deep pan Scones 200 3 190 3 10 - 20 Baking tray Preheat the empty oven. Use the cake mould.
ENGLISH Conventional Cooking Fan Cooking MEAT (min) (°C) (°C) English roast beef, rare 210 2 200 2 50 - 60 English roast beef, medium 210 2 200 2 60 - 70 English roast beef, well done 210 2 200 2 70 - 75 Conventional Cooking Fan Cooking (°C) (°C) MEAT (min) Pork shoulder, with rind 180 2 170 2 120 - 150 Pork shin, 2 pieces 180 2 160 2 100 - 120 Leg of lamb 190 2 175 2 110 - 130 Whole chicken 220 2 200 2 70 - 85 Whole turkey 180 2 160 2 210 - 240 Wh
www.electrolux.com 11.3 Grill Preheat the empty oven. Use the fourth shelf position. Grill with the maximum temperature setting. GRILL (kg) (min) 1st side (min) 2nd side Fillet steaks, 4 pieces 0.8 12 - 15 12 - 14 Beef steak, 4 pieces 0.6 10 - 12 6-8 Sausages, 8 - 12 - 15 10 - 12 Pork chops, 4 pieces 0.6 12 - 16 12 - 14 Chicken, half, 2 1 30 - 35 25 - 30 Kebabs, 4 - 10 - 15 10 - 12 Chicken breast, 4 pieces 0.4 12 - 15 12 - 14 Burgers, 6 0.
ENGLISH 19 11.5 Moist Fan Baking - recommended accessories Use the dark and non-reflective tins and containers. They have better heat absorption than the light colour and reflective dishes. Ramekins Pizza pan Baking dish Dark, non-reflective 28 cm diameter Dark, non-reflective 26 cm diameter Ceramic 8 cm diame‐ ter, 5 cm height Flan base tin Dark, non-reflective 28 cm diameter 11.6 Moist Fan Baking For the best results follow suggestions listed in the table below.
www.electrolux.com (°C) (min) Fish fillet, 0.3 kg pizza pan on wire shelf 170 3 30 - 40 Poached meat, 0.25 kg baking tray or dripping 180 pan 3 35 - 45 Shashlik, 0.
ENGLISH (°C) (min) Small cakes, 20 per tray Fan Cook‐ Baking ing tray 3 150 160 20 - 35 - Small cakes, 20 per tray Fan Cook‐ Baking ing tray 2 and 4 150 160 20 - 35 - Wire shelf 2 180 70 - 90 - Apple Fan Cook‐ Wire pie, 2 ing shelf tins Ø20 cm 2 160 70 - 90 - Sponge cake, cake mould Ø26 cm Conven‐ tional Cooking Wire shelf 2 170 40 - 50 Preheat the oven for 10 mi‐ nutes.
www.electrolux.com (°C) (min) Toast, 4 Grill -6 pieces Wire shelf 4 max. 2 - 3 mi‐ Preheat the nutes first oven for 3 mi‐ side; 2 - 3 nutes. minutes second side Beef burger, 6 pieces, 0.6 kg Wire shelf and dripping pan 4 max. 20 - 30 Grill Put the wire shelf on the fourth level and the dripping pan on the third level of the oven. Turn the food halfway through the cooking time. Preheat the oven for 3 mi‐ nutes. 12. CARE AND CLEANING WARNING! Refer to Safety chapters. 12.
ENGLISH 12.2 How to remove: Shelf supports Remove the shelf supports to clean the oven. Step 1 Turn off the oven and wait until it is cold. Step 2 Pull the front of the shelf support away from the side wall. Step 3 Pull the rear end of the shelf support away from the side wall and remove it. Step 4 Install the shelf supports in the opposite sequence. 12.3 How to use: Aqua Clean This cleaning procedure uses humidity to remove remaining fat and food particles from the oven.
www.electrolux.com Step 1 Open the door fully and hold both hinges. Step 2 Lift and turn the levers fully on both hinges. Step 3 Close the oven door halfway to the first opening position. Then lift and pull forward and remove the door from its seat. Step 4 Put the door on a soft cloth on a stable surface. Step 5 Hold the door trim (B) on the top edge of the door at the two sides and push inwards to release the clip seal. Step 6 Pull the door trim to the front to remove it.
ENGLISH The screen-printing zone must face the inner side of the door. Make sure that after the installation the surface of the glass panel frame on the screen-printing zones is not rough when you touch it. When installed correctly the door trim clicks. Make sure that you install the internal glass panel in the seats correctly. 12.5 How to replace: Lamp WARNING! Risk of electric shock. The lamp can be hot.
www.electrolux.com 13.2 Service data If you cannot find a solution to the problem yourself, contact your dealer or an Authorised Service Centre. The necessary data for the service centre is on the rating plate. The rating plate is on the front frame of the oven cavity. Do not remove the rating plate from the oven cavity. We recommend that you write the data here: Model (MOD.) ......................................... Product number (PNC) ......................................... Serial number (S.N.
867360992-A-132021 www.electrolux.