LAI 1470 E EN Washer Dryer User Manual
www.electrolux.com CONTENTS 1. SAFETY INFORMATION....................................................................................3 2. SAFETY INSTRUCTIONS..................................................................................5 3. PRODUCT DESCRIPTION................................................................................ 7 4. CONTROL PANEL............................................................................................. 8 5. PROGRAMMES ....................................
ENGLISH 1. 3 SAFETY INFORMATION Before the installation and use of the appliance, carefully read the supplied instructions. The manufacturer is not responsible if an incorrect installation and use causes injuries and damages. Always keep the instructions with the appliance for future reference. 1.1 Children and vulnerable people safety WARNING! Risk of suffocation, injury or permanent disability.
www.electrolux.com • • • • • • • • • • • • • side, where the appliance door can not be fully opened. Connect the mains plug to the mains socket only at the end of the installation. Make sure that there is access to the mains plug after the installation. The ventilation openings in the base (if applicable) must not be obstructed by a carpet.
ENGLISH • • • • • • • 5 or pillows fitted with foam rubber pads should not be dried in the wash dryer. Fabric softeners, or similar products, should be used as specified by the fabric softener instructions. Remove all objects from pockets such as lighters and matches. Never stop the wash dryer before the end of the drying cycle unless all items are quickly removed and spread out so that the heat is dissipated.
www.electrolux.com • • • • • • Always use a correctly installed shockproof socket. Do not use multi-plug adapters and extension cables. Do not pull the mains cable to disconnect the appliance. Always pull the mains plug. Do not touch the mains cable or the mains plug with wet hands. Only for UK and Ireland: The appliance has a 13 amp mains plug. If it is necessary to change the fuse in the mains plug, use a 13 amp ASTA (BS 1362) fuse. This appliance complies with the E.E.C. Directives.
ENGLISH 3. PRODUCT DESCRIPTION 3.1 Appliance overview 1 2 7 8 9 3 4 5 6 1 2 3 4 5 6 7 8 9 10 Detergent dispenser Control panel Door handle Rating plate Drain pump filter Feet for the appliance level Water drain hose Mains cable Water inlet hose Feet for the appliance level 3.2 How to activate the child safety device This device prevents children or pets to be closed in the drum. 10 Turn the device clockwise, until the groove is horizontal. You cannot close the door.
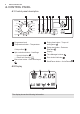
www.electrolux.com 4. CONTROL PANEL 4.
ENGLISH A 9 Soil degree indicators: Intensive Normal Daily Light Quick Quick Refresh Super Refresh When you select a programme, the display shows the indicator of the soil de‐ gree automatically proposed by the appliance. B C Child safety lock (see chapter «Settings»). Digit area: • • • • • • Duration of the selected programme After you select a programme, the duration is displayed in hours and mi‐ nutes (for example ).
www.electrolux.com D Washing programme phase indicators: Wash Rinses Drain Spin Drying By selecting the wash programme, the washing programme indicators corre‐ sponding to the various phases making up the programme are shown. After you have pressed the Avvio/Pausa button, only the indicator of the run‐ ning phase stays on. 5. PROGRAMMES 5.
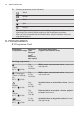
ENGLISH Programme Maximum Temperature range load Reduced load1) Maximum spin speed Centrifuga 11 Programme description (Type of load and soil level) 7 kg 1400 rpm To spin the laundry and to drain the water in the drum. All fabrics. 7 kg To drain the water in the drum. All fabrics. 7 kg 1400 rpm To rinse and spin the laundry. All fabrics. 1 kg 700 rpm Special programme for silk and mixed synthet‐ ic items.
www.electrolux.com Programme Maximum Temperature range load Reduced load1) Maximum spin speed 4 kg Programme description (Type of load and soil level) Drying programme for cotton items. Cotoni 1) If you select the Super Quick, Refresh or Super Refresh option by pressing buttons Time Manager, we recommend that you reduce the maximum load as indicated in the pro‐ grammes for cottons, synthetics and delicates. Full loading is possible however with some‐ what reduced cleaning results.
ENGLISH 13 5.2 Programmes for timed drying Dryness Level Type of fabric Load (kg) Extra Dry For towelling materi‐ als Cottons and Linen (bathrobes, bath towels, etc) Spin speed (rpm) Suggested duration (mins) 4 1400 215 - 220 3 1400 160 - 180 1.5 1400 95 - 105 4 1400 205 - 210 3 1400 150 - 170 1.
www.electrolux.com Programmes Load (kg) Wool/Handwash 30 °C Energy Water con‐ con‐ sumption sumption (litre) (kWh) 2 0.25 Approximate pro‐ gramme duration (minutes) 55 60 1) «Cotton Energy Saving programme » at 60°C with a load of 7 kg is the reference pro‐ gramme for the data entered in the energy label, in compliance with EEC 92/75 standards. 7. OPTIONS 7.1 Programme knob • This knob allows you to select a programme, to reset a programme and/or to switch the appliance on/off .
ENGLISH 7.6 Partenza Ritardata Press this button to delay the start of the programme by 30 min - 60 min - 90 min, 2 hours and then by 1 hour up to a maximum of 20 hour. Washing cycle The button indicator illuminates. The display shows the selected delay value. 7.7 Time Manager Press this button to increase or decrease the programme duration proposed by the appliance. The indicator of the chosen degree will appear on the display.
www.electrolux.com 8.2 Child Lock function With this function you can leave the appliance unattended and prevent that the children play with the control panel. • To activate/deactivate this function, press Partenza Ritardata and Tempo di asciugatura at the same time until the indicator in the display. You can activate this option in two ways: • • After you press Avvio/Pausa: the options and the programme knob are locked. Before you press Avvio/Pausa : the appliance cannot start.
ENGLISH If you set something not compatible with the selected programme, the display Detergent compartment for pre‐ wash phase. shows the message . The Avvio/Pausa button indicator flashes in red 3 times. Detergent compartment for washing phase. Compartment for liquid addi‐ tives (fabric conditioner, starch). 10.4 Bleach Alternatively the softener, it is also possible to use a bleach agent in the with the programmes compartment for white cottons. Proceed as follows: 1.
www.electrolux.com 10.7 Starting a programme without the delay start Press the Avvio/Pausa button. • The green Avvio/Pausa indicator stops flashing and stays on. • The programme starts, the door • 10.10 Opening the door While a programme is running or during the Partenza Ritardata, the appliance door is locked. The indicator CAUTION! If the temperature and level of the water in the drum are too high and the drum still rotates, you cannot open the door. illuminates locks, the indicator and stays on.
ENGLISH To drain the water: 1. Turn the programme knob to position an then select a spinning or draining programme. 2. Press the Avvio/Pausa button. If necessary, decrease the spin speed. The appliance spins and drains or only drains. 3. When the programme is completed and the indicator goes off, you can open the door. 19 4. Turn the programme knob to position to deactivate the appliance. 10.12 Stand-by Once the programme has finished, after a few minutes the energy saving system will be enabled.
www.electrolux.com When the door locked indicator off, you can open the door. goes 1. Turn the selector dial to position to deactivate the appliance. 2. Remove the laundry from the appliance. Make sure that the drum is empty. 3. Keep the door ajar, to prevent mildew and odours. 4. Close the water tap. 12. DAILY USE - WASHING & DRYING WARNING! Refer to Safety chapters. 12.1 Drying setting WARNING! Make sure that the water tap is open.
ENGLISH This inconvenient increases with technical fabrics. To prevent the fluff in your laundry, we recommend that you: • • • • To do not wash dark fabrics after you washed and dried light coloured fabrics (new sponge, wool, sweatshirt ) and the contrary. 21 To dry this type of fabrics at open air when they are washed the first time. To clean the drain filter. After the drying phase, clean the empty drum, the gasket and the door with a wet cloth. 13. HINTS AND TIPS WARNING! Refer to Safety chapters.
www.electrolux.com • • • Always start a washing programme with the maximum load of laundry. If necessary, use a stain remover when you set a programme with a low temperature. To use the correct quantity of the detergent, check the water hardness of your domestic system 13.5 Water hardness If the water hardness in your area is high or moderate, we recommend that you use a water softener for washing machines. In areas where the water hardness is soft it is not necessary to use a water softener. 13.
ENGLISH 23 14. CARE AND CLEANING 14.3 Maintenance wash WARNING! Refer to Safety chapters. With the low temperature programmes it is possible that some detergent stays in the drum. Make regularly a maintenance wash. To do this: 14.1 External cleaning Clean the appliance only with soap and warm water. Fully dry all the surfaces. • • CAUTION! Do not use alcohol, solvents or chemical products. Remove the laundry from the drum.
www.electrolux.com 3. 4. MAX 14.6 Cleaning the drain filter The pump should be inspected regularly and particularly if: • • • The appliance does not empty and/or spin. The appliance makes an unusual noise during draining due to objects such as safety pins, coins etc. blocking the pump. A problem with water draining is detected (see chapter “Troubleshooting” for more details). WARNING! Before unscrewing the pump cover, switch the appliance off and remove the mains plug from the socket.
ENGLISH 25 4. Release the emergency emptying hose, place it in the container and remove its cap cover. 5. When no more water comes out, unscrew the filter cover by turning it anti-clockwise and remove the filter. Use pliers, if necessary. Always keep a rag nearby to dry up any water spillages when removing the cover. Clean the filter under a tap, to remove any traces of fluff. 1 2 6. Remove foreign bodies and fluff from the filter seat and from the filter impeller. 7.
www.electrolux.com 14.7 Cleaning the inlet hose and the valve filter 1. 2. 1 2 3 3. 4. 45° 20° 14.8 Frost precautions If the appliance is installed in an area where the temperature can be less than 0° C, remove the remaining water from the inlet hose and the drain pump. 1. Disconnect the mains plug from the mains socket. 2. Close the water tap. 3. Place the end of the emergency emptying hose and that of the inlet hose in a bowl placed on the floor and let water flow out of the hoses. 4.
ENGLISH The water should drain by gravity into the bowl. 5. When the bowl is full, put the cap back on the emergency hose. 6. Empty the bowl. Repeat the procedure until water stops flowing out. 27 7. Clean the pump if necessary as previously described. 8. Replace the emergency emptying hose in its seat after having plugged it. 9. Screw the water inlet hose back on. 15. TROUBLESHOOTING WARNING! Refer to Safety chapters. 15.
www.electrolux.com Problem Possible cause/solution The appliance does not Make sure that the water tap is open. fill with water properly. Make sure that the pressure of the water supply is not too low. For this information, contact your local water authority. Make sure that the water tap is not clogged. Make sure that the filter of the inlet hose and the filter of the valve are not clogged. Refer to “Care and cleaning”. Make sure that the inlet hose has no kinks or bends.
ENGLISH 29 Problem Possible cause/solution You cannot open the appliance door. Make sure that the washing programme is finished. The appliance makes an unusual noise. Make sure the levelling of the appliance is correct. Refer to 'Installation'. Set the drain or the spin programme if there is water in the drum. Make sure that the packaging and/or the transit bolts are removed. Refer to 'Installation'. Add more laundry in the drum. The load may be too small. The washing results are not satisfactory.
www.electrolux.com 16. INSTALLATION 16.1 Unpacking WARNING! Remove all the packaging and the transit bolts before installing the appliance. Use the gloves. Remove the external film. If necessary, use a cutter. Remove the cardboard top. Remove the polystyrene packaging materials. Remove the internal film. Open the door. Remove the polystyrene piece from the door seal and all the items from the drum.
ENGLISH 31 Put one of the polystyrene packaging elements on the floor behind the appliance. Carefully put down the appliance with the rear side on it. Make sure not to damage the hoses. Remove the polystyrene protection from the bottom. Pull up the appliance in vertical position. 1 2 Remove the polystyrene block fitted on the door seal (if present). Pull out all items from the drum. Remove the power supply cable and the drain hose from the hose holders.
www.electrolux.com Remove the three bolts. Use the key supplied with the appliance. Pull out the plastic spacers. Put the plastic caps in the holes. You can find these caps in the user manual bag. We recommend that you keep the packaging and the transit bolts for any movements of the appliance. 16.2 Positioning and levelling • • • • Install the appliance on a flat hard floor. Make sure that air circulation around the appliance is not impeded by carpets, rugs etc.
ENGLISH • After having levelled the appliance, tighten the lock nuts. WARNING! Never place cardboard, wood or similar materials under the appliance to compensate for any unevenness in the floor. 16.3 The inlet hose • • 45 20 Connect the hose to the back appliance. Turn the inlet hose only left or right. Loose the ring nut to set it in the correct position. O O • 33 Connect the water inlet hose to the cold water tap with 3/4 thread. CAUTION! Make sure that there are no leaks from the couplings.
www.electrolux.com 16.4 Water-stop device The inlet hose has a water stop device. This device prevents water leaks in the hose because of its natural ageing. The red sector in the window «A» shows this fault. If this occur, close the water tap and contact the service centre to replace the hose. A 16.5 Water drainage There are different procedures to connect the drain hose: With the plastic hose guide: • Making an U form with the drain hose.
ENGLISH 35 Drain hose end • If the end of the drain hose looks like this (see the picture), you can push it directly into the stand pipe. Without the plastic hose guide. To a sink spigot • Refer to the illustration. Put the drain hose in the spigot and tighten it with a clip. • Make sure that the drain hose makes a loop to prevent that remaining particles go in the appliance from the sink. To a wall-pipe • Directly to a built-in drain pipe in the room wall and tighten it with a clip.
www.electrolux.com 16.7 Preparation and assembly of the door The appliance is originally pre-arranged for the assembly of a door opening from right to left. Door The dimensions of the door should be: • width 595 - 598 mm 16-22 mm X Ø 35 mm 416 mm • thickness 16-22 mm • the height X depends on the height of the adjacent furniture's base. 22±1,5 mm 14 mm 595-598 mm 1 2 Hinges To mount the hinges it is necessary to drill two holes (dia. 35 mm, depth12.
ENGLISH 37 Counter-magnet A B C WARNING! Do not remove the screw B. The appliance is prearranged for a magnetic closure of the door. To enable a correct operation of this device, it is necessary to screw the counter-magnet A (steel disk + rubber ring) in-to the inner side of the door. Its position must correspond to the magnet B on the appliance. WARNING! Do not remove the screw B.
www.electrolux.com 18. ENVIRONMENT CONCERNS Recycle the materials with the symbol . Put the packaging in applicable containers to recycle it. Help protect the environment and human health and to recycle waste of electrical and electronic appliances. Do not dispose appliances * marked with the symbol with the household waste. Return the product to your local recycling facility or contact your municipal office.
ENGLISH 39
132903251-A-252015 www.electrolux.