OEF5E50V OEF5E50X OEF5E50Z EN Oven User Manual
www.electrolux.com CONTENTS 1. SAFETY INFORMATION....................................................................................3 2. SAFETY INSTRUCTIONS..................................................................................4 3. INSTALLATION.................................................................................................. 7 4. PRODUCT DESCRIPTION................................................................................ 8 5. CONTROL PANEL..............................
ENGLISH 1. 3 SAFETY INFORMATION Before the installation and use of the appliance, carefully read the supplied instructions. The manufacturer is not responsible for any injuries or damage that are the result of incorrect installation or usage. Always keep the instructions in a safe and accessible location for future reference. 1.
www.electrolux.com • • • • • • • • • WARNING: The appliance and its accessible parts become hot during use. Care should be taken to avoid touching heating elements. Always use oven gloves to remove or put in accessories or ovenware. Before carrying out any maintenance, disconnect the appliance from the power supply. WARNING: Ensure that the appliance is switched off before replacing the lamp to avoid the possibility of electric shock.
ENGLISH • Cabinet minimum height (Cabinet un‐ der the worktop minimum height) 580 (600) mm Cabinet width 560 mm Cabinet depth 550 (550) mm Height of the front of the appliance 589 mm Height of the back of the appliance 570 mm Width of the front of the appliance 594 mm Width of the back of the appliance 558 mm Depth of the appli‐ ance 561 mm Built in depth of the appliance 540 mm Depth with open door 1007 mm Ventilation opening minimum size.
www.electrolux.com Total power (W) Section of the ca‐ ble (mm²) maximum 3680 3 x 1.5 The earth cord (green / yellow cable) must be 2 cm longer than phase and neutral cables (blue and brown cables). 2.3 Use WARNING! Risk of injury, burns and electric shock or explosion. • • • • • • • • • • • • This appliance is for household use only. Do not change the specification of this appliance. Make sure that the ventilation openings are not blocked.
ENGLISH • • • Clean the appliance with a moist soft cloth. Only use neutral detergents. Do not use any abrasive products, abrasive cleaning pads, solvents or metal objects. If you use an oven spray, follow the safety instruction on it's packaging. Do not clean the catalytic enamel (if applicable) with any kind of detergent. 2.5 Internal lighting • • • • WARNING! Risk of injury or suffocation. • The type of light bulb or halogen lamp used for this appliance is for household appliances only.
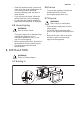
www.electrolux.com 540 21 min. 550 580 20 558 19 114 min. 560 589 570 9 594 3.2 Securing the oven to the cabinet 4. PRODUCT DESCRIPTION 4.1 General overview 1 2 3 4 5 6 7 12 4 8 9 3 10 2 1 11 1 2 3 4 5 6 7 8 9 10 11 12 4.2 Accessories • • • Wire shelf For cookware, cake tins, roasts.
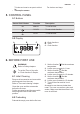
ENGLISH • To bake and roast or as pan to collect fat. Telescopic runners 9 For shelves and trays. 5. CONTROL PANEL 5.1 Buttons Sensor field / Button Function Description MINUS To set the time. CLOCK To set a clock function. PLUS To set the time. 5.2 Display A B C A. Clock functions B. Timer C. Clock function 6. BEFORE FIRST USE WARNING! Refer to Safety chapters. 1. Set the function .Set the maximum temperature. 2. Let the oven operate for 1 hour.
www.electrolux.com 7. DAILY USE WARNING! Refer to Safety chapters. Oven func‐ tion 7.1 Retractable knobs To use the appliance press the knob. The knob comes out. 7.2 Setting a heating function Moist Fan Baking 1. Turn the knob for the heating functions to select a heating function. 2. Turn the control knob to select the temperature. The lamp turns on when the oven operates. 3. To turn off the oven, turn the knob for the heating functions to the off position. 7.
ENGLISH Oven func‐ tion 11 Application To bake and roast food on one shelf position. Conventional Cooking (Top / Bottom Heat) 8. CLOCK FUNCTIONS 8.1 Clock functions table Clock function Application TIME OF DAY To set, change or check the time of day. DURATION To set how long the appliance operates. END To set when the appliance deactivates. TIME DELAY To combine DURATION and END function. MINUTE MIND‐ ER To set countdown time. This function has no effect on the operation of the appliance.
www.electrolux.com 4. When the time ends, flashes and an acoustic signal sounds. The appliance deactivates automatically. 5. Press any button to stop the signal. 6. Turn the knob for the oven functions and the knob for the temperature to the off position. 8.5 Setting the TIME DELAY 1. Set an oven function and temperature. again and again until 2. Press starts to flash. 3. Press or DURATION. 4. Press . 5. Press END. or to set the time for to set the time for 6. Press to confirm.
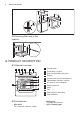
ENGLISH 13 Wire shelf and baking tray / deep pan together: Push the baking tray / deep pan between the guide bars of the shelf support and the wire shelf on the guide bars above. 2. The stop element (A) which is at one end of the telescopic runner must point up. A Small indentation at the top increase safety. The indentations are also anti-tip devices. The high rim around the shelf prevents cookware from slipping of the shelf. 9.
www.electrolux.com °C 2. Put the wire shelf on the telescopic runners and carefully push them into the oven. °C Make sure you push back the telescopic runners fully in the oven before you close the oven door. 10. ADDITIONAL FUNCTIONS 10.1 Cooling fan When the oven operates, the cooling fan turns on automatically to keep the surfaces of the oven cool. If you turn off the oven, the cooling fan can continue to operate until the oven cools down. dangerous overheating.
ENGLISH 15 If you use two baking trays at the same time, keep one empty level between them. deep pan. To prevent the smoke condensation, add water each time after it dries up. Cooking meat and fish Use a deep pan for very fatty food to prevent the oven from stains that can be permanent. Cooking times Cooking times depend on the type of food, its consistency, and volume. Leave the meat for approximately 15 minutes before carving so that the juice does not seep out.
www.electrolux.
ENGLISH 17 Bread and pizza Food Top / Bottom Heat True Fan Cooking Time (min) Com‐ ments Tempera‐ Shelf po‐ ture (°C) sition Tempera‐ Shelf po‐ ture (°C) sition 190 1 190 1 60 - 70 1-2 pieces, 500 gr one piece Rye bread 190 1 180 1 30 - 45 In a bread tin Bread rolls, pre‐ heat the empty oven 190 2 180 2 (1 and 3) 25 - 40 6 - 8 rolls in a bak‐ ing tray Pizza, pre‐ 190 heat the empty oven 1 190 1 20 - 30 On a deep pan Scones, preheat the empty oven 3 190 2 10 - 20 In a b
www.electrolux.
ENGLISH Food Top / Bottom Heat True Fan Cooking Time (min) Com‐ ments Tempera‐ Shelf po‐ ture (°C) sition Tempera‐ Shelf po‐ ture (°C) sition Goose 175 1 160 1 150 - 200 Whole on a deep pan Rabbit 190 2 175 2 60 - 80 Cut in pieces Hare 190 2 175 2 150 - 200 Cut in pieces Pheasant 190 2 175 2 90 - 120 Whole on a deep pan Time (min) Com‐ ments 19 Fish Food Top / Bottom Heat True Fan Cooking Tempera‐ Shelf po‐ ture (°C) sition Tempera‐ Shelf po‐ ture (°C) sition 190
www.electrolux.com Food Quantity Time (min) Pieces (kg) 1st side 2nd side Fish fillet 4 0.4 12 - 14 10 - 12 Toasted sandwiches 4-6 - 5-7 - Toast 4-6 - 2-4 2-3 11.4 Turbo Grilling Use the third shelf position. Set the maximum temperature of 200 °C. Food Quantity Time (min) Pieces (kg) 1st side 2nd side Rolled joints (turkey) 1 1 30 - 40 20 - 30 Chicken (cut in two) 2 1 25 - 30 20 - 30 Chicken drum‐ sticks 6 - 15 - 20 15 - 18 Quail 4 0.
ENGLISH 21 Food Quantity Defrosting (kg) time (min) Further defrost‐ Comments ing time (min) Cream 2 x 0.2 80 - 100 10 - 15 Cream can also be whipped when still slightly frozen in places. Gateau 1.4 60 60 - 11.6 Moist Fan Baking recommended accessories absorption than the light colour and reflective dishes. Use the dark and non-reflective tins and containers.
www.electrolux.com (°C) (min) Soufflè, 6 pieces ceramic ramekins on wire shelf 200 3 30 - 40 Sponge flan base flan base tin on wire shelf 170 2 20 - 30 Victoria sand‐ wich baking dish on wire shelf 170 2 35 - 45 Poached fish, 0.3 kg baking tray or dripping 180 pan 3 35 - 45 Whole fish, 0.2 kg baking tray or dripping 180 pan 3 35 - 45 Fish fillet, 0.3 kg pizza pan on wire shelf 180 3 35 - 45 Poached meat, 0.25 kg baking tray or dripping 200 pan 3 40 - 50 Shashlik, 0.
ENGLISH 23 11.8 Information for test institutes Tests according to IEC 60350-1. Food Function Acces‐ sories Shelf posi‐ tion Tem‐ pera‐ ture (°C) Time (min) Comments Small cake Conven‐ tional Cooking Baking tray 3 170 20 - 30 Put 20 small cakes per one baking tray. Apple pie Conven‐ tional Cooking Wire shelf 1 170 80 - 120 Use 2 tins (20 cm diameter), di‐ agonally shifted. Sponge cake Conven‐ tional Cooking Wire shelf 2 170 35 - 45 Use a cake mould (26 cm di‐ ameter).
www.electrolux.com 12.1 Notes on cleaning Clean the front of the oven with a soft cloth with warm water and a mild cleaning agent. To clean metal surfaces, use a dedicated cleaning agent. Cleaning Agents Clean stubborn stains with a special oven cleaner. Clean the oven cavity after each use. Fat accumulation or other food remains may cause fire. The risk is higher for the grill pan. Everyday Use Moisture can condense in the oven or on the door glass panels.
ENGLISH The retaining pins on the telescopic runners must point to the front. 12.5 Removing and installing door The oven door has two glass panels. You can remove the oven door and the internal glass panel to clean it. Read the whole "Removing and installing door" instruction before you remove the glass panels. The oven door may close if you try to remove the internal glass panel before you remove the oven door. CAUTION! Do not use the oven without the internal glass panel. 3.
www.electrolux.com 8. Clean the glass panels with water and soap. Dry the glass panels carefully. Do not clean the glass panels in the dishwasher. When the cleaning is completed, install the glass panel and the oven door. When installed correctly the door trim clicks. Make sure that you install the internal glass panel in the seats correctly. 6. Turn the two fasteners by 90° and remove them from their seats. A 12.6 Replacing the lamp 90° WARNING! Risk of electric shock. The lamp can be hot. 7.
ENGLISH 27 Problem Possible cause The oven does not heat up. The necessary settings are Make sure that the settings not set. are correct. The oven does not heat up. The fuse is blown. Make sure that the fuse is the cause of the malfunc‐ tion. If the fuse is blown again and again, contact a qualified electrician. The lamp does not oper‐ ate. The lamp is defective. Replace the lamp. Steam and condensation settle on the food and in the cavity of the oven.
www.electrolux.com Use metal cookware to improve energy saving. When possible, do not preheat the oven before cooking. Keep breaks between baking as short as possible when you prepare a few dishes at one time. Cooking with fan When possible, use the cooking functions with fan to save energy. Residual heat When the cooking duration is longer than 30 minutes, reduce the oven temperature to minimum 3 - 10 minutes before the end of cooking. The residual heat inside the oven will continue to cook.
ENGLISH 29
www.electrolux.
ENGLISH 31
867348993-B-142019 www.electrolux.