OEE5H71Z OKE5H71X EN Oven User Manual Get the most out of your appliance For quick access to manuals, how-to guides, support and more through our photo registration visit electrolux.
www.electrolux.com CONTENTS 1. SAFETY INFORMATION....................................................................................3 2. SAFETY INSTRUCTIONS..................................................................................4 3. PRODUCT DESCRIPTION................................................................................ 7 4. CONTROL PANEL............................................................................................. 8 5. BEFORE FIRST USE...............................
ENGLISH 1. 3 SAFETY INFORMATION Before the installation and use of the appliance, carefully read the supplied instructions. The manufacturer is not responsible for any injuries or damage that are the result of incorrect installation or usage. Always keep the instructions in a safe and accessible location for future reference. 1.
www.electrolux.com • • • • • • • • • • • WARNING: The appliance and its accessible parts become hot during use. Care should be taken to avoid touching heating elements. Always use oven gloves to remove or put in accessories or ovenware. Before carrying out any maintenance, disconnect the appliance from the power supply. WARNING: Ensure that the appliance is switched off before replacing the lamp to avoid the possibility of electric shock.
ENGLISH • • • Install the appliance in a safe and suitable place that meets installation requirements. The appliance is equipped with an electric cooling system. It must be operated with the electric power supply. The built-in unit must meet the stability requirements of DIN 68930.
www.electrolux.com • • • • • • • • Deactivate the appliance after each use. Be careful when you open the appliance door while the appliance is in operation. Hot air can release. Do not operate the appliance with wet hands or when it has contact with water. Do not apply pressure on the open door. Do not use the appliance as a work surface or as a storage surface. Open the appliance door carefully. The use of ingredients with alcohol can cause a mixture of alcohol and air.
ENGLISH 2.6 Service • • • • To repair the appliance contact the Authorised Service Centre. Use original spare parts only. • 2.7 Disposal WARNING! Risk of injury or suffocation. Disconnect the appliance from the mains supply. Cut off the mains electrical cable close to the appliance and dispose of it. Remove the door catch to prevent children or pets from becoming trapped in the appliance. 3. PRODUCT DESCRIPTION 3.
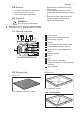
www.electrolux.com To bake and roast or as a pan to collect fat. Telescopic runners Food Sensor To insert and remove trays and wireshelf more easily. To measure the temperature inside food. 4. CONTROL PANEL 4.1 Buttons Sensor field / Button Function Description MINUS To set the time. CLOCK To set a clock function. PLUS To set the time. 4.2 Display A B C D A. B. C. D. Clock functions Timer Clock function Core temperature sensor indicator 5.
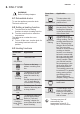
ENGLISH 9 6. DAILY USE WARNING! Refer to Safety chapters. Oven func‐ tion 6.1 Retractable knobs To use the appliance press the knob. The knob comes out. Bottom Heat 6.2 Setting a heating function 1. Turn the knob for the heating functions to select a heating function. 2. Turn the control knob to select the temperature. The lamp turns on when the oven operates. 3. To turn off the oven, turn the knob for the heating functions to the off position. Defrost Moist Fan Baking 6.
www.electrolux.com 7. CLOCK FUNCTIONS 7.1 Clock functions table Clock function Application TIME OF DAY To set, change or check the time of day. DURATION To set how long the appliance operates. END To set when the appliance deactivates. TIME DELAY To combine DURATION and END function. MINUTE MIND‐ ER To set countdown time. This function has no effect on the operation of the appliance. You can set the MINUTE MINDER at any time, also when the appliance is off. 7.2 Setting the time.
ENGLISH Appliance turns on automatically later on, works for the set DURATION time and stops at the set END time. At the set time an acoustic signal sounds. 7. The appliance deactivates automatically. Press any button to stop the signal. 8. Turn the knob for the oven functions and the knob for the temperature to the off position. 7.6 Setting the MINUTE MINDER 1. Press again and again until starts to flash. 2. Press time.
www.electrolux.com Food category: casserole 1. Place half of the ingredients in a baking dish. 2. Insert the tip of the core temperature sensor exactly in the centre of the casserole. The core temperature sensor should be stabilized in one place during baking. Use a solid ingredient to achieve that. Use the rim of the baking dish to support the silicone handle of the core temperature sensor. The tip of the core temperature sensor should not touch the bottom of a baking dish.
ENGLISH 6. Set the oven function and the oven temperature. When the dish is at the set core temperature, an acoustic signal sounds for 2 minutes. Press any button to stop the signal. 7. Deactivate the appliance. 8. Remove the plug of the core temperature sensor from the socket. Remove the dish from the appliance. If the dish is not cooked to your satisfaction, do the above steps again and set a higher core temperature. You can change the temperature at any time during the cooking.
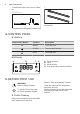
www.electrolux.com Put the wire shelf on the telescopic runners so that the feet point downwards. Wire shelf and deep pan together: Place the wire shelf and the deep pan together on the telescopic runner. The high rim around the wire shelf is a special device to prevent the cookware from slipping. Deep pan: Put the deep pan on the telescopic runners. 9. ADDITIONAL FUNCTIONS 9.1 Cooling fan When the oven operates, the cooling fan turns on automatically to keep the surfaces of the oven cool.
ENGLISH 10.2 Baking 15 Use the lower temperature the first time. need to change the temperature setting if an unequal browning occurs. The differences equalize during baking. You can extend baking times by 10 – 15 minutes if you bake cakes on more than one shelf position. Trays in the oven can twist during baking. When the trays become cold again, the distortions disappear. Cakes and pastries at different heights do not always brown equally. There is no 10.
www.electrolux.com BAKING IN TINS (°C) (min) Flan base sponge cake mixture True Fan Cooking 150 - 170 20 - 25 2 Ring cake / Brioche True Fan Cooking 150 - 160 50 - 70 1 Madeira cake / Fruit cakes True Fan Cooking 140 - 160 70 - 90 1 Cheesecake Conventional Cook‐ ing 170 - 190 60 - 90 1 CAKES / PASTRIES / BREADS CAKES / PASTRIES / BREADS Use the third shelf position. Use the function: True Fan Cooking.
ENGLISH CAKES / PASTRIES / BREADS Preheat the empty oven. Use the function: Conventional Cooking. Use a baking tray. (°C) (min) Swiss roll 180 - 200 10 - 20 3 Rye bread: first: 230 20 1 then: 160 - 180 30 - 60 Buttered almond cake / Sugar cakes 190 - 210 20 - 30 3 Cream puffs / Eclairs 190 - 210 20 - 35 3 Plaited bread / Bread crown 170 - 190 30 - 40 3 Fruit flans (made of 170 yeast dough / sponge cake mix‐ ture), use a deep pan 35 - 55 3 Yeast cakes with delicate toppings (e.g.
www.electrolux.com BISCUITS Use the third shelf position.
ENGLISH 10.6 Multilevel Baking 19 Use the baking trays. Use the function: True Fan Cooking.
www.electrolux.com 10.8 Roasting Baste meat joints with their own juice several times during roasting. Use the first shelf position. BEEF Pot roast (°C) (min) 1 - 1.
ENGLISH VEAL Use the function: Turbo Grilling. (kg) (°C) (min) Roast veal 1 160 - 180 90 - 120 Veal knuckle 1.5 - 2 160 - 180 120 - 150 (kg) (°C) (min) Lamb leg / Roast lamb 1 - 1.5 150 - 170 100 - 120 Lamb saddle 1 - 1.5 160 - 180 40 - 60 LAMB Use the function: Turbo Grilling. GAME Use the function: Conventional Cooking. (kg) (°C) (min) Saddle / Hare leg, preheat the empty oven up to 1 230 30 - 40 Venison saddle 1.5 - 2 210 - 220 35 - 40 Haunch of venison 1.
www.electrolux.com POULTRY Use the function: Turbo Grilling. (kg) (°C) (min) Poultry, portions 0.2 - 0.25 each 200 - 220 30 - 50 Chicken, half 0.4 - 0.5 each 190 - 210 35 - 50 Chicken, poulard 1 - 1.5 190 - 210 50 - 70 Duck 1.5 - 2 180 - 200 80 - 100 Goose 3.5 - 5 160 - 180 120 - 180 Turkey 2.5 - 3.5 160 - 180 120 - 150 Turkey 4-6 140 - 160 150 - 240 FISH (STEAMED) Use the function: Conventional Cooking. Whole fish (kg) (°C) (min) 1 - 1.5 210 - 220 40 - 60 10.
ENGLISH PIZZA PIZZA Preheat the empty oven before cooking. Use the first shelf position. Vegetable pie 23 (°C) (min) 160 - 180 50 - 60 Use the second shelf position. (°C) PIZZA Preheat the empty oven before cooking. Use the second shelf position. (min) Unleavened 230 - 250 bread 10 - 20 Puff pastry flan 160 - 180 45 - 55 Flammku‐ chen 230 - 250 12 - 20 Pierogi 180 - 200 15 - 25 10.10 Grill (min) Preheat the empty oven before cooking.
www.electrolux.com GRILL Use the function: Grill (°C) (min) 1st side (min) 2nd side Veal loin 210 - 230 30 - 40 30 - 40 2 Lamb saddle 210 - 230 25 - 35 20 - 25 3 Whole fish, 0.5 kg - 1 kg 210 - 230 15 - 30 15 - 30 3/4 10.11 Frozen Foods DEFROSTING Use the function: True Fan Cooking.
ENGLISH 10.12 Defrost Remove the food packaging and put the food on a plate. 25 the oven cavity. Put the food in a deep dish and set it on top of the plate inside the oven. Remove the shelf supports if necessary. Do not cover the food, as this can extend the defrost time. For large portions of food place an upturned empty plate on the bottom of Use the first shelf position. (kg) (min) Defrosting time (min) Further de‐ frosting time Chicken 1 100 - 140 20 - 30 Turn halfway through.
www.electrolux.com 10.14 Dehydrating - True Fan Cooking SOFT FRUIT Cover trays with grease proof paper or baking parchment. (min) Cooking time until simmering Strawberries / Blue‐ 35 - 45 berries / Raspber‐ ries / Ripe goose‐ berries For a better result, stop the oven halfway through the drying time, open the door and let it cool down for one night to complete the drying. For 1 tray use the third shelf position. For 2 trays use the first and fourth shelf position.
ENGLISH 10.
www.electrolux.
ENGLISH 10.16 Moist Fan Baking recommended accessories 29 absorption than the light colour and reflective dishes. Use the dark and non-reflective tins and containers. They have better heat Ramekins Pizza pan Baking dish Dark, non-reflective 28 cm diameter Dark, non-reflective 26 cm diameter Ceramic 8 cm diame‐ ter, 5 cm height Flan base tin Dark, non-reflective 28 cm diameter 10.17 Moist Fan Baking For the best results follow suggestions listed in the table below.
www.electrolux.com (°C) (min) Shashlik, 0.
ENGLISH 31 BAKING ON ONE LEVEL. Biscuits Use the third shelf position. (°C) (min) 140 25 - 40 Short bread / Pastry Conventional Cooking 160 strips, preheat the empty oven 20 - 30 Small cakes, 20 per tray, True Fan Cooking preheat the empty oven 150 20 - 35 Small cakes, 20 per tray, Conventional Cooking 170 preheat the empty oven 20 - 30 Short bread / Pastry strips True Fan Cooking MULTILEVEL BAKING.
www.electrolux.com GRILL Preheat the empty oven for 5 minutes. Grill with the maximum temperature setting. (min) Toast Grill 1-3 5 Beef steak, turn halfway through Grill 24 - 30 4 11. CARE AND CLEANING WARNING! Refer to Safety chapters. 11.1 Notes on cleaning Clean the front of the oven with a soft cloth with warm water and a mild cleaning agent. To clean metal surfaces, use a dedicated cleaning agent. Cleaning Agents Clean stubborn stains with a special oven cleaner.
ENGLISH 11.2 Removing the shelf supports To clean the oven, remove the shelf supports. CAUTION! Be careful when you remove the shelf supports. 1. Pull the front of the shelf support away from the side wall. WARNING! Make sure that the oven is cold before you touch it. There is a risk of burns. 11.4 Oven ceiling WARNING! Deactivate the appliance before you remove the heating element. Make sure that the appliance is cold. There is a risk of burns. Remove the shelf supports. 2.
www.electrolux.com number of glass panels is different for different models. WARNING! The door is heavy. 1. Open the door fully. 2. Fully press the clamping levers (A) on the two door hinges. A A 3. Close the oven door to the first opening position (approximately 70° angle). 4. Hold the door with one hand on each side and pull it away from the oven at an upwards angle. 5. Put the door with the outer side down on a soft cloth on a stable surface. 6.
ENGLISH 35 12. TROUBLESHOOTING WARNING! Refer to Safety chapters. 12.1 What to do if... Problem Possible cause Remedy The oven does not heat up. The oven is deactivated. Activate the oven. The oven does not heat up. The clock is not set. Set the clock. The oven does not heat up. The necessary settings are Make sure that the settings not set. are correct. The oven does not heat up. The fuse is blown. Make sure that the fuse is the cause of the malfunc‐ tion.
www.electrolux.com 13. TECHNICAL DATA 13.1 Technical data Voltage 230 V Frequency 50 Hz 14. ENERGY EFFICIENCY 14.1 Energy saving The oven contains features which help you save energy during everyday cooking. Make sure that the oven door is closed properly when the oven operates. Do not open the door too often during cooking. Keep the door gasket clean and make sure it is well fixed in its position. Use metal cookware to improve energy saving. When possible, do not preheat the oven before cooking.
ENGLISH 37
www.electrolux.
ENGLISH 39
867352652-C-172019 www.electrolux.