OMEC6330X EN Oven User Manual
www.electrolux.com CONTENTS 1. SAFETY INFORMATION....................................................................................3 2. SAFETY INSTRUCTIONS..................................................................................4 3. PRODUCT DESCRIPTION................................................................................ 7 4. CONTROL PANEL............................................................................................. 8 5. BEFORE FIRST USE...............................
ENGLISH 1. 3 SAFETY INFORMATION Before the installation and use of the appliance, carefully read the supplied instructions. The manufacturer is not responsible for any injuries or damages that are the result of incorrect installation or usage. Always keep the instructions in a safe and accessible location for future reference. 1.
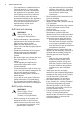
www.electrolux.com • • • • • • • • Always use oven gloves to remove or put in accessories or ovenware. Before carrying out any maintenance, disconnect the appliance from the power supply. Ensure that the appliance is switched off before replacing the lamp to avoid the possibility of electric shock. Do not use a steam cleaner to clean the appliance.
ENGLISH • • • • • • • • • • • • electrical ratings of the mains power supply. Always use a correctly installed shockproof socket. Do not use multi-plug adapters and extension cables. Make sure not to cause damage to the mains plug and to the mains cable. Should the mains cable need to be replaced, this must be carried out by our Authorised Service Centre. Do not let mains cables touch or come near the appliance door, especially when the door is hot.
www.electrolux.com • If the appliance is installed behind a furniture panel (e.g. a door) make sure the door is never closed when the appliance is in operation. Heat and moisture can build up behind a closed furniture panel and cause subsequent damage to the appliance, the housing unit or the floor. Do not close the furniture panel until the appliance has cooled down completely after use. 2.4 Care and cleaning WARNING! Risk of injury, fire, or damage to the appliance.
ENGLISH 2.6 Internal lighting • 2.8 Disposal WARNING! Risk of electric shock. • The type of light bulb or halogen lamp used for this appliance is for household appliances only. Do not use it for house lighting. Before replacing the lamp, disconnect the appliance from the power supply. Only use lamps with the same specifications. • • WARNING! Risk of injury or suffocation. • • • 2.7 Service • 7 Use original spare parts only. Disconnect the appliance from the mains supply.
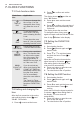
www.electrolux.com 4. CONTROL PANEL 4.1 Buttons Sensor field / Button Function Description MINUS To set the time. CLOCK To set a clock function. PLUS To set the time. 4.2 Display A G F E B D C A. Timer / Temperature B. Heat-up and residual heat indicator C. Core temperature sensor (selected models only) D. Door lock (selected models only) E. Hours / minutes F. Demo mode (selected models only) G. Clock functions 5. BEFORE FIRST USE WARNING! Refer to Safety chapters.
ENGLISH 6.2 Heating functions Oven func‐ tion Application The oven is off. Off position True Fan Cooking To bake on up to three shelf positions at the same time and to dry food. Set the temperature 20 - 40 °C lower than for Conventional Cooking. To bake and roast food on one shelf position. Conventional Cooking (Top / Bottom Heat) Moist Fan Baking Oven func‐ tion Fast Grilling 9 Application To grill flat food in large quantities and to toast bread.
www.electrolux.com 7. CLOCK FUNCTIONS 7.1 Clock functions table Clock func‐ tion 2. Press to confirm and set the minutes. Application The display shows hour. "00" flashes. TIME OF DAY To show or change the time of day. You can change the time of day only when the oven is off. 3. Press or minutes. DURATION To set how long the oven works. Use only when a heating function is set. END To set when the oven turns off. Use only when a heating function is set.
ENGLISH 7.5 Setting the TIME DELAY function 1. Set a heating function. again and again until 2. Press starts to flash. 3. Press or to set the minutes and then the hours for DURATION time. Press to confirm. The display shows flashing . 4. Press or to set the hours and then the minutes for END time. Press to confirm. The display shows and the set temperature. Oven turns on automatically later on, works for the set DURATION time and stops at the set END time.
www.electrolux.com CAUTION! Do not clean the telescopic runners in the dishwasher. Do not lubricate the telescopic runners. 1. Pull out the right and left hand telescopic runners. Wire shelf and baking tray / deep pan together: °C Push the baking tray / deep pan between the guide bars of the shelf support and the wire shelf on the guide bars above. 2. Put the wire shelf on the telescopic runners and carefully push them into the oven. Small indentation at the top increase safety.
ENGLISH The symbol appear on the display also when Pyrolysis function operates. To turn off the Child Lock, repeat step 2. 9.2 Residual heat indicator When you turn off the oven, the display if shows the residual heat indicator the temperature in the oven is more than 40 °C. 9.3 Automatic Switch-off For safety reasons the oven turns off automatically after some time if a heating function operates and you do not change the oven temperature. Temperature (°C) Switch-off time (h) 30 - 115 12.
www.electrolux.com Leave the meat for approximately 15 minutes before carving so that the juice does not seep out. To prevent too much smoke in the oven during roasting, add some water into the deep pan. To prevent the smoke condensation, add water each time after it dries up. Initially, monitor the performance when you cook. Find the best settings (heat setting, cooking time, etc.) for your cookware, recipes and quantities when you use this appliance.
ENGLISH Food Top / Bottom Heat True Fan Cooking Time (min) Com‐ ments Tempera‐ Shelf po‐ ture (°C) sition Tempera‐ Shelf po‐ ture (°C) sition Small cakes one lev‐ el1) 170 3 150 - 160 3 20 - 30 In a bak‐ ing tray Small cakes two lev‐ els1) - - 140 - 150 2 and 4 25 - 35 In a bak‐ ing tray Small cakes three lev‐ els1) - - 140 - 150 1, 3 and 5 30 - 45 In a bak‐ ing tray Biscuits / pastry stripes one level 140 3 140 - 150 3 25 - 45 In a bak‐ ing tray Biscuits / pastry stripes
www.electrolux.com Food Top / Bottom Heat True Fan Cooking Time (min) Com‐ ments Tempera‐ Shelf po‐ ture (°C) sition Tempera‐ Shelf po‐ ture (°C) sition Rich fruit cake 160 1 150 2 110 - 120 In a 24 cm cake mould Victoria sand‐ wich1) 170 1 160 2 (left and right) 30 - 50 In a 20 cm cake mould Time (min) Com‐ ments 1) Preheat the oven for 10 minutes.
ENGLISH Food Top / Bottom Heat True Fan Cooking Tempera‐ Shelf po‐ ture (°C) sition Tempera‐ Shelf po‐ ture (°C) sition Time (min) Com‐ ments 17 Lasagne1) 180 - 190 2 180 - 190 2 25 - 40 In a mould Cannello‐ ni1) 2 180 - 190 2 25 - 40 In a mould Time (min) Com‐ ments 180 - 190 1) Preheat the oven for 10 minutes.
www.electrolux.
ENGLISH To calculate the roasting time multiple the time given in the table below by the centimetres of thickness of the fillet. Food Tempera‐ ture (°C) Saddle of 160 - 180 lamb, 1 - 1.5 kg Time (min) 40 - 60 Food Tempera‐ ture (°C) Time (min) Roast beef or fillet, rare 190 - 200 5-6 Roast beef or fillet, me‐ dium 180 - 190 6-8 Food Tempera‐ ture (°C) Time (min) Roast beef or fillet, well done 170 - 180 8 - 10 Poultry por‐ tions, 0.2 0.25 kg each 200 - 220 30 - 50 Chicken, half, 0.
www.electrolux.com Food Accessories Temperature Shelf po‐ (°C) sition Time (min) Sweet rolls, 12 pieces baking tray or dripping pan 180 2 20 - 30 Rolls, 9 pieces baking tray or dripping pan 180 2 30 - 40 Pizza, frozen, 0.
ENGLISH Food Accessories Temperature Shelf po‐ (°C) sition Time (min) Poached vege‐ baking tray or dripping tables, 0.4 kg pan 180 3 35 - 45 Vegetarian omelette pizza pan on wire shelf 200 3 25 - 30 Vegetables, mediterrean 0.7 kg baking tray or dripping pan 180 4 25 - 30 21 10.6 Defrost Food Quantity (kg) Defrosting time (min) Further defrost‐ Comments ing time (min) Chicken 1.0 100 - 140 20 - 30 Place the chicken on an upturned saucer placed on a large plate.
www.electrolux.com Food Temperature (°C) Time (h) Vegetables for sour 60 - 70 5-6 Mushrooms 50 - 60 6-8 Herbs 40 - 50 2-3 Fruit Food Temperature (°C) Time (h) Plums 60 - 70 Apricots Apple slices Pears Shelf position 1 position 2 positions 8 - 10 3 1/4 60 - 70 8 - 10 3 1/4 60 - 70 6-8 3 1/4 60 - 70 6-9 3 1/4 10.8 Information for test institutes Tests according to IEC 60350-1.
ENGLISH Food Function Fatless‐ ponge cake Shelf posi‐ tion Tem‐ pera‐ ture (°C) Time (min) Comments Conven‐ Wire tional Cook‐ shelf ing 2 170 40 - 50 Use a cake mould (26 cm di‐ ameter). Preheat the oven for 10 minutes. Fatless‐ ponge cake True Fan Cooking / Fan Cook‐ ing Wire shelf 2 160 40 - 50 Use a cake mould (26 cm di‐ ameter). Preheat the oven for 10 minutes.
www.electrolux.com 11. CARE AND CLEANING WARNING! Refer to Safety chapters. 11.1 Notes on cleaning Clean the front of the oven with a soft cloth with warm water and a mild cleaning agent. CAUTION! Be careful when you remove the shelf supports. 1. Pull the front of the shelf support away from the side wall. To clean metal surfaces, use a dedicated cleaning agent. Clean the oven interior after each use. Fat accumulation or other food remains may result in a fire. The risk is higher for the grill pan.
ENGLISH CAUTION! If there are other appliances installed in the same cabinet, do not use them when the Pyrolysis function operates. It can cause damage to the appliance. The cleaning reminder goes out: • after the end of the pyrolysis. • 1. Wipe out the cavity with a wet, soft cloth. 2. Clean the inner side of the door with hot water, so that the residues do not burn from the hot air. 3. Set the Pyrolysis function. Refer to "Daily use" chapter, "Oven Functions". 4.
www.electrolux.com Make sure the glass slides out of the supports completely. 3. Close the oven door halfway to the first opening position. Then lift and pull forward and remove the door from its seat. 8. Clean the glass panels with water and soap. Dry the glass panels carefully. Do not clean the glass panels in the dishwasher. When the cleaning is completed, install the glass panels and the oven door. Make sure that you put the glass panels (A and B) back in the correct sequence.
ENGLISH 11.7 Replacing the lamp WARNING! Risk of electric shock. The lamp can be hot. 1. Turn off the oven. Wait until the oven is cooled down. 2. Disconnect the oven from the mains. 3. Put a cloth on the bottom of the cavity. 27 The back lamp 1. Turn the lamp glass cover to remove it. 2. Clean the glass cover. 3. Replace the lamp with a suitable 300 °C heat-resistant lamp. 4. Install the glass cover. CAUTION! Always hold the halogen lamp with a cloth to prevent grease residue from burning on the lamp.
www.electrolux.com Problem Possible cause Remedy It takes too long to cook The temperature is too low Adjust the temperature if the dishes or they cook too or too high. necessary. Follow the ad‐ quickly. vice in the user manual. Steam and condensation settle on the food and in the cavity of the oven. You left the dish in the oven for too long. The display shows "C3". The cleaning function does Fully close the door. not operate. You did not fully close the door, or the door lock is defective.
ENGLISH 12.2 Service data If you cannot find a solution to the problem yourself, contact your dealer or an Authorised Service Centre. 29 plate is on the front frame of the oven cavity. Do not remove the rating plate from the oven cavity. The necessary data for the service centre is on the rating plate. The rating We recommend that you write the data here: Model (MOD.) ......................................... Product number (PNC) ......................................... Serial number (S.N.) ......
www.electrolux.com 548 70 60 21 min. 550 20 520 114 18 590 min. 560 589 594 198 60 595+-1 5 3 523 20 13.2 Securing the appliance to the cabinet A B 13.3 Electrical installation The manufacturer is not responsible if you do not follow the safety precautions from the Safety chapters. 13.4 Cable Cable types applicable for installation or replacement: H07 RN-F, H05 RN-F, H05 RRF, H05 VV-F, H05 V2V2-F (T90), H05 BB-F For the section of the cable refer to the total power on the rating plate.
ENGLISH 31 15. ENERGY EFFICIENCY 15.1 Energy saving Cooking with fan When possible, use the cooking functions with fan to save energy. The oven contains features which help you save energy during everyday cooking. General hints Make sure that the oven door is closed properly when the oven operates. Do not open the door too often during cooking. Keep the door gasket clean and make sure it is well fixed in its position. Use metal dishes to improve energy saving.
867348129-A-222018 www.electrolux.