PBA640 PN640 PR640 PS640 PT640 EN Hob User Manual
www.electrolux.com CONTENTS 1. SAFETY INFORMATION....................................................................................2 2. SAFETY INSTRUCTIONS..................................................................................4 3. PRODUCT DESCRIPTION................................................................................ 7 4. DAILY USE......................................................................................................... 7 5. HINTS AND TIPS.........................
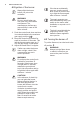
ENGLISH 3 injuries and damages. Always keep the instructions with the appliance for future reference. 1.1 Children and vulnerable people safety • • • • • • • This appliance can be used by children aged from 8 years and above and persons with reduced physical, sensory or mental capabilities or lack of experience and knowledge if they have been given supervision or instruction concerning use of the appliance in a safe way and understand the hazards involved. Do not let children play with the appliance.
www.electrolux.com • • • • Remove any spillage from the lid before opening. Let the hob surface cool down before closing the lid. If the supply cord is damaged, it must be replaced by the manufacturer, an authorized Service or similarly qualified persons in order to avoid a hazard. Where the appliance is directly connected to the power supply, an all-pole isolating switch with a contact gap is required.
ENGLISH • • • • • • • • • • • • • electricity mains cable or plug (if applicable) can make the terminal become too hot. Use the correct electricity mains cable. Do not let the electricity mains cable tangle. Make sure that a shock protection is installed. Use the strain relief clamp on the cable. Make sure the mains cable or plug (if applicable) does not touch the hot appliance or hot cookware, when you connect the appliance to the near sockets Do not use multi-plug adapters and extension cables.
www.electrolux.com • temperature than oil used for the first time. Do not put flammable products or items that are wet with flammable products in, near or on the appliance. WARNING! Risk of damage to the appliance. • • • • • • • • • • • • • Do not keep hot cookware on the control panel. Do not let cookware to boil dry. Be careful not to let objects or cookware fall on the appliance. The surface can be damaged. Do not activate the cooking zones with empty cookware or without cookware.
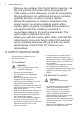
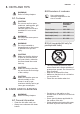
ENGLISH 3. PRODUCT DESCRIPTION 3.1 Cooking surface layout 1 1 2 3 4 2 4 3 3.2 Control knob Symbol Semi-rapid burner Triple Crown burner Auxiliary burner Control knobs Symbol Description Description ignition position / maxi‐ mum gas supply no gas supply / off posi‐ tion minimum gas supply 4. DAILY USE WARNING! Refer to Safety chapters. A 4.
www.electrolux.com 4.2 Ignition of the burner Always light the burner before you put on the cookware. WARNING! Be very careful when you use open fire in the kitchen environment. The manufacturer declines any responsibility in case of the flame misuse. 1. Push the control knob down and turn it counterclockwise to the maximum gas supply position ( ). 2. Keep the control knob pushed for equal or less than 10 seconds. This lets the thermocouple warm up. If not, the gas supply is interrupted. 3.
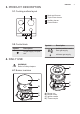
ENGLISH 9 5. HINTS AND TIPS WARNING! Refer to Safety chapters. 5.2 Diameters of cookware Use cookware with diameters applicable to the size of burners. 5.1 Cookware CAUTION! Do not use cast iron pans, potstones, earthenware, grill or toaster plates. The stainless steel can become tarnished if it is too much heated. WARNING! Do not put the same pan on two burners. WARNING! Do not put unstable or damaged pots on the burner to prevent from spill and injury.
www.electrolux.com 6.3 Cleaning the hob 6.2 Pan supports The pan supports are not resistant to washing in a dishwasher. They must be washed by hand. • • 1. Remove the pan supports to easily clean the hob. Be very careful when you replace the pan supports to prevent the hob top from damage. 2. The enamel coating occasionally can have rough edges, so be careful when you wash the pan supports by hand and dry them. If necessary, remove stubborn stains with a paste cleaner. 3.
ENGLISH Problem 11 Possible cause Remedy The fuse is released. Make sure that the fuse is the cause of the malfunc‐ tion. If the fuse releases again and again, contact a qualified electrician. Burner cap and crown are placed incorrectly. Place the burner cap and crown correctly. The flame extinguishes im‐ Thermocouple is not heat‐ mediately after ignition. ed up sufficiently. After lightning the flame, keep the knob pushed for equal or less than 10 sec‐ onds. The flame ring is uneven.
www.electrolux.com 7.3 Labels supplied with the accessories bag Stick the adhesive labels as indicated below: A B MOD. MOD. PROD.NO. PROD.NO. SER.NO SER.NO DATA DATA C MOD. PROD.NO. SER.NO. 0049 TYPE IP20 03 IT MADE IN ITALY A) Stick it on Guarantee Card and send this part (if applicable). B) Stick it on Guarantee Card and keep this part (if applicable). C) Stick it on instruction booklet. 8. INSTALLATION WARNING! Refer to Safety chapters. 8.
ENGLISH they do not come in touch with mobile parts or they are not squeezed. Also be careful when the hob is put together with an oven. Make sure that the gas supply pressure of the appliance obeys the recommended values. If the supplied pressure has not the specified value, it is necessary to assemble a proper pressure regulator in compliance with the standard UNI EN 88. For Liquid Gas (LPG) the use of pressure regulator is allowed only if they are in compliance with UNI EN 12864.
www.electrolux.com WARNING! Make sure the flame does not go out when you quickly turn the knob from the maximum position to the minimum position. 8.5 Electrical connection • Make sure that the rated voltage and type of power on the rating plate agree with the voltage and the power of the local power supply. • This appliance is supplied with a mains cable. It has to be supplied with a correct plug which can hold the load that the rating plate rates.
ENGLISH 8.8 Installing hob under the hood 15 access in case a technical assistance intervention is necessary. Kitchen unit with door A) Removable panel B) Space for connections If you install the hob under a hood, please see the installation instructions of the hood for the minimum distance between the appliances. Kitchen unit with oven The electrical connection of the hob and the oven must be installed separately for safety reasons and to let easy remove oven from the unit. 8.
www.electrolux.com BURNER NORMAL POWER kW MINIMUM POWER kW INJECTOR MARK 1/100 mm Semi-rapid 2,0 0,45 96 Auxiliary 1,0 0,33 70 9.5 Gas burners for LPG G30/G31 28-30/37 mbar BURNER NORMAL POWER kW MINIMUM POWER kW INJECTOR NOMINAL GAS FLOW g/h MARK 1/100 G30 28-30 G31 37 mbar mm mbar Triple Crown 4,0 1,4 98 291 286 Semi-rapid 2,0 0,45 71 145 143 Auxiliary 1,0 0,33 50 73 71 10. ENERGY EFFICIENCY 10.
ENGLISH Energy efficiency per gas burner (EE gas burner) Left rear - Semi-rapid 56.5% Right rear - Triple Crown 54.3% Left front - Semi-rapid 56.5% Right front - Auxiliary not applicable Energy efficiency for the gas hob (EE gas hob) 17 55.8% EN 30-2-1: Domestic cooking appliances burning gas - Part 2-1 : Rational use of energy - General 10.2 Energy saving • • • • • • • Before use, make sure that the burners and pan supports are assembled correctly.
www.electrolux.
ENGLISH 19
867315457-A-472014 www.electrolux.