PVF750 EN Hob User Manual
www.electrolux.com CONTENTS 1. SAFETY INFORMATION....................................................................................2 2. SAFETY INSTRUCTIONS..................................................................................5 3. PRODUCT DESCRIPTION................................................................................ 8 4. DAILY USE......................................................................................................... 8 5. HINTS AND TIPS.........................
ENGLISH 3 instructions in a safe and accessible location for future reference. 1.1 Children and vulnerable people safety • • • • • • • This appliance can be used by children aged 8 years and above and by persons with reduced capabilities provided that they have been given instruction and/or supervision regarding the safe use of the appliance and understand the potential hazards involved. Do not let children play with the appliance. Keep all packaging away from children and dispose of it appropriately.
www.electrolux.com • • • • • • • • • • CAUTION: The cooking process has to be supervised. A short term cooking process has to be supervised continuously. WARNING: Danger of fire: Do not store items on the cooking surfaces. Metallic objects such as knives, forks, spoons and lids should not be placed on the hob surface since they can get hot. Do not use a steam cleaner to clean the appliance.
ENGLISH 5 appliance. The use of inappropriate guards can cause accidents. 2. SAFETY INSTRUCTIONS This appliance is suitable for the following markets: IT 2.2 Electrical Connection WARNING! Risk of fire and electrical shock. 2.1 Installation WARNING! Only a qualified person must install this appliance. Prior to installation, ensure that the local distribution conditions (nature of the gas and gas pressure) and the adjustment of the appliance are compatible.
www.electrolux.com • • • • access to the mains plug after the installation. If the mains socket is loose, do not connect the mains plug. Do not pull the mains cable to disconnect the appliance. Always pull the mains plug. Use only correct isolation devices: line protecting cut-outs, fuses (screw type fuses removed from the holder), earth leakage trips and contactors. The electrical installation must have an isolation device which lets you disconnect the appliance from the mains at all poles.
ENGLISH • • • • • • • • • • Use only stable cookware with the correct shape and diameter larger than the dimensions of the burners. Make sure cookware is centrally positioned on the burners. Make sure the flame does not go out when you quickly turn the knob from the maximum to the minimum position. Use only the accessories supplied with the appliance. Do not install a flame diffuser on the burner. The use of a gas cooking appliance results in the production of heat and moisture.
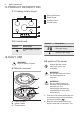
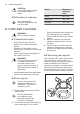
www.electrolux.com 3. PRODUCT DESCRIPTION 3.1 Cooking surface layout 1 2 3 4 1 Semi-rapid burner Rapid burner Auxiliary burner Control knobs 2 3 4 3.2 Control knob Symbol Symbol Description no gas supply / off posi‐ tion Description ignition position / maxi‐ mum gas supply minimum gas supply 4. DAILY USE 4.2 Ignition of the burner WARNING! Refer to Safety chapters. Always light the burner before you put on the cookware. 4.
ENGLISH lets the thermocouple warm up. If not, the gas supply is interrupted. 3. Adjust the flame after it is regular. If after some tries the burner does not light, check if the flame spreader is in correct position. WARNING! Do not keep the control knob pushed for more than 15 seconds. If the burner does not light after 15 seconds, release the control knob, turn it into off position and try to light the burner again after minimum 1 minute.
www.electrolux.com CAUTION! Liquids spilt during cooking can cause the glass to break. 5.2 Diameters of cookware Use cookware with diameters applicable to the size of burners. Burner Diameter of cookware (mm) Rapid 180 - 260 Semi-rapid 140 - 220 Auxiliary 100 - 160 6. CARE AND CLEANING WARNING! Refer to Safety chapters. 6.1 General information • • • • Clean the hob after each use. Always use cookware with clean bottom.
ENGLISH 11 Light stains: Wash the flame spreader with warm water and soap and dry it with a soft cloth. Medium stains: Use the dishwasher. Place the flame spreader on the bottom rack in a flat position, with the top side up. Heavy stains: Clean the flame spreader with warm water and soap, then wash it in the dishwasher. If the stain is still present wash the top of the flame spreader with a grill cleaner and run through the dishwasher again. 6.
www.electrolux.com Problem Possible cause Remedy The fuse is blown. Make sure that the fuse is the cause of the malfunc‐ tion. If the fuse is blown again and again, contact a qualified electrician. Flame spreader is placed incorrectly. Place the flame spreader correctly. The flame extinguishes im‐ Thermocouple is not heat‐ mediately after ignition. ed up sufficiently. The flame ring is uneven. Flame spreader holes are Make sure that the flame blocked with food residues. spreader is clean. 7.
ENGLISH 13 8. INSTALLATION WARNING! Refer to Safety chapters. the necessary direction and tighten everything. 8.1 Before the installation Before you install the hob, write down the information bellow from the rating plate. The rating plate is on the bottom of the hob. Model ....................................... PNC ......................................... Serial number ........................... 8.
www.electrolux.com • extension cable, an adapter or a multiple connection. Make sure that the ground connection agrees with the standards and regulations. Do not let the power cable to heat up to a temperature higher than 90° C. To prevent contact between the cable and the appliance below the hob use the clamps which are on the side of the cabinet. 2. 3. A min. 150 mm min. 650 mm min. 55 mm 30 mm 490 mm 4. A. Rigid copper pipe or flexible pipe of stainless steel 8.
ENGLISH 15 Kitchen unit with door A 30 mm min 20 mm (max 150 mm) A 60 mm B B 7. A) supplied seal B) assembled bracket A. Removable panel B. Space for connections Kitchen unit with drawer 30 mm min 20 mm (max 150 mm) A CAUTION! Install the appliance only on a worktop with flat surface. 8.6 Installing hob under the hood If you install the hob under a hood, please see the installation instructions of the hood for the minimum distance between the appliances. 8.
www.electrolux.com 9. TECHNICAL DATA 9.1 Hob dimensions Width 740 mm Depth 510 mm 9.2 Bypass diameters BURNER Ø BYPASS 1/100 mm Rapid 56 Semi-rapid 42 Auxiliary 34 9.3 Other technical data TOTAL POWER: Gas original: G20 (2H) 20 mbar = 8,9 kW Electric supply: 220-240 V ~ 50/60 Hz Appliance category: I2H Gas connection: G 1/2" Appliance class: 3 9.
ENGLISH Energy efficiency per gas burner (EE gas burner) Left rear - Semi-rapid 58.3% Right rear - Semi-rapid 57.8% Centre middle - Rapid 57.7% Left front - Auxiliary not applicable Right front - Auxiliary not applicable Energy efficiency for the gas hob (EE gas hob) 17 57.9% EN 30-2-1: Domestic cooking appliances burning gas - Part 2-1 : Rational use of energy - General 10.2 Energy saving • • • • • • • Before use, make sure that the burners and pan supports are assembled correctly.
www.electrolux.
ENGLISH 19
867329536-B-372016 www.electrolux.