Gasoline Generators Operator Manual
Thank you for purchasing our generator. We want to help you get the best results from your new generator and to operate it safely. This manual contains the information on how to do that; please read it carefully. This owner’s manual describes the operation and maintenance of the Generator. All information in this publication is based on the latest product information available at the time of printing. We reserve the right to make changes at any time without notice and without incurring any obligation.
Table Of Contents SAFETY SAFETY LABEL LOCATION SAFETY INFORMATION Component Identification CONTROLS Engine Switch Recoil Starter Fuel Valve Choke Rod Circuit Breaker Ground Terminal Oil Alert System Pilot Lamp DC Terminals DC Circuit Protector GENERATOR USE Connections to a Building’s Electrical System Generator Ground Circuit AC Applications AC Operation DC Operation Disconnecting the battery cables PREOPERATION CHECK Engine Oil Fuel Recommendation STARTING THE ENGINE STOPPING THE ENGINE MAINTENANCE Mainte
SAFETY LABEL LOCATION These labels warn you of potential hazards that can cause serious injury. Read them carefully. If a label comes off or becomes hard to read, contact your generator dealer for a replacement.
WARNING! Do not connect to a building’s electrical system unless a transfer switch has been installed by a qualified electrician. Using a generator or an electrical appliance in wet conditions such as rain or snow or near a pool or sprinkler system, or when your hands are wet, could result in electrocution. Keep the generator dry. SAFETY INFORMATION Generators are designed to give safe and dependable service if operated according to instructions.
• Do not smoke or allow flames or sparks where the generator is refueled or where gasoline is stored. • Refuel in a well-ventilated area with the engine stopped. Fuel vapors are extremely flammable and may ignite after the engine has started. Make sure that any spilled fuel has been wiped up before starting the generator. Record the engine serial number for your future reference. (See Page 6) Refer to this serial number when ordering parts, and when making technical requests.
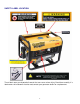
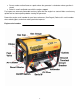
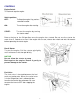
CONTROLS Engine Switch To start and stop the engine. Switch position: OFF: To Stop the engine. Key can be removed/inserted. ON: To run the engine after starting. START: To start the engine by turning the starter motor. Return the key to the ON position once the engine has started. Do not use the starter for more than 5 seconds at a time. If the engine fails to start, release the switch and wait 10 seconds before operating the starter again. Recoil Starter To start the engine.
Choke Rod The choke is used to provide an enriched fuel mixture when cold starting. The choke can be opened by moving the choke rod to the right and closed by moving the choke rod to the left. Circuit Breaker The circuit breaker will automatically switch OFF if there is a short circuit or a significant overload of the generator at the receptacle.
battery must be connected to the generator DC terminals with the proper polarity (battery positive to generator red terminal and battery negative to the generator black terminal.) DC Circuit Protector The DC circuit protector automatically shuts off the DC battery charging circuit when the generator is overloaded, when there is a problem with the battery or the connections between the battery and the generator are improper.
exceed that of the generator, Never exceed the maximum power rating of the generator. Power levels between rated and maximum may be used for no more than 5 minutes. NOTICE Substantial overloading will open the circuit breaker. Exceeding the time limit for maximum power operation or slightly overloading the generator may not switch the circuit breaker OFF, but will shorten the service life of the generator. Limit operation requiring maximum power to 5 minutes. Maximum power is: See specifications.
Disconnecting the battery cables: 1. Stop the engine. 2. Disconnect the negative (-) battery cable from the generator negative (-) terminal. 3. Disconnect the other end of the negative (-) battery cable from the battery negative (-) terminal. 4. Disconnect the positive (+) battery cable from the generator positive (+) terminal. 5. Disconnect the other end of the positive (+) battery cable to the battery positive (+) terminal. 6. Connect the vehicle ground cable to the battery negative (-) terminal. 7.
Fuel Recommendation 1. Check the fuel level gauge. 2. Refill the tank if the fuel level is low. Do not fill above the shoulder of the fuel strainer. WARNING Gasoline is extremely flammable and is explosive under certain conditions. Refuel in a well-ventilated area with the engine stopped. Do not smoke or allow flames or sparks in the area where the engine is refueled or where gasoline is stored. Do not overfill the fuel tank (there should be no fuel in the filler neck).
Gasoline containing more than 10% ethanol by volume may cause starting and/or performance problems. Gasoline containing ethanol may be marketed under the name Gasohol. Methanol (methyl or wood alcohol) Gasoline containing methanol must contain co solvents and corrosion inhibitors to protect the fuel system. Gasoline containing more than 5% methanol by volume may cause starting and/or performance problems and may damage metal, rubber and plastic parts of your fuel system.
STOPPING In an emergency: 1. To stop the engine in an emergency, turn the engine switch to the OFF position. In normal use: 1. Turn the AC circuit breaker to the OFF position. 2. Disconnect all electrical loads from panel receptacles. Disconnect DC battery charging cables. 3. Turn the engine switch to the OFF position. 4. Turn the fuel valve to the OFF position. MAINTENENCE Periodic maintenance and adjustment is necessary to keep the generator in good operating condition.
Maintenance Schedule Notes 1) Service more frequently when used in dusty areas. 2) These items should be serviced by an authorized generator dealer, unless owner has proper tools and is mechanically proficient. 3) For professional commercial use, log hours of operation to determine proper maintenance intervals. Engine oil change Drain the oil while the engine is warm to assure rapid and complete draining. 1. Remove the drain plug and sealing washer, oil filler cap, and drain the oil. 2.
Please dispose of used motor oil in a manner that is compatible with the environment. We suggest you take it in a sealed container to your local service station or recycling center for disposal. Do not throw it in the trash or pour it on the ground. Air cleaner service A dirty air cleaner will restrict air flow to the carburetor. To prevent carburetor malfunction, service the air cleaner regularly. Service more frequently when operating the generator in extremely dusty areas.
Fuel Sediment Cup Cleaning The sediment cup prevents dirt or water, which may be in the fuel tank, from entering the carburetor. If the engine has not been run for a long time, the sediment cup should be cleaned. 1. 2. 3. 4. Turn the fuel valve to the OFF position. Remove the sediment cup, O-ring, and filter. Clean the sediment cup, O-ring, and filter in nonflammable or high flash point solvent. Reinstall the filter, O-ring, and sediment cup. Turn the fuel valve ON and check for leaks.
NOTICE The spark plug must be securely tightened. An improperly tightened spark plug can become very hot and could damage the engine. Never use spark plugs which have an improper heat range. Use only the recommended spark plugs or equivalent. TRANSPORTATION/STORAGE When transporting the generator, turn the engine switch and the fuel valve OFF. Keep the generator level to prevent fuel spillage. Fuel vapor or spilled fuel may ignite.
Gasoline is extremely flammable and is explosive under certain conditions Perform this task in a well ventilated area with the engine stopped. Do not smoke or allow flames or sparks in the area during this procedure. 1. Drain the carburetor by loosening the drain screw. Drain the gasoline into a suitable container. 2. Change the engine oil. 3. Remove the spark plug, and pour about a tablespoon of clean engine oil into the cylinder.
TROUBLE SHOOTING TYPICAL WIRING DIAGRAM 20
SPECIFICATIONS Generator Model Frequency(Hz) Rated AC voltage (volts) AC Circuit breaker Rated AC Output (watts) Peak AC (watts) DC Output (volts) Engine Model Engine(HP) Low level oil alert Oil Capacity Gas tank capacity Starting system Noise level db(A)@7m Gas level gauge Voltmeter AC receptacles AC twist lock receptacle Wheel Kit Dimensions L*W*H Gross weight QB1300 QB2800 QB3300 QB5500E QB7700E 60Hz 60Hz 60Hz 60Hz 60Hz 120 120 120 120/240 120/240 10A(1pc) 22A (1pc) 27A (1pc) 22A(2 pcs
TYPICAL WATTAGES Appliances Surge Wattage (Startup) Running Wattage Automatic Washer 2300 1150 Blender 900 300 Ceiling Fan 1200 800 Clock Radio 100 100 Clothes Dryer (Gas) 1200 700 Coffee pot (10 cup) 1200 1200 Coffee pot (4 cup) 650 650 Color Television 300 300 Curling iron 65 65 Dehumidifier 800 650 Dishwasher (Cool Dry) 1400 700 Electric blanket 400 400 Electric Clothes Dryer 6750 5400 Electric Fry Pan 1500 1500 Electric Range (8-inch element) 2100 2100 Fry
Electronics Surge Wattage (Startup) Running Wattage CD player 100 100 Color Television 300 300 600 to 800 600 to 800 100 100 Fax 600 to 800 600 to 800 Laptop Computer 200 to 250 200 to 250 Monitor (CRT) 200 to 250 200 to 250 Printer 400 to 600 400 to 600 Radio 50-200 50-200 Receiver 450 450 Stereo 100 100 Television - Color 300 300 Television (20") 130 130 Television (big screen) 400 400 VCR 100 100 Video game console 100 100 X-Box 360 game console 200 170
Power Equipment Surge Wattage (Startup) Running Wattage Air Compressor (1 HP) 4500 1600 Air Compressor (1/2 HP) 1600 975 2400/7800 2400/7800 380 380 1500/5750 1500/5750 Belt Sander 2400 1200 Bench Grinder (8") 2500 1400 Circular Saw, Heavy Duty (7 1/4") 2300 1400 Drill: 1/2in., 5.4 Amps 900 600 Drill: 3/8in., 4 Amps 600 440 Electric Chain Saw (14" , 2 HP) 1100 1100 Electric Chain Saw: 14in.
Limited Warranty Queen Bee Power™ Generators are warranted by Jae Enterprises, Inc. to the original retail consumer against defects in material and workmanship for a period of one (1) year from the date of retail purchase and is not transferable. This one year warranty applies only to products used in consumer applications. If this generator is used in a commercial application, then the period of warranty coverage is limited to six (6) months from the date of purchase.