RGG6242 EN DE IT Hob Kochfeld Piano cottura User Manual Benutzerinformation Istruzioni per l’uso 2 17 34
www.electrolux.com CONTENTS 1. SAFETY INFORMATION....................................................................................3 2. SAFETY INSTRUCTIONS..................................................................................4 3. PRODUCT DESCRIPTION................................................................................ 7 4. DAILY USE......................................................................................................... 7 5. HINTS AND TIPS.........................
ENGLISH 1. 3 SAFETY INFORMATION Before the installation and use of the appliance, carefully read the supplied instructions. The manufacturer is not responsible if an incorrect installation and use causes injuries and damages. Always keep the instructions with the appliance for future reference. 1.
www.electrolux.com • • • • • • Metallic objects such as knives, forks, spoons and lids should not be placed on the hob surface since they can get hot. Do not use a steam cleaner to clean the appliance. Remove any spillage from the lid before opening. Let the hob surface cool down before closing the lid. If the supply cord is damaged, it must be replaced by the manufacturer, an authorized Service or similarly qualified persons in order to avoid a hazard.
ENGLISH 2.2 Electrical Connection • WARNING! Risk of fire and electrical shock. • • • • • • • • • • • • • • • • • All electrical connections should be made by a qualified electrician. The appliance must be earthed. Before carrying out any operation make sure that the appliance is disconnected from the power supply. Make sure that the electrical information on the rating plate agrees with the power supply. If not, contact an electrician. Make sure the appliance is installed correctly.
www.electrolux.com • • • Do not operate the appliance with wet hands or when it has contact with water. Do not use the appliance as a work surface or as a storage surface. When you place food into hot oil, it may splash. WARNING! Risk of fire and explosion • • • • Fats and oil when heated can release flammable vapours. Keep flames or heated objects away from fats and oils when you cook with them. The vapours that very hot oil releases can cause spontaneous combustion.
ENGLISH 7 3. PRODUCT DESCRIPTION 3.1 Cooking surface layout 1 1 2 3 4 2 4 3 3.2 Control knob Symbol Semi-rapid burner Rapid burner Auxiliary burner Control knobs Symbol Description no gas supply / off posi‐ tion Description ignition position / maxi‐ mum gas supply minimum gas supply 4. DAILY USE C) Ignition candle D) Thermocouple WARNING! Refer to Safety chapters. 4.2 Ignition of the burner 4.1 Burner overview Always light the burner before you put on the cookware.
www.electrolux.com lets the thermocouple warm up. If not, the gas supply is interrupted. 3. Adjust the flame after it is regular. If after some tries the burner does not light, check if the crown and its cap are in correct positions. WARNING! Do not keep the control knob pushed for more than 15 seconds. If the burner does not light after 15 seconds, release the control knob, turn it into off position and try to light the burner again after minimum 1 minute.
ENGLISH CAUTION! Make sure that the pots are placed centrally on the burner in order to get maximum stability and to get lower gas consumption. 9 5.3 Lid (separated kit only for predisposed hobs) 5.2 Diameters of cookware Use cookware with diameters applicable to the size of burners.
www.electrolux.com • cleaning, rub the hob dry with a soft cloth. To clean the enamelled parts, cap and crown, wash them with warm soapy water and dry them carefully before you put them back. 6.4 Cleaning the spark plug This feature is obtained through a ceramic ignition candle with a metal electrode. Keep these components well clean to prevent difficult lighting and check that the burner crown holes are not obstructed. 6.
ENGLISH 11 7.3 Labels supplied with the accessories bag Stick the adhesive labels as indicated below: A B MOD. MOD. PROD.NO. PROD.NO. SER.NO SER.NO DATA DATA C MOD. PROD.NO. SER.NO. 0049 TYPE IP20 03 IT MADE IN ITALY A) Stick it on Guarantee Card and send this part (if applicable). B) Stick it on Guarantee Card and keep this part (if applicable). C) Stick it on instruction booklet. 8. INSTALLATION WARNING! Refer to Safety chapters. 8.
www.electrolux.com they do not come in touch with mobile parts or they are not squeezed. Also be careful when the hob is put together with an oven. Make sure that the gas supply pressure of the appliance obeys the recommended values. If the supplied pressure has not the specified value, it is necessary to assemble a proper pressure regulator in compliance with the standard UNI EN 88. For Liquid Gas (LPG) the use of pressure regulator is allowed only if they are in compliance with UNI EN 12864.
ENGLISH WARNING! Make sure the flame does not go out when you quickly turn the knob from the maximum position to the minimum position. 8.5 Electrical connection • Make sure that the rated voltage and type of power on the rating plate agree with the voltage and the power of the local power supply. • This appliance is supplied with a mains cable. It has to be supplied with a correct plug which can hold the load that the rating plate rates. Make sure that you install the plug in a correct socket.
www.electrolux.com 8.8 Installing hob under the hood If you install the hob under a hood, please see the installation instructions of the hood for the minimum distance between the appliances. A) Removable panel B) Space for connections Kitchen unit with oven The electrical connection of the hob and the oven must be installed separately for safety reasons and to let easy remove oven from the unit. 8.
ENGLISH 15 9.3 Other technical data Gas original: G20 (2H) 20 mbar = 8 kW TOTAL POWER: Gas replacement: G30 (3+) 28-30 mbar = 567 g/h G31 (3+) 37 mbar = 557 g/h Electric supply: 230 V ~ 50 Hz Appliance category: II2H3+ Gas connection: G 1/2" Appliance class: 3 9.4 Gas burners for NATURAL GAS G20 20 mbar BURNER NORMAL POWER kW MINIMUM POWER kW INJECTOR MARK 1/100 mm Rapid 3,0 0,75 119 Semi-rapid 2,0 0,45 96 Auxiliary 1,0 0,33 70 9.
www.electrolux.com Energy efficiency for the gas hob (EE gas hob) 59.0% EN 30-2-1: Domestic cooking appliances burning gas - Part 2-1 : Rational use of energy - General 10.2 Energy saving • • • • • • • Before use, make sure that the burners and pan supports are assembled correctly. Use cookware with diameters applicable to the size of burners. Center the pot on the burner. When you heat up water, use only the amount you need. If it is possible, always put the lids on the cookware.
DEUTSCH 17 INHALTSVERZEICHNIS 1. SICHERHEITSINFORMATIONEN................................................................... 18 2. SICHERHEITSANWEISUNGEN...................................................................... 19 3. GERÄTEBESCHREIBUNG.............................................................................. 23 4. TÄGLICHER GEBRAUCH................................................................................23 5. TIPPS UND HINWEISE.......................................................
1. www.electrolux.com SICHERHEITSINFORMATIONEN Lesen Sie vor der Montage und dem Gebrauch des Geräts zuerst die Gebrauchsanleitung. Der Hersteller übernimmt keine Verantwortung für Verletzungen und Beschädigungen durch unsachgemäße Montage. Bewahren Sie die Gebrauchsanleitung griffbereit auf. 1.
DEUTSCH • • • • • • • • • 19 Kochen mit Fett oder Öl auf einem unbeaufsichtigten Kochfeld ist gefährlich und kann zu einem Brand führen. Versuchen Sie nicht einen Brand mit Wasser zu löschen, sondern schalten Sie das Gerät aus und bedecken Sie die Flamme mit einem Deckel oder einer Feuerlöschdecke. Legen Sie keine Gegenstände auf dem Kochfeld ab. Legen Sie keine Metallgegenstände wie Messer, Gabeln, Löffel oder Topfdeckel auf die Oberfläche des Kochfelds, da diese heiß werden können.
www.electrolux.com 2.1 Montage • • • • • • • • • • WARNUNG! Nur eine qualifizierte Fachkraft darf den elektrischen Anschluss des Geräts vornehmen. • Entfernen Sie das Verpackungsmaterial. Stellen Sie ein beschädigtes Gerät nicht auf und benutzen Sie es nicht. Halten Sie sich an die mitgelieferte Montageanleitung. Die Mindestabstände zu anderen Geräten und Küchenmöbeln sind einzuhalten. Seien Sie beim Umsetzen des Geräts vorsichtig, denn es ist schwer. Tragen Sie stets Sicherheitshandschuhe.
DEUTSCH • • Stromversorgung trennen möchten. Ziehen Sie stets am Netzstecker. Verwenden Sie nur geeignete Trennvorrichtungen: Überlastschalter, Sicherungen (Schraubsicherungen müssen aus dem Halter entfernt werden können), Fehlerstromschutzschalter und Schütze. Die elektrische Installation muss eine Trenneinrichtung aufweisen, mit der Sie das Gerät allpolig von der Stromversorgung trennen können. Die Trenneinrichtung muss mit einer Kontaktöffnungsbreite von mindestens 3 mm ausgeführt sein.
www.electrolux.com • • • • • • • • • Verwenden Sie nur standfestes Kochgeschirr mit der richtigen Form und einem Durchmesser, der größer als der der Brenner ist. Achten Sie darauf das Kochgeschirr mittig auf die Brenner zu stellen. Vergewissern Sie sich, dass die Flamme nicht erlischt, wenn Sie den Einstellknopf schnell von der höchsten zur niedrigsten Stufe drehen. Verwenden Sie ausschließlich das mit dem Gerät gelieferte Zubehör. Setzen Sie keinen Wärmeverteiler auf den Brenner.
DEUTSCH 23 3. GERÄTEBESCHREIBUNG 3.1 Kochfeldanordnung 1 1 2 3 4 2 4 3 3.2 Kochzonen-Einstellknopf Symbol Normalbrenner Starkbrenner Hilfsbrenner Kochzonen-Einstellknöpfe Beschreibung Keine Gaszufuhr/ausge‐ schaltet Symbol Beschreibung Zündstellung/maximale Gaszufuhr minimale Gaszufuhr 4. TÄGLICHER GEBRAUCH B) Brennerkrone C) Zündkerze D) Thermoelement WARNUNG! Siehe Kapitel Sicherheitshinweise. 4.2 Zünden des Brenners 4.
www.electrolux.com Uhrzeigersinn auf die Position für die Sollte der Brenner zufällig ausgehen, drehen Sie den Knopf in die Aus-Position und versuchen ihn nach einer Minute erneut zu zünden. maximale Gaszufuhr ( ). 2. Halten Sie den Einstellknopf bis zu 10 Sekunden lang gedrückt. In dieser Zeit wird das Thermoelement erwärmt. Andernfalls wird die Gaszufuhr unterbrochen. 3. Stellen Sie die Flamme ein, sobald sie ruhig brennt.
DEUTSCH 5.1 Kochgeschirr ACHTUNG! Verwenden Sie kein Kochgeschirr aus Gusseisen, Speckstein oder Steingut und keine Grilloder Sandwichplatten. Edelstahl kann bei zu starker Erhitzung anlaufen. WARNUNG! Kochen Sie nicht mit einem Kochgeschirrteil auf zwei Brennern gleichzeitig. WARNUNG! Stellen Sie keine beschädigten Töpfe oder solche, die nicht standfest sind, auf den Brenner, um ein Verschütten und Verletzungen zu vermeiden. 25 5.
www.electrolux.com • • Funktionsfähigkeit des Kochfelds nicht. Verwenden Sie einen Spezialreiniger zur Reinigung der Kochfeldoberfläche. Reinigen Sie Edelstahlteile mit Wasser und wischen Sie sie mit einem weichen Tuch trocken. • 6.2 Topfträger Die Topfträger sind nicht spülmaschinenfest. Sie müssen von Hand gereinigt werden. 1. Entfernen Sie die Topfträger, um die Reinigung des Kochfelds zu erleichtern.
DEUTSCH 27 7.1 Was tun, wenn ... Problem Mögliche Ursache Abhilfe Es wird kein Funke er‐ zeugt, wenn Sie den Fun‐ kenerzeuger betätigen. Das Kochfeld ist nicht oder nicht ordnungsgemäß an die Spannungsversorgung angeschlossen. Prüfen Sie, ob das Koch‐ feld ordnungsgemäß an die Spannungsversorgung angeschlossen ist. Die Sicherung hat ausge‐ löst. Vergewissern Sie sich, dass die Sicherung der Grund für die Störung ist.
www.electrolux.com 7.3 Im Zubehörbeutel mitgelieferte Aufkleber Bringen Sie die Aufkleber, wie unten gezeigt, an: A B MOD. MOD. PROD.NO. PROD.NO. SER.NO SER.NO DATA DATA C MOD. PROD.NO. SER.NO. 0049 TYPE IP20 03 IT MADE IN ITALY A) Kleben Sie ihn auf die Garantiekarte und verschicken Sie diesen Teil (falls vorhanden). B) Kleben Sie ihn auf die Garantiekarte und behalten Sie diesen Teil (falls vorhanden). C) Kleben Sie ihn auf die Gebrauchsanleitung. 8.
DEUTSCH Je nach geltenden Bestimmungen kann der Anschluss fest oder durch Verwendung eines flexiblen Edelstahlrohrs erfolgen. Bei Verwendung flexibler Metallrohre muss darauf geachtet werden, dass sie nicht mit beweglichen Teilen in Kontakt kommen oder eingeklemmt werden können. Wenn das Kochfeld mit einem Backofen installiert wird, muss ebenfalls vorsichtig vorgegangen werden. Achten Sie darauf, dass der Gasdruck des Geräts den empfohlenen Werten entspricht.
www.electrolux.com Erdverbindung den Normen und Vorschriften entspricht. • Das Netzkabel darf nicht heißer als 90 °C werden. Um einen Kontakt des Kabels mit dem Gerät unter dem Kochfeld zu vermeiden, verwenden Sie die Haken auf den Seiten des Gehäuses. A 5. Bei Umstellung: • Von Erdgas G20 20 mbar zu Flüssiggas, ziehen Sie die Bypass-Schraube bis zum Anschlag an. • Von Flüssiggas zu Erdgas G20 20 mbar, drehen Sie die BypassSchraube ca. 1/4 Umdrehung zurück .
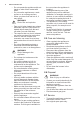
DEUTSCH 31 8.9 Einbaumöglichkeiten A Die unter dem Kochfeld eingebaute Platte muss sich leicht entfernen lassen und einen einfachen Zugang ermöglichen, falls eine Reparatur erforderlich wird. Unterbaumöbel mit Tür 10 mm 11 mm 3 mm 11 mm 30 mm A A 60 mm min 20 mm (max 150 mm) B B A) mitgelieferte Dichtung B) mitgelieferte Halterungen ACHTUNG! Montieren Sie das Gerät nur in einer flachen Arbeitsplatte. 8.
www.electrolux.com 9.2 Bypassdurchmesser TYP Ø BYPASS 1/100 mm Starkbrenner 42 Normalbrenner 32 Hilfsbrenner 28 9.3 Sonstige technische Daten Gas – Original: G20 (2H) 20 mbar = 8 kW GESAMTLEISTUNG: Gas – Ersatz: G30 (3+) 28-30 mbar = 567 g/Std. G31 (3+) 37 mbar = 557 g/Std. Netzanschluss: 230 V ~ 50 Hz Gerätekategorie: II2H3+ Gasanschluss: G 1/2" Geräteklasse: 3 9.
DEUTSCH 33 10. ENERGIEEFFIZIENZ 10.1 Produktinformationen gemäß EU 66/2014 Modellidentifikation RGG6242OOX Kochfeldtyp Einbau-Kochfeld Anzahl der Gasbrenner 4 Energieeffizienz pro Gasbrenner (EE gas burner) Hinten links - Normalbrenner 57.9% Hinten rechts - Starkbrenner 61.3% Vorne links - Normalbrenner 57.9% Vorne rechts - Hilfsbrenner nicht zutreffend Energieeffizienz für das Gas‐ kochfeld (EE gas hob) 59.
www.electrolux.com INDICE 1. INFORMAZIONI PER LA SICUREZZA............................................................ 35 2. ISTRUZIONI DI SICUREZZA........................................................................... 36 3. DESCRIZIONE DEL PRODOTTO....................................................................40 4. UTILIZZO QUOTIDIANO.................................................................................. 40 5. CONSIGLI E SUGGERIMENTI UTILI..........................................
ITALIANO 1. 35 INFORMAZIONI PER LA SICUREZZA Leggere attentamente le istruzioni fornite prima di installare e utilizzare l'apparecchiatura. Il produttore non è responsabile se un'installazione ed un uso non corretto dell'apparecchiatura provocano lesioni e danni. Tenere sempre le istruzioni a portata di mano come riferimento futuro. 1.
www.electrolux.com • • • • • • • • • • Non utilizzare un timer esterno o un sistema di controllo remoto distinto per mettere in funzione l'apparecchiatura. Non lasciare mai il piano di cottura incustodito durante la preparazione di cibi in quanto olio e grassi potrebbero provocare un incendio. Non tentare mai di spegnere un incendio con dell'acqua; spegnere l'apparecchiatura e coprire le fiamme ad es. con un coperchio o una coperta di protezione dal fuoco.
ITALIANO 2.1 Installazione ATTENZIONE! L’installazione dell'apparecchiatura deve essere eseguita da personale qualificato. • • • • • • • • • • Rimuovere tutti i materiali di imballaggio. Non installare o utilizzare l'apparecchiatura se è danneggiata. Attenersi alle istruzioni fornite insieme all'apparecchiatura. È necessario rispettare la distanza minima dalle altre apparecchiature. Prestare sempre attenzione in fase di spostamento dell'apparecchiatura, dato che è molto pesante.
www.electrolux.com • portafusibile), sganciatori per correnti di guasto a terra e relè. L'impianto elettrico deve essere dotato di un dispositivo di isolamento che consenta di scollegare l'apparecchiatura dalla presa di corrente a tutti i poli. Il dispositivo di isolamento deve avere una larghezza dell'apertura di contatto non inferiore ai 3 mm. • • • • 2.3 Collegamento gas • • • • • Tutti i collegamenti del gas devono essere eseguiti da una persona qualificata.
ITALIANO • • • • • • • Accertarsi che la fiamma non si spenga quando si gira rapidamente la manopola dalla posizione massima a quella minima. Usare esclusivamente gli accessori in dotazione con l'apparecchiatura. Non utilizzare un diffusore di fiamma sul bruciatore. Un'apparecchiatura per cottura a gas produce calore e umidità. Provvedere ad un'adeguata ventilazione nell'ambiente in cui si trova l'apparecchiatura.
www.electrolux.com 3. DESCRIZIONE DEL PRODOTTO 3.1 Disposizione della superficie di cottura 1 2 4 Bruciatore semirapido Bruciatore rapido Bruciatore ausiliario Manopole di regolazione 3 3.2 Manopola di regolazione Simbolo 1 2 3 4 Descrizione alimentazione gas as‐ sente/posizione di spen‐ to Simbolo Descrizione alimentazione minima del gas posizione di accensione/ alimentazione massima del gas 4. UTILIZZO QUOTIDIANO ATTENZIONE! Fare riferimento ai capitoli sulla sicurezza. 4.
ITALIANO A) B) C) D) Spartifiamma bruciatore Corona bruciatore Candela di accensione Termocoppia 4.2 Accensione del bruciatore Accendere sempre il bruciatore prima di posizionare una pentola. ATTENZIONE! Fare attenzione in fase di utilizzo di fiamme libere all'interno della cucina. Il produttore declina qualsiasi responsabilità in caso di cattivo utilizzo delle fiamme. 1. Premere la manopola di regolazione e ruotarla in senso antiorario fino alla posizione massima ( ). 2.
www.electrolux.com 5.1 Pentole AVVERTENZA! Non usare pentole in ghisa, teglie in terracotta, grill o piastre tostapane. L’acciaio inox può brunire se sottoposto ad eccessivo riscaldamento. ATTENZIONE! Non mettere la stessa pentola su due bruciatori. ATTENZIONE! Evitare di posare sul bruciatore pentole instabili o deformate per prevenire versamenti e lesioni.
ITALIANO • • • I graffi o le macchie scure sulla superficie non compromettono il funzionamento del piano di cottura. Usare un prodotto di pulizia speciale adatto alla superficie del piano di cottura. Lavare le parti in acciaio inox con acqua e asciugarle con un panno morbido. 6.3 Pulizia del piano di cottura • • 6.2 Supporti pentole I supporti pentole non possono essere lavati in lavastoviglie. Devono essere lavati a mano. 1.
www.electrolux.com 7.1 Cosa fare se... Problema Causa possibile Il gas non si accende quando si preme il pul‐ sante di accensione. Il piano di cottura non è Accertarsi che il piano di collegato a una fonte di ali‐ cottura sia collegato corret‐ mentazione elettrica o non tamente alla rete elettrica. è collegato correttamente. È scattato il fusibile. Soluzione Verificare se l'anomalia di funzionamento sia dovuta al fusibile.
ITALIANO 7.3 Etichette fornite con il sacchetto degli accessori Attaccare le etichette adesive come indicato di seguito: A B MOD. MOD. PROD.NO. PROD.NO. SER.NO SER.NO DATA DATA C MOD. PROD.NO. SER.NO. 0049 TYPE IP20 03 IT MADE IN ITALY A) Attaccarla sul Foglietto di garanzia ed inviare questa parte (ove prevista). B) Attaccarla sul Foglietto di garanzia e conservare questa parte (ove prevista). C) Attaccarla sul libretto di istruzioni. 8.
www.electrolux.com Scegliere dei collegamenti fissi o usare un tubo flessibile in acciaio inossidabile conforme alle disposizioni vigenti. Se si utilizzano tubi in metallo flessibili, fare attenzione che non entrino in contatto con parti mobili o non siano schiacciati. Ulteriore attenzione è richiesta qualora al piano di cottura fosse abbinato il forno. Accertarsi che la pressione del gas di alimentazione dell'apparecchiatura sia conforme ai valori consigliati.
ITALIANO ATTENZIONE! Accertarsi che la fiamma non si spenga quando si gira rapidamente la manopola dalla posizione massima a quella minima. 8.5 Collegamento elettrico • Verificare che la tensione nominale e il tipo di corrente della rete di distribuzione corrispondano ai valori indicati sulla targhetta dei dati dell'apparecchiatura. • L'apparecchiatura è provvista di cavo di collegamento alla rete. Deve essere dotato di una spina in grado di supportare il carico indicato sulla targhetta dei dati.
www.electrolux.com 8.8 Installazione del piano di cottura sotto la cappa da cucina Mobile da incasso con porta 30 mm Se si installa il piano di cottura sotto a una cappa da cucina, fare riferimento alle istruzioni per l'installazione della cappa per la distanza minima tra le apparecchiature. A 60 mm min 20 mm (max 150 mm) B 8.
ITALIANO Collegamento gas: G 1/2" Classe apparecchia‐ tura: 3 49 9.4 Bruciatori a GAS NATURALE G20 a 20 mbar BRUCIATORE POTENZA NOR‐ MALE kW POTENZA MINIMA kW SIMBOLO INIET‐ TORE 1/100 mm Rapido 3,0 0,75 119 Semirapido 2,0 0,45 96 Ausiliario 1,0 0,33 70 9.
www.electrolux.com 10.2 Risparmio energetico • • • • • • • Prima dell'uso, assicurarsi che i bruciatori e i supporti pentole siano assemblati correttamente. Usare pentole con diametro adatto alle dimensioni dei bruciatori. Centrare la pentola sul bruciatore. Quando si riscalda l'acqua, utilizzare solo la quantità necessaria. Se possibile, coprire sempre le pentole con il coperchio. Quando il liquido inizia a bollire, abbassare la fiamma per provocare una lenta ebollizione del liquido.
ITALIANO 51
867305362-A-482014 www.electrolux.