Finding Information Please read and save this guide Thank you for choosing Electrolyte, the new premium brand in home appliances. This Use & Care Guide is part of our commitment to customer satisfaction and product quality throughout the service life of your new appliance. We view your purchase as the beginning of a relationship. To ensure our ability to continue serving you, please use this page to record important product information.
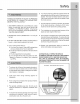
Safety Important Safety Instructions Read all instructions before using this appliance. Save these instructions for future reference. Do not attempt to install or operate your appliance until you have read the safety precautions in this manual. Safety items throughout this manual are labeled with a WARNING or CAUTION based on the risk type. [WARNING This symbol alerts you to situations that may cause serious body harm, death or property damage.
Safety i a TO REDUCE THE RISK OF INJURY TO PERSONS IN THE EVENT OF A RANGE TOP GREASE FIRE, OBSERVE THE FOLLOWING 1. SMOTHER FLAMES with a close-fitting lid, cookie sheet, or metal tray, then turn off the bummer, BE CAREFUL TO PREVENT BURNS. If the flames do not go out immediately, EVACUATE AND CALL THE FIRE DEPARTMENT. 2. NEVER PICK UP A FLAMING PAN You may be boomed. 3. DO NOT USE WATER, including wet dishcloths or dowels violent steam explosion will result. 4. Use an extinguisher ONLY if: A.
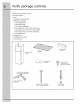
Verify package contents Unpack hood and check contents. You should receive: 1 Hood 1 Decorative Flue Assembly 1 Parts Bag containing: 1 Mounting Bracket 1 Discharge Collar 1 Flue Mounting Bracket 8 Mounting Screws (4,8 x 38mm Pan Head) 7 Mounting Screws (3,8 x 8,5mm Pan Head) 2 Mounting Screws (3.9 x 8mm Flat Head) 8 Drywall Anchors 2 Grease Filters 1 Installation instructions 1 Warranty Card GREASE FILTERS DECORATIVE FLUE DISCHARGE COLLAR 2 MOUNTING SCREWS (3.
Installation Install the duct work SN Caution To reduce the risk of tire, use only metal duct work, 1. Decide where the duct work will run between the hood and the outside. 2. A straight, short duct run will allow the hood to perform most efficiently. 3. Long duct runs, gibbous, and transitions will reduce the performance of the hood. Use as few of them as possible. Larger ducting may be required for best performance with longer duct runs. 4, Install a roof or wall cap.
Installation Wiring (1 WANING Lo : This range bani must bie properly provided. . The unit should be instated by 2 qualify ted electrician in accordance with all applicable dona) and locale ERICH tissues, : ; GROUNDING INSTRUCTIONS This appliance must be grounded. In the event of an electrical short circuit, grounding reduces the risk of electric shock by providing an escape wire for the electric current. This appliance is equipped with a cord having a grounding wire with a grounding plug.
Installation install mounting bracket . Construct wood wall framing that is flush with interior surface of wail studs. Make sure: a) the framing is centered over installation location. by the height of the framing will allow the mounting bracket io be secured to the framing within the dimensions shown. 2. After wall surface is finished, secure mounting bracket to framing using dimensions shown. install flue mounting bracket DUSTED AND NON-DUCTED 1.
ro Sing . Turnover the polystyrene block and the tape (Fig. 1). . The back plate shown in Fig. 2 must be removed: . Remove the tape on the electrical system plate; . Remove the (2) screws of the back plate (Fig. 5) 40 Installation Prepare the hood On stainless sleek hoods, carefully remove the plastic protective film from all Arteriosclerosis of the Hood ald decorative Hues prior to final installation. remove the (4) screws of the back plate, operating from the inside of the hood (Fig. 3).
Installation 11 DUSTED CONFIGURATION 1. Install the discharge collar into the duct connector of the range hood. Fig. &. DISCHARGE COLLAR CONDUCTED CONFIGURATION E NOTE The following materials inst be purchased separately for aon dusted re circulation installations: . i Hor Dusted Continuation Kl Model DPR Fe reds Bltamgterauet 1. Discard discharge collateralize supplied with the hood. install the 5” to 8” adapter supplied with the Non-Dusted Re circulation Kit (Fig. 7). 2.
Installation Install the hood Cig a At least two people will be required to ma uni the hood. . Raise the hood into its mounting position. 2. Align the rectangular opening on the back of the hood with the wail-mounting bracket. Gently lower the hood until it securely engages the bracket. Fig. 9. 3. Level the hood with (2) 3.98, 5mm mounting screws and secure with (2) 4.8x38mm mounting screws. Use drywall anchors provided if wall studs or framing are not available. Fig. 9. 4.
Installation 13 9. Carefully place the decorative flue on the hood. Fig. 13. On dusted installation in rooms with Soot ceilings, the air vents are concealed. Install the flue with the air vents down. On non-dusted installations in rooms with 8-foot ceilings, the air vents are exposed. Install the flue with the air vents up. On dusted and non-dusted installations in rooms with 8-foot ceilings, the vents are exposed. Install the flue with air vents up.
1a Installation install filters {DUSTED AND NON-DUSTED HOODS) 1. To turnover the GREASE filters, pull the metal latch tab outside and unlock the filter. 2. To install the GREASE filters, align rear filter tabs with slots ini the hood. Depress the metal fats tab, push filter into position and release. Make sure filter is securely engaged after installation. Teeing riot fo use, remove protective fim Hom the A GREASE FILTERS filet Fran. : (NON-BUSTED HOODS ONLY) 1.
Maintenance 15 Proper maintenance of the Range Hood will assure proper performance of the unit. Grease filters Hood cleaning The grease filters should be cleaned when the filter reset switch will be illuminated. Use a warm detergent solution. Grease fillers are dishwasher safe. See “INSTALL FILTERS” section for removal and installation instructions. Once the grease fairs are cleaned and installed, press in and hold the “filter reset switch” for approximately 3 seconds.
Operation Controls |] wv. fitter fan selves on/off switch switches light switch fan sporadic display switches delay shut off Dead-front mode Stand-by mode dead-front mode, press any key for enter in standby mode. If the hood is in stand-by mode, after 10 seconds on return automatically in dead-front mode. Light switch Press any key for enter in stand-by mode. Push the light switch once to turn the lights ON to a dim level. Push a second time to turn the lights ON 10 a brighter level.
Operation = 417 Halogen bulbs Fuse replacement This range hood requires two halogen bulbs (max 20W, i 12V, Type T3 bulb, Gd Base), uk WINING Halogen Bulb Key : 5304454981 SWITCH ORE THE ELECTRICITY SURLY. AN WARNING : 1 = Remove the grease filters. Open the fuse box. ALWAYS switch OFF He ELECTRICITY SURLY BEFORE CARVING QUT BMY OPERATIONS ON THE Replace with the same type of fuse (5x20mm, 44, 1258). APPLIANCE Fuse Key : 5304455332 To change bulbs: 1.
Warranty Information in the U.S.A. your appliance is warranted by Electrolyte Home Products North America, a division of Whits Consolidated Industries, Inc. We authorize no person to change or add to any of our obligations under this warranty. Our obligations for service and parts. under this warranty must be performed by us or authorized Electrolyte Home Products North America service. In Canada, our appliance is warranted by Electrolyte Canada Corp.