user manual notice d'utilisation benutzerinformation istruzioni per l’uso Fridge Freezer Réfrigérateur/congélateur Kühl - Gefrierschrank Frigo-Congelatore SB 269 11 SB 315 12
electrolux Electrolux. Thinking of you. Share more of our thinking at www.electrolux.com Contents 2 4 4 4 6 Care and cleaning 7 What to do if… 8 Technical data 10 Installation 10 Environmental concerns 13 Subject to change without notice In the interest of your safety and to ensure the correct use, before installing and first using the appliance, read this user manual carefully, including its hints and warnings.
electrolux 3 Warning! Any electrical component (power cord, plug, compressor) must be replaced by a certified service agent or qualified service personnel. • • • • 1. Power cord must not be lengthened. 2. Make sure that the power plug is not squashed or damaged by the back of the appliance. A squashed or damaged power plug may overheat and cause a fire. 3. Make sure that you can come to the mains plug of the appliance. 4. Do not pull the mains cable. 5.
electrolux Service • Any electrical work required to do the servicing of the appliance should be carried out by a qualified electrician or competent person. • This product must be serviced by an authorized Service Centre, and only genuine spare parts must be used. Environment Protection This appliance does not contain gasses which could damage the ozone layer, in either its refrigerant circuit or insulation materials. The appliance shall not be discarded together with the urban refuse and rubbish.
electrolux 5 Storage of frozen food When first starting-up or after a period out of use, before putting the products in the compartment let the appliance run at least 2 hours on the higher settings. Important! In the event of accidental defrosting, for example due to a power failure, if the power has been off for longer than the value shown in the technical characteristics chart under "rising time", the defrosted food must be consumed quickly or cooked immediately and then re-frozen (after cooling).
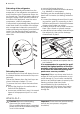
electrolux the time of its removal from the freezer, pull the basket towards yourself and, upon reaching the end point, remove the basket by tilting its front upwards. At the time of putting it back, slightly lift the front of the basket to insert it into the freezer. Once you are over the end points, push the baskets back in their position. Removal of freezing baskets from the freezer The freezing baskets have a limit stop to prevent their accidental removal or falling out.
electrolux 7 Butter and cheese: these should be placed in special airtight containers or wrapped in aluminium foil or polythene bags to exclude as much air as possible. Milk bottles: these should have a cap and should be stored in the bottle rack on the door. Bananas, potatoes, onions and garlic, if not packed, must not be kept in the refrigerator.
electrolux Defrosting of the refrigerator Frost is automatically eliminated from the evaporator of the refrigerator compartment every time the motor compressor stops, during normal use. The defrost water drains out through a trough into a special container at the back of the appliance, over the motor compressor, where it evaporates.
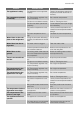
electrolux 9 Problem Possible cause Solution The appliance is noisy. The appliance is not supported properly. Check if the appliance stands stable (all the four feet should be on the floor). The compressor operates continually. The Temperature regulator may be set incorrectly. Set a warmer temperature. The door is not closed correctly. Refer to "Closing the door". The door has been opened too frequently. Do not keep the door open longer than necessary. The product temperature is too high.
electrolux Problem The lamp does not work. Possible cause Solution The appliance has no power. There is no voltage in the mains socket. Connect a different electrical appliance to the mains socket. Contact a qualified electrician. The lamp is in stand-by. Close and open the door. The lamp is defective. Refer to "Replacing the lamp". If your appliance is still not working properly after making the above checks, contact the After Sales Centre.
electrolux 11 Location The appliance should be installed well away from sources of heat such as radiators, boilers, direct sunlight etc. Ensure that air can circulate freely around the back of the cabinet. To ensure best performance, if the appliance is positioned below an overhanging wall unit, the minimum distance between the top of the cabinet and the wall unit must be at least 100 mm . Ideally, however, the appliance should not be positioned below overhanging wall units.
electrolux m1 m5 m3 m2 m6 m4 Door reversibility Warning! Before carrying out any operations, remove the plug from the power socket. Important! To carry out the following operations, we suggest that this be made with another person that will keep a firm hold on the doors of the appliance during the operations. To change the opening direction of the door, do these steps: 1. Open the doors. Unscrew the middle hinge (m2). Remove the plastic spacer (m1). 2. Remove the doors. 3.
electrolux 13 1 7. Unscrew the upper hinge pivot (t1) and screw it on the opposite side. 8. Remove the left-hand cover pin of the middle hinge (m3,m4) and move to the other side. 9. Fit the pin of the middle hinge (m5) into the left-hand hole of the lower door. 10. Re-insert the lower door on the lower hinge pivot (b2). 11. Fit the upper door on the upper hinge pivot (t1). 12. Re-insert the upper door on the middle hinge pivot (m5) slightly tilting both doors. 13. Re-screw the middle hinge (m2).
electrolux Electrolux. Thinking of you. Partagez notre imagination sur www.electrolux.
electrolux 15 Pendant le transport et l'installation de l'appareil, assurez-vous qu'aucune pièce du circuit de refroidissement n'est endommagée. Si tel est le cas : – évitez les flammes vives et les sources d'ignition – aérez soigneusement la pièce où se trouve l'appareil • Il est dangereux de modifier les caractéristiques de l'appareil ou l'appareil. Un cordon d'alimentation endommagé peut être la cause de courts-circuits, d'incendies et/ ou de décharges électriques.
electrolux • Il est conseillé d'attendre au moins quatre heures avant de brancher l'appareil pour que le circuit frigorifique soit stabilisé. • Veillez à ce que l'air circule librement autour de l'appareil pour éviter qu'il ne surchauffe. Pour assurer une ventilation suffisante, respectez les instructions de la notice (chapitre Installation). • Placez l'appareil dos au mur pour éviter tout contact avec le compresseur et le condenseur (risque de brûlure).
electrolux 17 Première utilisation Nettoyage intérieur Avant d'utiliser l'appareil pour la première fois, nettoyez l'intérieur et tous les accessoires internes avec de l'eau tiède savonneuse pour supprimer l'odeur caractéristique du "neuf" puis séchez soigneusement. Important N'utilisez pas de produits abrasifs, poudre à récurer, éponge métallique pour ne pas abîmer la finition.
electrolux Ce porte-bouteilles peut être incliné afin de pouvoir y ranger des bouteilles déjà ouvertes. Pour ce faire, tirez le compartiment vers le haut afin qu'il puisse tourner vers le haut et être placé sur le niveau supérieur. Emplacement des balconnets de la porte En fonction de la taille des paquets d'aliments conservés, les balconnets de la porte peuvent être positionnés à différentes hauteurs.
electrolux 19 Conseils utiles Bruits de fonctionnement normaux • Le liquide de refroidissement qui passe dans le circuit d'évaporation peut produire un bruit de gargouillis ou de bouillonnement. Ce phénomène est normal. • Le compresseur peut produire un ronronnement aigu ou un bruit de pulsation. Ce phénomène est normal. • La dilatation thermique peut provoquer un soudain, léger bruit de craquement. C'est un phénomène normal et sans gravité. Ce phénomène est normal.
electrolux produit, et respectez la durée de conservation indiquée par le fabricant. Conseils pour la conservation des produits surgelés et congelés du commerce Pour une bonne conservation des produits surgelés et congelés, vous devez : • vous assurer qu'ils ont bien été conservés au magasin ; • prévoir un temps réduit au minimum pour leur transport du magasin d'alimentation à votre domicile ; • éviter d'ouvrir trop souvent la porte du congélateur et ne la laisser ouverte que le temps nécessaire.
electrolux 21 Dégivrage du congélateur Une certaine quantité de givre se formera toujours sur les plateaux du congélateur et autour du compartiment supérieur. Périodiquement (toutes les 2 ou 3 semaines) ou lorsque la couche de givre atteint une épaisseur d'environ 3-5 mm, grattez la mince couche de givre qui recouvre les parois. Pour dégivrer, suivez les instructions ci-dessous : • Débranchez l'appareil. • Sortez les denrées surgelées et congelées.
electrolux Anomalie Cause possible Solution La porte a été ouverte trop souvent. Ne laissez pas la porte ouverte plus longtemps que nécessaire. La température du produit est trop élevée. Laissez la température du produit rejoindre la température ambiante avant de le stocker. La température ambiante est trop élevée. Abaissez la température de la pièce. De l'eau coule sur la plaque arrière du réfrigérateur. Pendant le dégivrage automatique, le givre fond sur la plaque arrière.
electrolux 23 Anomalie Cause possible Solution L'ampoule est défectueuse. Consultez le paragraphe « Remplacement de l'ampoule ». En cas d'anomalie de fonctionnement et si malgré toutes les vérifications une intervention s'avère nécessaire, contactez le service après-vente de votre magasin vendeur. Remplacement de l'ampoule d'éclairage Pour remplacer l'ampoule, suivez les instructions ci-dessous : 1. Coupez l'alimentation électrique. 2. Dévissez la vis du diffuseur. 3.
electrolux aux rayons solaires trop intenses). Veillez à ce que l'air circule librement tout autour de l'appareil. Pour obtenir les meilleures performances possibles, si vous souhaitez placer l'appareil sous un élément, il est indispensable de laisser un espace d'au moins 100 mm entre le dessus de l'appareil et l'élément supérieur. Théoriquement, l'appareil ne doit pas être placé sous un élément. Calez soigneusement l'appareil en agissant sur le(s) pied(s) réglable(s).
electrolux 25 m1 m5 m3 m2 m6 m4 Réversibilité de la porte Avertissement Avant toute opération, débranchez la prise d'alimentation électrique. Important Pour effectuer les opérations suivantes, il est conseillé de se faire aider par une autre personne pour maintenir fermement les portes de l'appareil pendant les opérations. Pour changer le sens d'ouverture de la porte, suivez les étapes suivantes : 1. Ouvrez la porte. Dévissez la charnière du milieu (m2). Déposez l'entretoise en plastique (m1). 2.
electrolux 1 7. Dévissez le gond de la charnière supérieure (t1) et vissez-le de l'autre côté. 8. Retirez la goupille du cache gauche de la charnière centrale (m3, m4) et placezla de l'autre côté. 9. Insérez la goupille de la charnière centrale (m5) dans le trou gauche de la porte inférieure. 10. Replacez la porte inférieure sur le gond de la charnière inférieure (b2). 11. Installez la porte supérieure sur le gond de la charnière supérieure (t1). 12.
electrolux 27 Electrolux. Thinking of you. Mehr zu unserem Denken finden Sie unter www.electrolux.com Inhalt 27 29 30 30 32 Reinigung und Pflege 33 Was tun, wenn … 34 Technische Daten 36 Aufstellung 37 Hinweise zum Umweltschutz 40 Änderungen vorbehalten Lesen Sie zu Ihrer Sicherheit und für die optimale Geräteanwendung vor der Installation und dem Gebrauch des Gerätes die vorliegende Benutzerinformation aufmerksam durch, einschließlich der Ratschläge und Warnungen.
electrolux • Das Kältemittel Isobutan (R600a) im Kältekreislauf des Gerätes ist ein natürliches und sehr umweltfreundliches Gas, das jedoch leicht entflammbar ist. Achten Sie beim Transport und bei der Aufstellung des Gerätes darauf, nicht die Komponenten des Kältekreislaufs zu beschädigen.
electrolux 29 • • • • • • dem Sie es erworben haben. Bewahren Sie in diesem Fall die Verpackung auf. Lassen Sie das Gerät mindestens vier Stunden stehen, bevor Sie es elektrisch anschließen, damit das Öl in den Kompressor zurückfließen kann. Ausreichenden Freiraum zur Luftzirkulation um das Gerät lassen; anderenfalls besteht Überhitzungsgefahr. Halten Sie sich für die Belüftung an die Installationsanweisungen.
electrolux Erste Inbetriebnahme Reinigung des Innenraums Bevor Sie das Gerät in Betrieb nehmen, beseitigen Sie den typischen "Neugeruch" am besten durch Auswaschen der Innenteile mit lauwarmem Wasser und einem neutralen Reinigungsmittel. Sorgfältig nachtrocknen. Wichtig! Verwenden Sie keine Reinigungsmittel oder Scheuerpulver, da hierdurch die Oberfläche beschädigt wird.
electrolux 31 Die Flaschenablage kann in der Neigung verstellt werden, damit bereits geöffnete Flaschen geöffnet werden können. Zu diesem Zweck das Regal so hochziehen, dass es sich drehen und in die nächst höhere Einschubebene setzen lässt. Positionierung der Türeinsätze Die Türeinsätze können in verschiedener Höhe positioniert werden; damit ermöglichen Sie das Lagern verschieden großer Lebensmittelpackungen.
electrolux Täglicher Gebrauch Normale Betriebsgeräusche • Unter Umständen ist ein leichtes Gurgeln und Blubbern zu hören, wenn das Kältemittel durch die Leitungen gepumpt wird. Das ist normal. • Bei eingeschaltetem Kompressor wird das Kältemittel umgewälzt und Sie hören ein Surren und ein pulsierendes Geräusch vom Kompressor. Das ist normal. • Die thermische Ausdehnung kann ein plötzliches Krachen verursachen. Das ist eine natürliche und nicht gefährliche physikalische Erscheinung. Das ist normal.
electrolux 33 bekommen, da dieses sonst antauen kann; • weniger fetthaltige Lebensmittel lassen sich besser lagern als fetthaltigere; Salz verkürzt die Lagerzeit von Lebensmitteln im Gefrierfach; • werden Gefrierwürfel direkt nach der Entnahme aus dem Gefrierfach verwendet, können Sie zu Frostbrand auf der Haut führen; • Es empfiehlt sich, das Einfrierdatum auf jeder einzelnen Packung zu notieren, um einen genauen Überblick über die Lagerzeit zu haben.
electrolux gelieferte Reinigungswerkzeug, das sich bereits in der Ablauföffnung befindet. Abtauen des Gefrierschranks Auf den Ablagen des Gefrierschranks und im Innern des oberen Fachs wird sich stets etwas Reif bilden. Tauen Sie den Gefrierschrank ab, wenn die Reifschicht eine Stärke von etwa 3 bis 5 mm erreicht hat. Entfernen Sie den Reif wie nachstehend erläutert: • Ziehen Sie den Netzstecker oder schalten Sie das Gerät ab.
electrolux 35 Störung Mögliche Ursache Abhilfe Das Gerät ist zu laut. Das Gerät ist nicht korrekt abgestützt. Prüfen Sie, ob das Gerät stabil steht (alle vier Füße müssen fest auf dem Boden stehen). Der Kompressor arbeitet ständig. Der Temperaturregler kann falsch Stellen Sie eine wärmere Tempeeingestellt sein. ratur ein. Die Tür ist nicht richtig geschlossen. Siehe hierzu "Schließen der Tür". Die Tür wurde zu häufig geöffnet. Lassen Sie die Tür nicht länger als unbedingt erforderlich offen.
electrolux Störung Mögliche Ursache Das Gerät funktioniert nicht. Die Lampe funktioniert nicht. Abhilfe Das Gerät ist abgeschaltet. Schalten Sie das Gerät ein. Der Netzstecker ist nicht richtig in die Steckdose gesteckt. Stecken Sie den Netzstecker richtig in die Steckdose. Das Gerät bekommt keinen Strom. Es liegt keine Spannung an der Netzsteckdose an. Versuchen Sie bitte, ob ein anderes Gerät an dieser Steckdose funktioniert. Kontaktieren Sie einen qualifizierten Elektriker.
electrolux 37 Aufstellung Installieren Sie dieses Gerät an einem Ort, an dem die Umgebungstemperatur mit der Klimaklasse übereinstimmt, die auf dem Typschild des Geräts angegeben ist: Klimaklasse Umgebungstemperatur SN +10°C bis + 32°C N +16°C bis + 32°C ST +16°C bis + 38°C T +16°C bis + 43°C Standort Das Gerät sollte möglichst weit entfernt von Wärmequellen wie Heizungen, Boilern oder direktem Sonnenlicht usw. aufgestellt werden.
electrolux 2 1 3 Ausrichten Bei der Aufstellung des Gerätes muss dieses waagerecht ausgerichtet werden. Dies lässt sich mit einem oder mehreren Schraubfüßen am Sockel des Gerätes erreichen. Wechsel des Türanschlags Warnung! Vor der Durchführung von Arbeiten am Gerät ist stets der Netzstecker ziehen. Wichtig! Die nachfolgend beschriebenen Tätigkeiten müssen mit Hilfe einer zweiten Person durchgeführt werden, um ein Herunterfallen der Türen zu vermeiden.
electrolux 39 2. Die Türen entfernen. 3. Das Distanzstück (m6) entfernen und an der anderen Seite des Scharnierhaltestifts (m5) befestigen. 4. Die Abdeckung (b1) mit einem geeigneten Werkzeug entfernen. Den Haltestift (b2) des unteren Scharniers lösen, das Distanzstück (b3) entfernen und an der gegenüberliegenden Seite montieren. 5. Die Abdeckung (b1) auf der anderen Seite wieder anbringen. b1 b2 b3 6. Die Abdeckungen (1) entfernen und auf der gegenüberliegenden Seite der Türen befestigen. 1 7.
electrolux dendiensttechniker wird die Türen dann auf Ihre Kosten umbauen. Hinweise zum Umweltschutz Das Symbol auf dem Produkt oder seiner Verpackung weist darauf hin, dass dieses Produkt nicht als normaler Haushaltsabfall zu behandeln ist, sondern an einem Sammelpunkt für das Recycling von elektrischen und elektronischen Geräten abgegeben werden muss. Durch Ihren Beitrag zum korrekten Entsorgen dieses Produkts schützen Sie die Umwelt und die Gesundheit Ihrer Mitmenschen.
electrolux 41 Electrolux. Thinking of you. Per conoscere meglio il nostro modo di pensare, visitate il sito www.electrolux.
electrolux componenti del circuito refrigerante venga danneggiato. Se il circuito refrigerante dovesse venire danneggiato: – evitare fiamme libere e sorgenti di accensione – ventilare la stanza in cui si trova l'apparecchio • È pericoloso cambiare le specifiche o modificare il prodotto in qualunque modo. Un danneggiamento del cavo potrebbe provocare cortocircuiti, incendi e/o scosse elettriche.
electrolux 43 • • • • menti si può surriscaldare. Per ottenere una ventilazione sufficiente seguire le istruzioni di installazione. Se possibile il retro dell'apparecchio dovrebbe essere posizionato contro una parete per evitare di toccare le parti calde o di rimanervi impigliati (compressore, condensatore), evitando così possibili scottature. L'apparecchio non deve essere posto vicino a radiatori o piani di cottura a gas. Installare l'apparecchio in modo che la presa rimanga accessibile.
electrolux Utilizzo quotidiano Congelazione dei cibi freschi Il vano congelatore è adatto alla congelazione di cibi freschi e alla conservazione a lungo termine di cibi congelati e surgelati. Per congelare cibi freschi non è necessario cambiare la regolazione media. Tuttavia, per un'operazione di congelamento più rapida, ruotare il termostato verso una regolazione più alta per ottenere il massimo raffreddamento. Importante In questa condizione la temperatura del vano frigorifero può scendere sotto 0°C.
electrolux 45 Rimozione dei cestelli dal vano congelatore I cestelli del vano congelatore sono provvisti di un fermo che ne impedisce la caduta o la rimozione accidentale. Per estrarre un cestello dal vano congelatore, tirarlo in avanti e, al raggiungimento del fermo, inclinare verso l'alto la parte anteriore. Per reinserire il cestello, sollevarlo leggermente sul lato anteriore e introdurlo nel vano congelatore. Una volta superato il fermo, spingere il cestello nella posizione originaria.
electrolux naturale, non pericoloso. Non si tratta di un'anomalia. • Quando il compressore si accende o si spegne, si sente un lieve scatto del regolatore della temperatura. Non si tratta di un'anomalia. Consigli per il risparmio energetico • Non aprire frequentemente la porta e non lasciarla aperta più di quanto assolutamente necessario.
electrolux 47 Pulizia e cura Attenzione Staccare la spina dell'apparecchio prima di eseguire lavori di manutenzione. Questo apparecchio contiene idrocarburi nell'unità di raffreddamento; la manutenzione e la ricarica devono pertanto essere effettuate esclusivamente da tecnici autorizzati. ciale sul retro dell'apparecchio, sopra il motocompressore, dove evapora.
electrolux • Quando il ghiaccio inizia a sciogliersi, raschiarlo con delicatezza usando un raschietto di legno o di plastica. • Quando il ghiaccio è completamente sciolto, pulire e asciugare il vano interno e riporre il canale di scarico. • Riaccendere l'apparecchio e reintrodurre i surgelati. Si raccomanda di far funzionare l'apparecchio per alcune ore regolando il termostato al massimo, in modo che possa raggiungere una temperatura sufficiente nel più breve tempo possibile.
electrolux 49 Problema Possibile causa Soluzione Scorre acqua sul pavimento. L'acqua di sbrinamento non vie- Collegare lo scarico dell'acqua di ne scaricata nella bacinella di sbrinamento alla bacinella di evaevaporazione posta sopra il com- porazione. pressore. Lo strato di brina è troppo spesso. Gli alimenti non sono avvolti correttamente. Avvolgere correttamente gli alimenti. La porta non è chiusa correttamente. Vedere "Chiusura della porta".
electrolux 5. Riapplicare il coprilampada. 6. Inserire la vite di fissaggio del coprilampada. 7. Reinserire la spina nella presa e accendere l'apparecchio. 8. Aprire la porta e verificare che la luce si accenda. Chiusura della porta 1. Pulire le guarnizioni della porta. 2. Se necessario, regolare la porta. Vedere "Installazione". 3. Se necessario, sostituire le guarnizioni della porta difettose. Contattare il Centro di assistenza locale.
electrolux 51 stanza minima tra quest'ultimo e lo spigolo superiore dell'apparecchio di almeno 100 mm. Se possibile, tuttavia, evitare di installare l'apparecchio sotto un pensile. Per consentire un perfetto livellamento dell'apparecchio sono provvisti uno o più piedini regolabili. 100 mm min Avvertenza Deve essere possibile scollegare l'apparecchio dalla rete elettrica; eseguire perciò l'installazione facendo sì che la spina rimanga facilmente accessibile.
electrolux 2. Rimuovere le porte. 3. Rimuovere il distanziatore (m6) e spostarlo sull'altro lato del perno della cerniera (m5). 4. Rimuovere il tappo (b1) usando un utensile adatto. Svitare il perno della cerniera inferiore (b2) e il distanziatore (b3) e fissarli sul lato opposto. 5. Reinserire il tappo (b1) sul lato opposto. b1 Reversibilità della porta Avvertenza Prima di eseguire le operazioni descritte, estrarre la spina dalla presa di corrente.
electrolux 53 8. Rimuovere il tappino di copertura di sinistra della cerniera centrale (m3, m4) e spostarlo sull'altro lato. 9. Inserire il perno della cerniera centrale (m5) nel foro di sinistra della porta inferiore. 10. Reinserire la porta inferiore sul perno (b2) della cerniera inferiore. 11. Inserire la porta superiore sul perno della cerniera superiore (t1). 12. Reinserire la porta superiore sul perno della cerniera centrale (m5) inclinando leggermente le due porte. 13.
electrolux
electrolux 55
www.electrolux.com Pour les accessoires et le pièces détachées visité notre Web Shop: www.electrolux.ch Für Gerätezubehör und Ersatzeile besuchen Sie unseren Web Shop: www.electrolux.ch Per gli accessori e i pezzi di ricambio vogliate visitare il nostro Web Shop: www.electrolux.