Benutzerinformation Notice d'utilisation Istruzioni per l'uso User manual Weinkühler Armoire à vins Refrigeratore per vino Wine Cooler SC361W10
We were thinking of you when we made this product
Welcome to the world of Electrolux Thank you for choosing a first class product from Electrolux, which hopefully will provide you with lots of pleasure in the future. The Electrolux ambition is to offer a wide variety of quality products that make your life more comfortable. You find some examples on the cover in this manual. Please take a few minutes to study this manual so that you can take advantage of the benefits of your new machine.
The following symbols are used in this manual: Important information concerning your personal safety and information on how to avoid damaging the appliance General information and tips Environmental information Scrapping old appliances The symbol on the product or on its packaging indicates that this product may not be treated as household waste. Instead it shall be handed over to the applicable collection point for the recycling of electrical and electronic equipment.
Safety instructions Your new Wine cooler may have other functions compared to your previous one. Carefully read these instructions to learn how the appliance works and how to care for it. Keep the instruction booklet. It will come in handy if you later sell the cabinet or give it to somebody else. These warnings are provided in the interests of your safety. Ensure that you understand them all before installing or using the appliance. Your safety is of paramount importance.
Contents Scrapping old cabinets . . . . . . . . . . 62 Safety instructions . . . . . . . . . . . . . . 63 Contents . . . . . . . . . . . . . . . . . . . . . . 64 USE . . . . . . . . . . . . . . . . . . . . . . . . . . Control Panel . . . . . . . . . . . . . . . . . . To start the wine cooler and set the correct temperature . . . . . . Temperature inside the wine cooler Wine Placement Storage tips . . . . . . . . . . . . . . . . Measuring the temperature . . . . . . . Switching off . . . . . . . . . . . . .
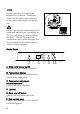
USE Position and clean the cabinet as explained in the section "Installation". Check that the drain hose at the rear of the cabinet discharges into the drip tray. Before inserting the power plug into the outlet and switching on the cabinet for the first time, leave it standing upright for about 4 hours. Otherwise the compressor may sustain damage. This time will allow the oil sufficient time to return to the compressor. Control Panel 12 A A. Wine cooler power switch Switches the wine cooler on and off. B.
To start the wine cooler and set the correct temperature Switching on: Switch on the wine cooler by pressing the power switch. + + + 12 Setting the temperature Press the buttons until the desired temperature flashes in the temperature display (The temperature can be set between +6°C and +17°C.) "+" raises the temperature. "-" lowers the temperature. + 12 Once set, the temperature display shows the current temperature inside the cabinet.
Store the bottles lying down so that the corks do not dry out. Store the wine in the dark. The cooler doors are made with double-paned glass with a dark coating. This will protect the wine against light damage if the cooler is placed in a well-lit area. Avoid turning on the light in the cooler too often or for too long. The wine should be stored in the dark. Handle the bottles with care, so that the wine is not agitated.
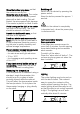
Cabinet interior The drawer has two moveable partitions. The shelves may be placed flat or at an angle. Angle the shelf by placing the front pegs in a lower set of tracks. You can store already opened bottles on the shelf in this position. HINT and TIPS Saving energy · Pay careful attention to where the cabinet is placed. See the section "Installation". When installed correctly, the cabinet will consume less energy.
MAINTENANCE and CLEANING Removing the ventilation grille The ventilation grille can be removed, e.g. to wash the grille. Make sure the door is open when removing the ventilation grille. Unsnap the upper edge of the grille by pulling outward/downward. Then pull the grille straight out to completely remove it. Cleaning Clean the cabinet at regular intervals. Disconnect the appliance from electricity supply.
Defrosting the wine cooler The wine cooler is defrosted automatically every time the compressor stops. Frost formation can be prevented by: · not putting warm foodstuff inside the cabinet. · avoiding frequently opening the When moving the cabinet, lift it by the f door or keeping it open too long. avoid scratching the floor. When the appliance is not in use To change the lamp Disconnect the appliance from Before replacing the light bulb, electricity supply.
It is too warm inside the wine cooler. Set a lower temperature. Make sure that the door is completely closed and that the insulating strip is complete and clean. It is too cold inside the wine cooler. Set a warmer temperature. There is water on the cooling plate inside the wine cooler. This is normal. During automatic defrosting, frost thaws on the cooling plate. Water is running inside the wine cooler. Clean the water drain and drain hole inside the wine cooler using e.g.
Sound level in cabinet is too high. The refrigerating system will always produce some sounds. A pulsing sound is heard when coolant is pumped inside the cooling pipes. A ticking sound from the thermostat can be heard when the compressor switches on and off. The sound level varies depending on the operation of the cabinet. If you feel the sound level is incorrect: Make sure the pipes at the back of the cabinet not touch each other. Carefully bend them if they do.
Unpacking Unpack the cabinet and check that it is in good condition and free of any transport damage. Notify the dealer immediately of any damage. Hand the packaging over for recycling. For more information, contact your local city office or the dealer. Do not allow children to play with the packaging. The plastic film can cause suffocation. Remove the transport supports Remove the tape and the transport supports from · the door sides · inside the door hinges · the shelves Remove the transport hinge.
To obtain the best performance from the cabinet, ensure: · the cabinet is placed in a dry, cool place and is not exposed to direct sunlight. · the cabinet is not placed close to a source of heat, e.g. a cooker or dishwasher. · the cabinet is level. The cabinet should not lean against any wall. If necessary adjust the feet using the adjustment spanner supplied. · there is good air circulation around the cabinet and that the air channels below and behind the cabinet are not blocked.
Door Reversal 1. Close the cabinet and remove the plug from the electrical socket. 2. Remove the ventilation grille. There is a part on the grille that can be removed. Remove and reposition it on the other side. 3. Put the cabinet on a wooden board when it is laid down. Later, when raising the cabinet, it will be easier to grip under the cabinet thanks to the board. 1 2 3 4 4. On the upper part of the cabinet. Put the hinge pin on the other side. On the lower part of the cabinet. Unscrew the hinge.
KUNDENDIENST Servicestellen Points de service Servizio dopo vendita 5506 Mägenwil/Zürich Industriestr. 10 1028 Préverenges Le Trési 6 6916 Grancia Zona Industriale E Ersatzteilverkauf Point de vente de rechange Vendita pezzi di ricambio 5506 Mägenwil Industriestrasse 10 Tel. 0848 848 023 5506 Mägenwil Industriestrasse 10 Tel. 0848 848 023 5506 Mägenwil Industriestrasse 10 Tel.
EUROPEAN GUARANTEE This appliance is guaranteed by Electrolux in each of the countries listed at the back of this user manual, for the period specified in the appliance guarantee or otherwise by law.
p t b Great Britain +44 8705 929 929 Addington Way, Luton, Bedfordshire LU4 9QQ Hellas +30 23 10 56 19 70 4 Limnou Str., 54627 Thessaloniki Hrvatska +385 1 63 23 338 Slavonska avenija 3, 10000 Zagreb Ireland +353 1 40 90 753 Long Mile Road Dublin 12 Italia +39 (0) 434 558500 C.so Lino Zanussi, 26 - 33080 Porcia (PN) Latvija +37 17 84 59 34 Kr.
79
www.electrolux.com www.electrolux.