Use & Care Guide Side-By-Side Refrigerator 241868900 August 2007
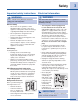
Finding Information Please read and save this guide Thank you for choosing Electrolux, our new premium brand in home appliances. This Use & Care Guide is part of our commitment to customer satisfaction and product quality throughout the service life of your new appliance. Keep a record for quick reference Purchase date Electrolux model number Electrolux serial number NOTE Registering your product with Electrolux enhances our ability to serve you. You can register online at www.electroluxusa.
Safety Important safety instructions WARNING Please read all safety instructions before using your new refrigerator. General Safety • Do not store or use gasoline, or other flammable liquids, near this or any other appliance. Read product labels for warnings regarding flammability and other hazards. • Do not operate the refrigerator in the presence of explosive fumes. • Avoid contact with any moving parts of the automatic ice maker. • Remove all staples from the carton to avoid cut injuries.
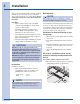
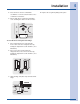
Installation This Use & Care Guide provides general operating instructions for your model. Use the refrigerator only as instructed in this Use & Care Guide. Before starting the refrigerator, follow these important first steps. Door opening NOTE The refrigerator doors are designed to shut by themselves within a 20 degree opening. Location • Choose a place that is near a grounded electrical outlet. Do Not use an extension cord or an adapter plug.
Installation 2 Close the doors and use a flat-blade screwdriver or ³⁄₈ inch socket wrench to raise or lower the front rollers. 3 Ensure both doors are bind-free with their seals touching the cabinet on all four sides. To level the doors using the lower hinge: 1 If the refrigerator door is lower than the freezer door, raise the refrigerator door by turning the adjustment screw clockwise. (See illustration.
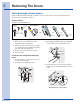
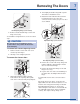
Removing The Doors Getting through narrow spaces If your refrigerator will not fit through an entrance area, you can reduce its size by removing the doors. Check first by measuring the entrance. Required Tools You will need the following tools: Top Hinge Cover Rear Screw Top Hinge Cover Front Screw Top Hinge Screw Tools Necessary: AND Bottom Hinge Screw Phillips Head ™ To prepare for removing the doors: 1 Make sure the electrical power cord is unplugged from the wall outlet.
Removing The Doors 2 Trace lightly around the hinge with a pencil. This makes reinstallation easier. 3 Detach the water tube from the connector located below the freezer door. The connector releases when you press its outer sleeve inward. Non-Adjusting Hinge (some models) 3 Remove the two bottom hinge screws and hinge if necessary. To reinstall the refrigerator door, reverse the above steps.
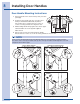
Installing Door Handles Door Handle Mounting Instructions 1 Remove handles from carton and any other protective packaging. 2 Position freezer handle end caps over upper and lower pre-installed shoulder bolts (A) that are fastened into door, ensuring the holes for the set screws are facing towards the refrigerator door. 3 While holding handle firmly against door, fasten upper and lower Allen set screws (B) with supplied Allen wrench. 4 Repeat steps 2 and 3 to install refrigerator handle.
Connecting The Water Supply About your refrigerator’s water supply The automatic ice & water dispenser on your refrigerator requires a permanent water supply to function correctly. During installation, you (or a service professional) establish this water supply by connecting a copper tube from your household water system to a valve at the rear of the refrigerator. You may have already followed the directions in the Installation Instructions to connect the water supply.
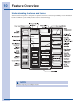
Feature Overview Understanding features and terms Your Electrolux refrigerator is designed for optimal convenience and storage flexibility. Use the illustration below to familiarize yourself with product features and terminology. NOTE Features may vary according to model.
Controls Wave-TouchTM IQ-TouchTM 11
Controls Wave-TouchTM (some models) 3rd Level: User Variable Options Your refrigerator is equipped with a Wave-TouchTM Panel user interface display. It is only necessary to touch the glass. There is no need to press with force. There are three levels of display. 1st Level: Sleep Mode Touching the options icon displays the following options: vacation mode Sleep mode displays only the water, cubes and crushed options. Touch an icon to activate the desired dispenser mode.
Controls (-) indicators will appear on either side of the displayed temperatures. 3 Press the + or – indicator to adjust the temperature to the desired setting. The temperature display will begin to blink with the first touch. After five seconds of inactivity, the display will beep to accept the new temperature. After 10 seconds, the display times out and returns to the basic display.
Controls IQ-TouchTM (some models) IMPORTANT Pressing the system off icon does not turn off power to your refrigerator. You must unplug the power cord from the wall outlet. Setting cooling temperatures Your refrigerator is equipped with a Glass Touch Panel user interface display. It is only necessary to touch the glass. There is no need to press with force.
Storage Features CAUTION NOTE To avoid injury from breakage, handle tempered glass shelves carefully. NOTE Features may vary according to model. You can easily adjust shelf positions in the freezer and fresh food compartments to suit your needs. The shelves have mounting brackets which attach to slotted supports at the rear of each compartment. To change the position of a shelf: 1 Before adjusting a shelf, remove all food.
Storage Features Crisper humidity control Doors Crisper drawers include a sliding control for adjusting the humidity inside the crisper. This feature can extend the life of certain fresh vegetables that keep longer in high humidity. Storage bins The doors to your freezer and fresh food compartments use a system of modular storage bins. All of these bins are removable for easy cleaning. Some of them have fixed positions, while others can be adjusted to your needs.
Storage Features Accessories Tall bottle retainer Dairy compartment The tall bottle retainer keeps tall containers in the bin from falling forward when opening or closing the refrigerator door. To install, snap the ends of the retainer over the edge of the retainer wall as shown in the illustration. Use the dairy compartment, at the top of the fresh food compartment door, for short term storage of cheese, spreads, or butter.
Automatic Ice & Water Maker/Dispenser Priming the water supply system Your refrigerator’s water supply system includes several tubing lines, an advanced water filter, a distribution valve bank, and a reserve tank to ensure ample supply to the ice and water dispenser at all times. This system needs to be completely filled with water when first connected to an external supply line. CAUTION For proper dispenser operation, recommended water supply pressure should fall between 30 psi and 100 psi.
Automatic Ice & Water Maker/Dispenser Ice maker/dispenser tips • Ice cubes stored too long may develop an odd flavor. Empty the ice container as explained below. • Occasionally shake the ice container to keep ice separated. • If your refrigerator is not connected to a water supply or the water supply is turned off, turn off the ice maker by pressing the On/Off switch. • If you need a large quantity of ice at one time, it is best to get cubes directly from the ice container.
Changing The Filter Locating the filters Your refrigerator is equipped with separate water and air filtering systems. The water filter system filters all dispensed drinking water, as well as the water used to produce ice. The air filter removes odors and impurities from the refrigerator compartment. Water filter The water filter is located at the top right side of the fresh food compartment. Air filter The air filter is located at the top of the fresh food compartment next to the water filter.
Changing The Filter More about your advanced water filter The PureAdvantageTM ice and water filter system is tested and certified by NSF International, the nationally respected, not-for-profit certification organization for public health safety. The PureAdvantageTM ice and water filter system is tested and certified to ANSI/NSF Standards 42 and 53 for the reduction of claims specified on the performance data sheet.
Storing Food & Saving Energy Ideas for storing foods Fresh food storage • Keep the fresh food compartment between 34° F and 40° F with an optimum temperature of 37° F. • Avoid overcrowding the refrigerator shelves, which reduces air circulation and causes uneven cooling. Fruits and vegetables • Store fruits and vegetables in crisper drawers, where trapped moisture helps preserve food quality for longer time periods.
Normal Operating Sounds & Sights Understanding the sounds you may hear Your new, high-efficiency refrigerator may introduce unfamiliar sounds. These sounds normally indicate your refrigerator is operating correctly. Some surfaces on floors, walls, and kitchen cabinets may make these sounds more noticeable. Following is a list of major components in your refrigerator and the sounds they can cause: A Evaporator Refrigerant through the evaporator may create a boiling or gurgling sound.
Care & Cleaning Protecting your investment Keeping your refrigerator clean maintains appearance and prevents odor build-up. Wipe up any spills immediately and clean the freezer and fresh food compartments at least twice a year. When cleaning, take the following precautions: • Never use metallic scouring pads, brushes, abrasive cleaners or strong alkaline solutions on any surface. • Never use CHLORIDE to clean stainless steel. • Do not wash any removable parts in a dishwasher.
Care & Cleaning Care & cleaning tips Part Interior & Door Liners Door Gaskets Drawers & Bins Glass Shelves Toe Grille Exterior & Handles Exterior & Handles (Stainless Steel Models Only) Cleaning Agents • Soap and water • Baking soda and water • Soap and water • Soap and water • Soap and water • Glass cleaner • Mild liquid sprays • Soap and water • Mild liquid sprays • Vacuum attachment • Soap and water • Non abrasive glass cleaner • Soap and water • Ammonia • Stainless steel cleaners Tips and Precautio
Care & Cleaning Replacing light bulbs Both the freezer and fresh food compartments of your refrigerator include light bulbs that will need replacing from time to time. Some lights have covers that you will need to remove before replacing the bulbs. Always use bulbs that are designed for appliance lighting. CAUTION Wear gloves when replacing light bulbs to avoid getting cut. To replace light bulbs: 1 Unplug your refrigerator’s power cord. 2 Wear gloves as protection against possible broken glass.
Warranty Major Appliance Warranty Information Your appliance is covered by a one year limited warranty. For one year from your original date of purchase, Electrolux will repair or replace any parts of this appliance that prove to be defective in materials or workmanship when such appliance is installed, used, and maintained in accordance with the provided instructions.
Solutions To Common Problems Before you call... If you experience a problem with your refrigerator or notice a product behavior or condition you do not understand, you can usually avoid a call to your service representative by referring to this section for an answer. Beginning with the following table, this information includes common problems, causes, and suggested solutions. Running Your Refrigerator Problem Compressor does not run. Cause • Cooling system is turned Off.
Solutions To Common Problems Temperatures Are Too Cold Problem Freezer temperature too cold. Refrigerator temperature is satisfactory. Refrigerator temperature too cold. Freezer temperature is satisfactory. Food stored in drawers freezes. Food stored in Meat Keeper freezes (some models). Cause Correction • Refrigerator control is set too cold. • Set refrigerator control to a warmer setting. Allow 24 hours for temperature to stabilize. • Refrigerator control is set too cold.
Solutions To Common Problems Water/Moisture/Frost Inside Refrigerator Problem Cause Correction Water collects on bottom side of drawer cover. • Vegetables contain and give off moisture. Moisture collects in bottom of drawer. • Washed vegetables and fruit drain while in the drawer. • Fruits and vegetables are kept past their prime • Weather is humid. • Moisture on the bottom side of the cover is not unusual. • Move humidity control (some models) to lower setting.
Solutions To Common Problems Automatic Ice Maker Problem Ice maker is not making any ice. Cause • Ice maker power switch is Off. • Water supply is not connected to refrigerator. • Household water line valve is not open. • Freezer is not cold enough. • Valve on cold water pipe is clogged or restricted by foreign material. If valve is of the self-piercing type, it may not have created a sufficiently sized hole in tube for water to pass through. • Check to see if the water dispenser is dispensing water.
Solutions To Common Problems Ice Dispenser Problem Dispenser will not dispense ice. Cause • Water supply is not connected. • Ice storage container is empty. • Freezer temperature is set too warm. • Household water line valve is not open. • Freezer door is not closed. Ice dispenser is jammed. • Ice dispensing arm has been held in for more than 4-5 minutes. • Ice has melted and frozen around auger due to infrequent use, temperature fluctuations, and/or power outages.
Solutions To Common Problems Odors In Refrigerator Problem Interior is dirty. Cause • Interior needs to be cleaned. • Food with strong odors is stored in refrigerator. Correction • See Care & Cleaning Tips. • Cover food tightly. Turn on air filtration system. Air filter may need to be changed more frequently if foods with strong odors are routinely stored in refrigerator. Opening/Closing Of Doors/Drawers Problem Door(s) will not close.