user manual Pro Steam Condenser Dryer TK SL5 E
We were thinking of you when we made this product
electrolux 3 Welcome to the world of Electrolux 136901221-00-04102007 You’ve chosen a first class product from Electrolux, which hopefully will provide you with lots of pleasure in the future. Electrolux ambition is to offer a wide variety of quality products that would make your life even more comfortable. You can look at some examples on the cover in this manual. But now it’s time to study this manual and start using and enjoying the benefits from your new machine.
electrolux Contents Operating Instructions Important safety information Product description Care and cleaning Technical data Consumption values Hints for test institutes Installation Environment 5 5 10 38 53 54 55 55 60 Subject to change without notice
important safety information electrolux 5 Operating Instructions Important safety information Only operate the ProSteam programmes with distilled water! Mains water causes damage to the appliance. In the interest of your safety and to ensure the correct use, before installing and first using the appliance, read this user manual carefully, including its hints and warnings.
electrolux important safety information • Items such as foam rubber (latex foam), shower caps, waterproof textiles, rubber backed articles and clothes or pillows fitted with foam rubber pads should not be dried in the tumble dryer. • Always unplug the appliance after use, clean and maintenance. • Under no circumstances should you attempt to repair the machine yourself. Repairs carried out by inexperienced persons may cause injury or serious malfunctioning. Contact your local Service Centre.
important safety information electrolux 7 Never stop a tumble dry before the end of the drying cycle unless all items are quickly removed and spread out so that the heat is dissipated. Risk of fire! • Risk of electric shock! Do not spray down the appliance with jets of water. Installation • Note the "Installation" instructions. • Important! Appliance must be moved in vertical position for transport. • This appliance is heavy. Care should be taken when moving it.
electrolux important safety information • Clothes which are dripping wet should not be placed in the dryer. • Garments which have been in contact with volatile petroleum products should not be machine dried. If volatile cleaning fluids are used, care should be taken to ensure that the fluid is removed from the garment before placing in the machine. • When using dry-cleaning sets: only use those products which are declared as suitable for the dryer by the manufacturer.
important safety information electrolux 9 • When discarding the appliance, cut the electrical supply cable and destroy the plug with the remaining cable. Disable to door catch in order to prevent young children from becoming trapped inside the machine while playing.
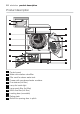
electrolux product description Product description 2 3 1 4 6 5 7 8 9 10 11 12 14 1 2 3 4 5 6 7 8 9 10 11 Control panel Water recirculation valve/filter Filler neck for steam water tank Drawer with condensed water container Fine strainer (lint filter) Lamp for inside light Large mesh filter (lint filter) Micro-fine filter (lint filter) Loading door (reversible) Rating plate Button for opening door in plinth 13 15
electrolux 11 12 13 14 15 Base door upstream of heat exchanger Air slots Drainage hose for water tank Screwed feet (with height adjustment) Control panel 6 1 1 2 3 4 5 6 5 4 2 3 Programme knob and ON/OFF (Aus) switch Function buttons START PAUSE button DELAY START (Zeitvorwahl) button Status led Display What is shown in the display 1 2 3 4 The display can show the following basic messages:
electrolux 1 2 3 4 Currently set Pro Steam or drying programme name and cycle duration. Expected time of cycle end. Option icon after option selection. Visualization of additional functions. Each time when the cycle is performed, you are informed by animated progress bar about cycle status. In some cases you might be also guide and warn by displayed messages. First start-up Switching machine on / switching light on Turn the programme selector to any programme or turn it to LIGHT.
electrolux 13 1. EINSTELLUNGEN Zurück SPRACHE UHR DEU Press the OPTION button repeatedly, until the desired language appears in the display. 2. To confirm the choice press the OK button. After this a text appears asking you again to confirm the set language. This step is added to ensure that you did not set a language by mistake. To confirm the choice press the OK button again. In case of mistake or at any time after the first time use a short-cut is provided to avoid going through the SETTINGS.
electrolux To select the time please use OPTION button to confirm press OK. See also the chapter " Machine settings". Before first use In order to remove any residues which may have been produced during production, wipe the dryer drum with a damp cloth or carry out a brief drying cycle (30 MIN) with damp cloths in the machine. 1. Turn the programme knob to TIME (Zeitprogramm). 2. Press the TIME (Zeitwahl) button repeatedly until 30' appears in the display. 3. Press the START PAUSE button.
electrolux 15 Sorting and preparing laundry Sorting laundry • Sort by fabric type: – Cotton/linen for programmes in COTTONS (Baumwolle) pogramme group. – Mixtures and synthetics for programmes in SYNTHETICS (Mischgewebe) programme group. • Sorting by care label.
electrolux • To smooth or freshen laundry with a Pro Steam programme, sort laundry by size, weight, material and colour. Only smooth textiles together that are similar in terms of size, weight, material and colour. • Do not dry new, coloured textiles together with light-coloured laundry items. Colours may fade (check colour fastness of fabric when damp in an inconspicuous area). • Do not use dry cleaning sets in combination with Pro Steam programmes.
electrolux 17 Use force to push against the loading door (push point - see picture) 2. Load your laundry (do not force it in). Do not jam laundry in between the loading door and rubber seal. 3. Close loading door securely. Lock must audibly lock.
electrolux Pro Steam system Fill steam water tank You must fill up the steam water tank before using a Pro Steam programme for the first time. Use the distilled water provided if there is not yet any condensed water from previous drying programmes (see chapter on ‘Care and cleaning, Emptying condensed water container’). If, after a Pro Steam programme is selected, following message The steam water tank is empty.
electrolux 19 Fill with distilled water from the canister provided, up to the MAX mark inside the container. Push filler neck and drawer with condensed water container back in. When dry, all textiles not specifically prohibited in the chapter ‘Sorting and preparing laundry’ may be treated with the Pro Steam System. Wet textiles may only be treated if they are labelled as suitable for dry programmes.
electrolux 2. turn the valve in ON position. Water will be supplied by the water circuit directly to the steam water tank filling it automatically during the next drying cycle. The steam water tank is empty. Please fill it and then press START If valve is closed (OFF position) - recirculation system does not work.
electrolux 21 Overview of Pro Steam programmes SPIN SPEED1) DELAY START (Zeitvorwahl) • • • • For 1- 5 cotton shirts. Min. • 80% natural fibres (cotton, linen etc). SYNTHETIC SHIRTS (Hemden Misch.) 1.0 kg • • • • For 1- 5 synthetic shirts. Max. wet, dry • 20% natural fibres (cotton, linen etc). COTTONS (Baumwolle) 3.0 kg • • • • For smoothing cotton garwet, • ments. Min. 80% natural fibres dry (cotton, linen etc). EASY CARE ( Mischgewebe) 1.
SPIN SPEED1) DELAY START (Zeitvorwahl) BUZZER1) 2.5 kg LONG ANTI-CREASE 1) BUSINESS REFRESH (Business Kleidung Refresh) Additional functions / options STEAM LEVEL (Dampfmenge) Programmes max. load (weight when dry) 22 electrolux - For suits, jacket suits and trou• sers refresh Application/properties dry • • • 1) OPTION menu 2) for more details please refer to Textile Guide leaflet. All information on applications is for guidance only.
electrolux 23 Given the wide range of different textile grades and properties that can be manufactured today using different mechanical and chemical processes, we recommend running the first few Pro Steam programmes at low steam levels and with a small number of garments that are as similar as possible.
electrolux STEA M LEVEL Loading DURATION dry1) DURATION wet 1) Programme (Damp volume [min.] [min.] fmeng e) COTTON SHIRTS (Hemden Baumwolle) SYNTHETIC SHIRTS (Hemden Misch.) COTTONS (Baumwolle) EASY CARE (Mischgewebe) WOOL REFRESH (Wolle Refresh) CASUAL REFRESH (Legere Kleidung Refresh) MIN 1-2 items MED 3-4 items MAX 5 items MIN 1-2 items MED 3-4 items MAX 5 items MIN 0.5 - 1 kg MED 1 - 2 kg MAX 2 - 3 kg MIN 0,2 - 0,5 kg MED 0.5 - 1 kg MAX 1 – 1.
electrolux 25 STEA M LEVEL Loading DURATION dry1) DURATION wet 1) Programme (Damp volume [min.] [min.] fmeng e) BUSINESS REFRESH (Business Kleidung Refresh) MIN 1 pair of trousers 17 - MED 1 jacket 18 - MAX 1 suit 19 - 1) exact programme times appear in the display once the machine has performed wet/dry recognition (approx. 2 min.) All information provided on selecting the steam level and corresponding load are suggestions only.
electrolux If the STEAM LEVEL (Dampfmenge) button is not pressed after a Pro Steam programme is selected, the medium steam level (MED) is selected automatically. If you select a REFRESH programme, MIN is selected automatically. If in doubt, always select a lower steam level first until you have more experience with load volumes, fabric types and the corresponding optimum steam level. If too high steam level is selected, garments may lose their shape.
electrolux 27 – cycle interruption by a warning – alarm CHILD LOCK The child lock can be set to prevent a programme being accidentally started or a programme in operation being accidentally changed. The child safety device locks all buttons and the programme knob. The child safety device can by deactivated by holding down the OPTION and OK buttons simultaneously for 5 seconds.
electrolux 2. Press the DELAY (Zeitvorwahl) button as many times as necessary. During selection, END TIME of the cycle increases in the display and delay icon is on. If you reach 20 hours of start delay and you press the button again, the time delay is cancelled and delay icon disappears. 3. To activate the delay timer, press the START PAUSE button. The amount of time remaining until the programme is set to start is continuously displayed (e.g. 5:00 hours, 4:59… 0:30 minutes etc).
electrolux 29 It is normal for the appliance to make noises during a Pro Steam or drying programme if garments with hard parts, such as metal buttons, are put in the drum. Changing a programme To change a programme which has been selected by mistake once the programme has started, first turn the programme selector to OFF and then reset the programme. The programme can no longer be changed directly once the programme has started.
electrolux The Pro Steam programme is automatically followed by an anti-crease phase, including brief steam phases, which lasts around 30 minutes. The drum rotates during the anti-crease phase. This keeps the laundry loose and free of creases. It can be removed at any time during the anticrease phase, except during steam injection phases (look for STEAM INJECTION message in the display !). Laundry should be removed as quickly as possible. 1. Open the loading door to remove the laundry. 2.
electrolux 31 Drying SYNTHETICS COTTONS (Baumwolle) EXTRA (Extratro cken) 7 kg CUPBOARD (Schrank trocken) 7 kg DAMP (Leichttro cken) 7 kg EXTRA (Extratro cken) 3 kg SENSITIVE1) LONG ANTI-CREASE BUZZER TIME DELAY START (Zeitvorwahl) Additional functions / options DRYNESS (Trockengrad) RPM DELICATE max.
SPECIAL TIME CUPBOARD (Schrank trocken) 3 kg DAMP (Leichttro cken) 3 kg TIME (Zeitprog ramm) 7 kg - SPORTS LIGHT (Sport) 2 kg • • BED LINEN (Bettwashe) 3 kg SENSITIVE1) LONG ANTI-CREASE BUZZER TIME DELAY START (Zeitvorwahl) Additional functions / options DRYNESS (Trockengrad) RPM DELICATE max. load (weight when dry) Programmes 32 electrolux • • • • • • • • • • • • - • • 3) Application/properties - For thin fabrics which are not ironed, e.g.
SENSITIVE1) LONG ANTI-CREASE BUZZER TIME DELAY START (Zeitvorwahl) Additional functions / options DRYNESS (Trockengrad) RPM DELICATE max. load (weight when dry) Programmes electrolux 33 JEANS 7 kg • • • • • • SILK (Seide) 1 kg • • WOOL (Wolle) 1 kg • • 1) not selectable wit DELICATE 2) select DELICATE 3) set by default • 3) • 3) - - • • • • Application/properties - For leisure clothing, such as jeans, sweatshirts, etc., of different • material thicknesses (e.g.
electrolux Selecting the programme Use the programme selector to set the programme you require. The estimated programme duration (in hours and minutes) appears in the multi-display as well as cycle finish time. Setting DRYNESS LEVEL If laundry comes out of the machine too damp after a standard drying programme, you can increase the drying result by using the DRYNESS LEVEL (Dampfmenge) function. Laundry becomes drier as you move from MIN to MAX.
electrolux 35 DELICATE For especially gentle drying of sensitive fabrics with the care label: and for temperature-sensitive textiles (e.g. acrylic, viscose). Programme is executed with reduced heat. DELICATE is only suitable for use with loads of up to 3kg. When the option is active, the DELICATE icon is on. SENSITIVE For gentle drying of fabrics that are frequently worn. Programme starts on full heat setting, which is then reduced as the programme progresses to be kind to the washing.
electrolux The higher the spin speed was, the shorter the programme length for the drying cycle. Activate the SPIN SPEED option and then number of times press OPTION button until the desired spin speed of the initial drainage is displayed. No value is shown if no spin speed is selected. In certain programmes the spin speed has not effect (time controlled cycles), its selection can be not selectable and only three dashes are visualized. Available selections: from 800 to 1800 rpm's in 100 rpm's intervals.
electrolux 37 It is normal for the appliance to make noises during drying programme if garments with hard parts, such as metal buttons, are put in the drum. Changing a programme To change a programme which has been selected by mistake once the programme has started, first turn the programme selector to OFF and then reset the programme. The programme can no longer be changed directly once the programme has started.
electrolux care and cleaning 1. Open the loading door to remove the laundry. 2. Before removing the laundry, remove fluff from the micro-fine filter. It is best to use a damp hand for this purpose. (See “Care and cleaning” chapter.) 3. Remove laundry. 4. Turn the programme knob to OFF. After each drying cycle – Clean the micro-fine filter and fine filter – Drain the condensed water container (See chapter “Care and Cleaning”.) 5. Close door.
care and cleaning electrolux 39 2. Use a damp hand to clean the micro- fine filter, which is built into the lower part of the loading aperture. 3. After a period of time, a patina due to detergent residue on laundry forms on the filters. When this occurs, clean the filters with warm water using a brush. Remove the filter from the door pulling it out. It can be positioned with the tooth facing to the left or to the right). After cleaning do not forget to put it back. 4.
electrolux care and cleaning 5. Take out fine strainer. 6. Remove fluff from fine strainer. It is best to use a damp hand for this purpose. Clean the entire filter area The strainer area does not have to be cleaned after every drying cycle, but should be checked regularly and cleaned of fluff if necessary. 7. To do this, grip the top of the large mesh filter and pull it forwards until it comes loose from the two brackets. 8. Remove fluff from the entire filter area.
care and cleaning electrolux 41 If the fine strainer is not fitted, the large mesh filter will not snap into place and the loading door cannot be closed. Cleaning the door seal Wipe the door seal with a damp cloth immediately after the drying cycle has finished. Emptying the condensate tank Empty condensed water container after every drying cycle.
electrolux care and cleaning 1. 2 1 Take out drawer containing condensed water container completely 1 and pull up the condensed water container’s drainage pipe as far as it will go 2. 2. Pour condensed water out into a basin or similar receptacle. 3. Slide outlet connections in and refit condensate tank. If the programme has been interrupted as a result of the condensate tank being full: Press the START PAUSE button to continue the drying cycle. The condensate tank has a volume of approx. 4 litres.
care and cleaning electrolux 43 The condensed water can be used as distilled water, e.g. for steam programmes. However, first filter the condensed water to remove any residues and small pieces of fluff. Using the attached canister to filter: Pour the water out of the container straight through the filter at the top of the canister. Cleaning heat exchanger If the message: Please clean the condenser is shown in the display, the heat exchanger needs to be cleaned.
electrolux care and cleaning 4. Turn both lock washers inwards. 5. Use the handle to pull the heat exchanger out of the base and carry it horizontally to prevent any remaining water from spilling. 6. To empty the heat exchanger, hold vertically over a washing-up bowl. Do not use sharp objects to clean. The heat exchanger could develop leaks. 7. Clean heat exchanger. It is best to use a brush or to rinse thoroughly with a hand-held shower. 8.
care and cleaning electrolux 45 1. 2. 3. 4. 5. 6. 7. Pull out completely the drawer containing condensed water container. Turn the valve/filter to the OFF position. Wait a few seconds to allow the correct emptying of the valve/filter. Pull out the valve/filter. Clean the valve/filter under warm water. Re-insert the valve/filter. Turn the valve/filter in ON position. Cleaning the drum Do not use abrasives or steel wool to clean the drum.
electrolux Clean operating screen and housing Do not use furniture cleaners or aggressive cleaning agents to clean the machine. Use a damp cloth to wipe down the operating screen and housing. What to do if ... Troubleshooting by yourself If, during operation, the warning message appears on the LCD follow strictly guides included in the massage on the display. If you are not able to solve the problem Problem Dryer does not work. Possible cause Mains plug is not plugged Plug in at mains socket.
electrolux 47 After a Pro Steam programme, there are no creases left in the garments. Clothes are not removed until the anti-crease phase is finished. Remove clothes quickly one at a time from the machine as soon as possible after the start of the anticrease phase. Garments not hung on clothes hangers and/or not tugged into shape. Hang garments on clothes hangers, do up buttons and tug garments into shape. Multi-layered garments tend to lose their shape.
electrolux Conductance of water at installation site differs from standard setting of machine. Re-programme standard setting for degree of drying (see ‘Programming options’ chapter). Fine strainer not in place and/or mesh filter not locked in place. Install fine strainer and/or snap large mesh filter into place. Drying protection. After When a button is pressed the start of the pro- no reaction of the magramme, the option can chine. no longer be set. Turn the programme knob to OFF.
electrolux 49 Drying cycle lasts an unusually long time. Note: After around 5 hours the drying cycle ends automatically (see „Drying cycle complete ”). Discoloration Lint filter clogged. Clean lint filter. Fluff filter clogged. Clean fluff filter. Load volume too big. Reduce load volume. Laundry insufficiently spun. Laundry must be adequately spun. Particularly high room temperature. Temporary switching off of the compressor to avoid overload.
electrolux Check the correct positioning of o-ring gasket before screwing back the door light cover. Do not operate the dryer when missing o-ring gasket on door light cover. For safety reasons, the cover must be screwed down tightly. If this is not done, the dryer must not be operated.
electrolux 51 Language setting is always first as a default. 1. Press OK button - frame above language abbreviation starts blinking. 2. Press OPTION button until you set requested language. 3. Press OK to confirm. TIME 1. 2. 3. 4. 5. 6. Press OPTION button until TIME selected. Press OK to confirm - hour indication starts blinking. Press OPTION until you set the right hour. Press OK to confirm - minutes indication starts blinking. Press OPTION until you set right minutes. Press OK to confirm.
electrolux CONTRAST 1. 2. 3. 4. Press OPTION button until CONTRAST selected. Press OK to confirm - frame around bar indicator starts blinking. Press OPTION until you set right contrast level. Press OK to confirm. WATER HARDNESS Water contains, a variable quantity of limestone and mineral salts of which quantities vary according to geographical locations thus varying its conductivity values.
technical data electrolux 53 available selections: – MIN- low conductivity <300 micro S/cm – MED - medium conductivity 300-600 micro S/cm – MAX- high conductivity >600 micro S/cm MED is set as default. FULL TANK WARNING - ON/OFF The container indicator at the end of the programme can be deactivated, for example, if an external condensed water drain is installed. 1. 2. 3. 4. Press OPTION button until FULL TANK WARNING selected. Press OK to confirm - frame around bar indicator starts blinking.
electrolux consumption values – 89/336/EEC dated 03.05.1989 EMC Directive inclusive of Amending Directive 92/31/EEC – 93/68/EEC dated 22.07.1993 CE Marking Directive Height x width x depth 85 x 60 x 58 cm Depth with loading door open 109 cm Height can be adjusted by 1.5 cm Weight when empty approx. 46 kg Loading volume (depends on programme)1) max. 7 kg Energy consumption in accordance with IEC 1121 s. e. (7kg of cotton, pre4.
hints for test institutes electrolux 55 Hints for test institutes Parameters possible to be checked by the Test Institutes: • Energy consumption (corrected with final humidity) during the cupboard dry cotton cycle with nominal load. • Energy consumption (corrected with final humidity) during the cupboard dry cotton cycle with half load.
electrolux installation The hot air emitted by the tumble dryer can reach temperatures of up to 60° C. The appliance must therefore not be installed on floors which are not resistant to high temperatures. When operating the tumble dryer, the room temperature must not be lower than +5°C and higher than +35°C, as it may affect the performance of the appliance. Should the appliance be moved, it must be transported vertically.
installation electrolux 57 3. Remove foil hose and polystyrene padding from the machine. Electrical connection Details on mains voltage, type of current and the fuses required should be taken from the type plate. The type plate is fitted near the loading aperture (see “Product description” chapter). Connect the machine to an earthed socket, in accordance with current wiring regulations.
electrolux installation A C B D A C 1. Open loading door. 2. Unscrew hinge A from the front of the machine and take off the loading door. 3. Remove cover plates B and C. To do this, insert a thin screwdriver into the slots as shown in the illustration, press downwards slightly and pry out the cover plates. 4. Use an appropriate tool and exert pressure to unfasten locking block D from the snap-on fixture, take out and re-insert on the other side having rotated the block through 180°. 5.
installation electrolux 59 E G F E F G 7. Unscrew cover plates E from the front of the machine, rotate through 180°, screw on the opposite side. 8. Unscrew door lock F, push down slightly and remove from the front of the machine. 9. Disconnect cable connector from door lock F. 10. Press snap-in button G in and down, press cover down slightly and remove from front of the machine. 11. Disconnect cable connector from cover G. 12.
electrolux environment Available from your Service Force Centre or your specialist dealer These intermediate installation kits can be used to arrange the dryer and an automatic AEG-Electrolux washing machine (60cm wide, front loading) as a spacesaving washer/dryer stack. The automatic washing machine is at the bottom and the dryer is at the top. Version to be supplied: – with extractable stacker plate 916.018 903 Read carefully the instructions supplied with the kit.
environment electrolux 61 this product is disposed of correctly, you will help prevent potential negative consequences for the environment and human health, which could otherwise be caused by inappropriate waste handling of this product. For more detailed information about recycling of this product, please contact your local council, your household waste disposal service or the shop where you purchased the product. Remove mains plug from socket when you have no further use for the machine.
electrolux
www.electrolux.com www.electrolux.