
User manual


9. INSTALLATION
WARNING!
Refer to Safety chapters.
9.1 Positioning
This appliance can be installed in a dry,
well ventilated indoor where the ambient
temperature corresponds to the climate
class indicated on the rating plate of the
appliance:
Climate
class
Ambient temperature
SN +10°C to + 32°C
N +16°C to + 32°C
ST +16°C to + 38°C
T +16°C to + 43°C
Some functional problems
might occur for some types of
models when operating outside
of that range. The correct
operation can only be
guaranteed within the specified
temperature range. If you have
any doubts regarding where to
install the appliance, please
turn to the vendor, to our
customer service or to the
nearest Service Centre
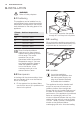
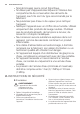
9.2 Rear spacers
In the bag with the documentation, there
are two spacers which must be fitted as
shown in the figure.
1. Fit the spacers into the holes. Make
sure that the arrow (A) is positioned as
shown in the picture.
45°
45°
A
1
2
2
2. Turn counter-clockwise the spacers
through 45° until they lock into place.
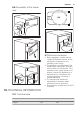
9.3 Levelling
When placing the appliance ensure that it
stands level. This can be achieved by two
adjustable feet at the bottom in front.
9.4 Location
It must be possible to
disconnect the appliance from
the mains power supply; the
plug must therefore be easily
accessible after installation.
The appliance should be installed well
away from sources of heat such as
radiators, boilers, direct sunlight etc.
Ensure that air can circulate freely around
the back of the cabinet. To ensure best
performance, if the appliance is positioned
below an overhanging wall unit, the
minimum distance between the top of the
cabinet and the wall unit must be at least
100 mm . Ideally, however, the appliance
should not be positioned below
overhanging wall units. Accurate levelling
www.electrolux.com12