user manual Condenser Dryer TKGL 5E 100
We were thinking of you when we made this product
electrolux 3 Welcome to the world of Electrolux 136901300 -00- 28092007 You’ve chosen a first class product from Electrolux, which hopefully will provide you with lots of pleasure in the future. Electrolux ambition is to offer a wide variety of quality products that would make your life even more comfortable. You can look at some examples on the cover in this manual. But now it’s time to study this manual and start using and enjoying the benefits from your new machine.
electrolux Contents Operating Instructions Important safety information Product description Control panel Before first use Sorting and preparing laundry Programme overview Daily use Care and cleaning What to do if ... Machine settings Technical data Consumption values Hints for test institutes Installation Environment Guarantee conditions Service www.electrolux.
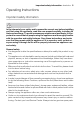
important safety information electrolux 5 Operating Instructions Important safety information In the interest of your safety and to ensure the correct use, before installing and first using the appliance, read this user manual carefully, including its hints and warnings. To avoid unnecessary mistakes and accidents, it is important to ensure that all people using the appliance are thoroughly familiar with its operation and safety features.
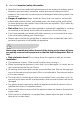
electrolux important safety information • Items that have been soiled with substances such as cooking oil acetone, petrol, kerosene, spot removers, turpentine, waxes and wax removers should be washed in hot water with an extra amount of detergent before being dried in the tumble dryer. • Danger of explosion: Never tumble dry items that have been in contact with inflammable solvents (petrol, methylated spirits, dry cleaning fluid and the like).
important safety information electrolux 7 • After having installed the appliance, check that it is not pressing or standing on its electrical supply cable. • If the tumble dryer is placed on top of a washing machine, it is compulsory to use the stacking kit (optional accessory). Use • This appliance is designed for domestic use. It must not be used for purposes other than those for which it was designed. • Only wash fabrics which are designed to be machine dried.
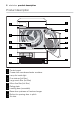
electrolux product description Product description 2 1 4 3 5 6 8 7 10 9 11 12 1 2 3 4 5 6 7 8 9 10 11 Control panel Drawer with condensed water container Lamp for inside light Fine strainer (lint filter) Large mesh filter (lint filter) Micro-fine filter (lint filter) Rating plate Loading door (reversible) Base door upstream of heat exchanger Button for opening door in plinth Air slots
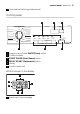
control panel electrolux 9 12 Screwed feet (with height adjustment) Control panel 5 6 Aus Arrêt Laufzeit Temps Restant Beleuchtung / Eclairage Wollpflege / Laine 4 Zeitvorwahl Départ Différé Baumwolle / Coton Extratrocken / Três Sec Leichtbügeln Plus / Facile à repasser Schranktrocken / Prêt à Ranger Sport Bügeltrocken / Prêt à Repasser Jeans Extratrocken / Três Sec Bettwäsche /Draps Schranktrocken / Prêt à Ranger Auffrischen /Rafraîchir Schon Délicat Sensitiv Sensible Knitterschutz Plus
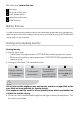
electrolux before first use 2 3 4 5 6 warnings long anti-crease icon cycle phase status delay time option icon child lock icon Before first use In order to remove any residues which may have been produced during production, wipe the dryer drum with a damp cloth or carry out a brief drying cycle (30 MIN) with damp cloths in the machine. Sorting and preparing laundry Sorting laundry • Sort by fabric type: – Cotton/linen for programmes in COTTONS (Baumwolle) programme group.
sorting and preparing laundry electrolux 11 • Do not dry cotton jersey and knitwear with the EXTRA programme. Items may shrink! • Do not dry wool in the dryer. May become entangled! After air-drying, wool may be dried with the WOOL CARE (Wollpflege) programme. Preparing laundry • To avoid laundry becoming tangled: close zips, button up duvet covers and tie loose ties or ribbons (e.g. of aprons). • Empty pockets. Remove metal items (paper clips, safety pins, etc).
electrolux programme overview Programme overview COTTONS (Baumwolle) EXTRA (Extratro cken) 7 kg CUPBOARD (Schrank trocken) 7 kg IRON (Bugeltro cken) 7 kg DELICATE(Schon) 1) SENSITIVE(Sensitiv) 1) LONG ANTI-CREASE (Knitterschutz Plus) BUZZER (Signal) TIME (Zeitwahl) DELAY START (Zeitvorwahl) max. load (weight when dry) Programmes Additional functions Application/properties - Thorough drying of thick or • multi- layered fabrics, e.g. terry towelling items, bathrobes.
programme overview electrolux 13 SYNTHETICS (Mischgewebe) (Mischgewebe) EXTRA (Extratro cken) CUPBOARD (Schrank trocken) 3 kg 3 kg DELICATE(Schon) 1) SENSITIVE(Sensitiv) 1) LONG ANTI-CREASE (Knitterschutz Plus) BUZZER (Signal) TIME (Zeitwahl) DELAY START (Zeitvorwahl) max. load (weight when dry) Programmes Additional functions • • • • • • • • Application/properties - Thorough drying of thick or • multi-layered fabrics, e.g. pullovers, bedding, table linen.
electrolux programme overview max. load (weight when dry) TIME (Zeitwahl) 7 kg FRESHE N UP (Auffrischen) S PE CI AL BED LINEN (Bettwasche) JEANS DELICATE(Schon) 1) SENSITIVE(Sensitiv) 1) LONG ANTI-CREASE (Knitterschutz Plus) BUZZER (Signal) TIME (Zeitwahl) DELAY START (Zeitvorwahl) Programmes TIME (Zeitwahl) (Zeitwahl) Additional functions Application/properties • For further drying of individual - • • • • items of laundry or for small volumes of less than 1kg.
programme overview electrolux 15 SPORTS LIGHT (Beleuch tung) (Sport) 2 kg DELICATE(Schon) 1) SENSITIVE(Sensitiv) 1) LONG ANTI-CREASE (Knitterschutz Plus) BUZZER (Signal) TIME (Zeitwahl) DELAY START (Zeitvorwahl) max. load (weight when dry) Programmes Additional functions A - • • EASY 1 IRON kg PLUS (or A - • • (Leichtbu 5 geln shir Plus) ts) Application/properties - For sportswear, thin fabrics, • polyester, which are not ironed.
electrolux programme overview WOOL CARE (Wollpflege) 1 kg DELICATE(Schon) 1) SENSITIVE(Sensitiv) 1) LONG ANTI-CREASE (Knitterschutz Plus) BUZZER (Signal) TIME (Zeitwahl) DELAY START (Zeitvorwahl) max. load (weight when dry) Programmes Additional functions A - • • - Application/properties Special programme for briefly treating woollens with warm air, after they have been dried naturally, worn or stored for - long periods. Wool fibres stand up and the wool becomes soft and cosy.
daily use electrolux 17 Daily use Switching machine on / switching light on Turn the programme selector to any programme or turn it to LIGHT (Beleuchtung). The machine has been switched on. When the loading door is opened, the drum is illuminated. Opening loading door / loading laundry 1. Open loading door: Use force to push against the loading door (push point) 2. Load your laundry (do not force it in). Do not jam laundry in between the loading door and rubber seal. 3. Close loading door securely.
electrolux daily use DELICATE (Schon) function Schon Délicat Sensitiv Sensible Knitterschutz Plus Anti Froissage For especially gentle drying of sensitive fabrics with the care label and for temperature-sensitive textiles (e.g. acrylic, viscose). Programme is executed with reduced heat. Delicate function is only suitable for use with loads of up to 3kg. To activate it: 1. Choose the drying programme. 2. Press DELICATE (Schon) button - the led above is on.
daily use electrolux 19 DELICATE (Schon) and SENSITIVE (Sensitiv) cannot be selected together. LONG ANTI-CREASE (Knitterschutz Plus) function Sensitiv Sensible Knitterschutz Plus Signal Anti Alarme Froissage This function prolongs anti-crease phase what gives 90 min in total. The drum rotates in intervals during this phase. The laundry thereby remains relaxed and free of creases. To activate it: 1. Choose the drying programme. 2.
electrolux daily use BUZZER (Signal) function Knitterschutz Plus Signal Anti Alarme Froissage Zeitwahl Minuterie The appliance is supplied with the BUZZER (Signal) function deactivated. The buzzer sounds or plays a tune when activated during: – cycle end – anti-crease phase and when phase starts or ends – cycle interruption by a warning – alarm To activate it: 1. Choose the drying programme. 2. Press BUZZER (Signal) button - the led above is on.
daily use electrolux 21 2. Press the TIME (Zeitwahl) button repeatedly until the desired programme duration is shown in the display, e.g. 20 for a programme of 20 minutes. If the programme duration is not selected, the duration is automatically set to 10 mins. DELAY (Zeitvorwahl) function With the DELAY (Zeitvorwahl) button, you can delay the start of a programme by between 30 minutes (30') and a maximum of 20 hours (20h). 1.
electrolux daily use CHILD LOCK function The child lock can be set to prevent a programme being accidentally started or a programme in operation being accidentally changed. The child lock function locks all buttons and the programme knob. The child lock can be activated or deactivated by holding down the LONG ANTI-CREASE (Knitterschutz Plus) and BUZZER (Signal) buttons simultaneously for 5 seconds.
daily use electrolux 23 Changing programme To change a programme which has been selected by mistake once the programme has started, first turn the programme selector to OFF (Aus) and then reset the programme. The programme can no longer be changed directly once the programme has started. If nevertheless there is an attempt to change the programme on the programme knob, the programme progress display and the maintenance indicators flash.
electrolux care and cleaning 1. Open door. 2. Before removing the laundry, remove fluff from the micro-fine filter. It is best to use a damp hand for this purpose. (See “Care and cleaning” chapter.) 3. Remove laundry. 4. Turn the programme selector to OFF (Aus). After each drying cycle: - Clean the micro-fine filter and fine filter - Drain the condensed water container (See chapter “Care and cleaning”.) 5. Close the door.
care and cleaning electrolux 25 2. Use a damp hand to clean the micro- fine filter, which is built into the lower part of the loading aperture. 3. After a period of time, a patina due to detergent residue on laundry forms on the filters. When this occurs, clean the filters with warm water using a brush. Remove the filter from the door pulling it out. It can be positioned with the tooth facing to the left or to the right). After cleaning do not forget to put it back. 4.
electrolux care and cleaning The strainer area does not have to be cleaned after every drying cycle, but should be checked regularly and cleaned of fluff if necessary. 7. To do this, grip the top of the large mesh filter and pull it forwards until it comes loose from the two brackets. 8. Remove fluff from the entire filter area. It is best to use a vacuum cleaner for this purpose. 9. Press both journals of the large mesh filter into the brackets on the loading door until they snap into place. 10.
care and cleaning electrolux 27 Cleaning the door seal Wipe the door seal with a damp cloth immediately after the drying cycle has finished. Emptying the condensate tank Empty condensate tank after every drying cycle. If the condensate tank is full, an active programme will break off automatically and the EMPTY CONTAINER icon on the display will light up. In order to continue the programme, the condensate tank must first be emptied. The condensate is not suitable for drinking or for preparing foodstuffs.
electrolux care and cleaning The condensate tank has a volume of approx. 4 litres. This is sufficient for around 7kg of laundry which has previously been spun at 1000 revolutions/ minute. The condensate can be used as distilled water, e.g. for steam ironing. However first filter the condensate (e.g. with a coffee filter) to remove any residue and small pieces of fluff. Cleaning heat exchanger If the HEAT EXCHANGER cleaned.
care and cleaning electrolux 29 4. Turn both lock washers inwards. 5. Use the handle to pull the heat exchanger out of the base and carry it horizontally to prevent any remaining water from spilling. 6. To empty the heat exchanger, hold vertically over a washing-up bowl. Do not use sharp objects to clean. The heat exchanger could develop leaks. 7. Clean heat exchanger. It is best to use a brush or to rinse thoroughly with a hand-held shower. 8.
electrolux what to do if ... Cleaning the drum Do not use abrasives or steel wool to clean the drum. Lime in the water or cleaning agents may form a barely visible lining on the inside of the drum. The degree to which the laundry has been dried is then no longer detected reliably. The laundry is damper than expected when removed from the dryer. Use a standard domestic cleaner (e.g. vinegar-based cleaner) to wipe down the inside of the drum and drum ribs.
what to do if ... electrolux 31 Have you pressed the START PAUSE (Start/ Pause) button? Press the START PAUSE (Start/Pause) button again. Select a different proWrong programme selec- gramme the next time you dry (see “Programme ted. chart” chapter). Drying results unsatisfactory. Lint filters clogged. Clean lint filters. Fluff filter clogged. Clean fluff filter. Heat exchanger clogged with lint. Clean heat exchanger. Overloading of laundry. Observe recommended loading volumes.
electrolux what to do if ... Defective light bulb. Replace light bulb (see next section). Programme time is corDisplayed programme rected automatically detime changes erratically or Automatic process; this is pending on type and volstays unchanged for a not a machine fault. ume of laundry and level long time. of dampness. Programme inactive, empty water tank icon Condensate tank is full. is on. Drying cycle ends shortly after programme starts. END display illuminated.
machine settings electrolux 33 Do not use standard bulbs! These develop too much heat and may damage the machine! Before replacing the bulb, disconnect the mains plug. 1. Unscrew cover above the bulb (this can be found directly behind the loading aperture, at the top; refer to “Description of machine” section.) 2. Replace defective bulb. 3. Screw cover back down. Check the correct positioning of o-ring gasket before screwing back the door light cover.
electrolux machine settings BUZZER (Signal) permanent 1. Turn the programme selector to any programme. off 2. Press simultaneously the DELICATE (Schon) and SENSITIVE (Sensitiv) buttons and hold down for approx. 5 seconds the result can be following: – diode above BUZZER (Signal) button starts lighting - BUZZER (Signal) permanently on. – lighting diode comes off - BUZZER (Signal) permanently off. 3. The buzzer is by default always off.
technical data electrolux 35 Emptying water tank - warn- 1. Turn the programme selector to any programme. ing message permanent off 2. Press simultaneously the SENSITIVE (Sensitiv) and TIME (Zeitwahl) buttons and hold down for approx. 5 seconds. When using an external The current setting is on the display: drain for the condensed wa– warning icon and - warning ter.
electrolux consumption values Energy consumption in accordance with IEC 61121 s. e. (7kg of cotton, 3,92 kWh pre-drained at 1000 rpm, COTTON CUPBOARD DRY programme) Use Domestic Permissible ambient temperature + 5°C to + 35°C 1) Different loading volume data may be needed in some countries as a result of different measuring methods. Consumption values The consumption values have been established under standard conditions. They may deviate when the machine is operated in domestic circumstances.
installation electrolux 37 All the cycles have to be checked in accordance with IEC 61121 (Tumble dryers for household use – Methods for measuring the performance). Installation Appliance positioning • It is recommended that, for your convenience, the machine is positioned close to your washing machine. • The tumble dryer must be installed in a clean place, where dirt does not build up. • Air must be able to circulate freely all round the appliance.
electrolux installation Removing transport safety packaging Before use all parts of the transport packaging must be removed. 1. Open loading door 2. Pull off adhesive strips from inside machine on top of drum. 3. Remove foil hose and polystyrene padding from the machine. Electrical connection Details on mains voltage, type of current and the fuses required should be taken from the type plate. The type plate is fitted near the loading aperture (see “Product description” chapter).
installation electrolux 39 The manufacturer declines any responsibility for damage or injury through failure to comply with the above safety precautions. Should the appliance power supply cable need to be replaced, this must be carried out by our Service Center. The power supply cable must be accessible after installing the machine. Changing door stop The door stop may only be changed by a specialist. If necessary, please contact our after-sales service or your specialist dealer.
electrolux installation 1. Open loading door. 2. Unscrew hinge A from the front of the machine and take off the loading door. 3. Remove cover plates B and C. To do this, insert a thin screwdriver into the slots as shown in the illustration, press downwards slightly and pry out the cover plates. 4. Use an appropriate tool and exert pressure to unfasten locking block D from the snap-on fixture, take out and re-insert on the other side having rotated the block through 180°. 5.
installation electrolux 41 12. Change door lock F over to the opposite side, insert the cable connector and screw down the door interlock. 13. On the other side, insert the cable connector in cover G, insert cover and allow snap-in button to lock into place. 14. Insert loading door and hinges into recesses on the front of the machine and screw down. Note regarding contact protection:The machine is only secure for operations again once all plastic parts have been inserted.
electrolux environment Environment The symbol on the product or on its packaging indicates that this product may not be treated as household waste. Instead it should be taken to the appropriate collection point for the recycling of electrical and electronic equipment. By ensuring this product is disposed of correctly, you will help prevent potential negative consequences for the environment and human health, which could otherwise be caused by inappropriate waste handling of this product.
guarantee conditions electrolux 43 Environmental tips • In the dryer, laundry becomes fluffy and soft. Fabric softeners are not therefore needed when washing.
electrolux guarantee conditions • The appliance guarantee is personal to the original purchaser of the appliance and cannot be transferred to another user. • The appliance is installed and used in accordance with instructions issued by Electrolux and is only used within the home, i.e. is not used for commercial purposes. • The appliance is installed in accordance with all relevant regulations in force within your new country of residence.
www.electrolux.com electrolux 45 Service In the event of technical faults, please first check whether you can remedy the problem yourself with the help of the operating instructions (Chapter “What to do if…”). If you were not able to remedy the problem yourself, please contact the Customer Care Department or one of our service partners. In order to be able to assist you quickly, we require the following information: – Model description – Product number (PNC) – Serial number (S No.
electrolux www.electrolux.com Danmark +45 70 11 74 00 Sjællandsgade 2, 7000 Fredericia Deutschland +49 180 32 26 622 Muggenhofer Str. 135, 90429 Nürnberg Eesti +37 2 66 50 030 Pärnu mnt. 153, 11624 Tallinn España +34 902 11 63 88 Carretera M-300, Km. 29,900 Alcalá de Henares Madrid France www.electrolux.fr Great Britain +44 8705 929 929 Addington Way, Luton, Bedfordshire LU4 9QQ Hellas +30 23 10 56 19 70 4, Limnou Str.
www.electrolux.com electrolux 47 Polska +48 22 43 47 300 ul. Kolejowa 5/7, Warszawa Portugal +35 12 14 40 39 39 Quinta da Fonte - Edificio Gonçalves Zarco - Q 35 -2774-518 Paço de Arcos Romania +40 21 451 20 30 Str. Garii Progresului 2, S4, 040671 RO Schweiz - Suisse - Svizzera +41 62 88 99 111 Industriestrasse 10, CH-5506 Mägenwil Slovenija +38 61 24 25 731 Gerbičeva ulica 98, 1000 Ljubljana Slovensko +421 2 43 33 43 22 Electrolux Slovakia s.r.o.
electrolux
electrolux 49
electrolux
www.electrolux.com www.electrolux.