TP804L3B EN Dishwasher User Manual
www.electrolux.com CONTENTS 1. SAFETY INFORMATION....................................................................................3 2. SAFETY INSTRUCTIONS..................................................................................4 3. PRODUCT DESCRIPTION................................................................................ 6 4. CONTROL PANEL ............................................................................................ 7 5. PROGRAMMES.....................................
ENGLISH 1. 3 SAFETY INFORMATION Before the installation and use of the appliance, carefully read the supplied instructions. The manufacturer is not responsible for any injuries or damages that are the result of incorrect installation or usage. Always keep the instructions in a safe and accessible location for future reference. 1.
www.electrolux.com • • • • • • Put the cutlery in the cutlery basket with the sharp ends pointing down or put them in the cutlery drawer in a horizontal position with the sharp edges down. Do not leave the appliance with the open door unattended to avoid stepping accidentally onto it. Before any maintenance operation, deactivate the appliance and disconnect the mains plug from the socket. Do not use high pressure water sprays and/or steam to clean the appliance.
ENGLISH 2.3 Water connection • • • • Do not cause damage to the water hoses. Before connection to new pipes, pipes not used for a long time, where repair work has been carried out or new devices fitted (water meters, etc.), let the water flow until it is clean and clear. Ensure that there are no visible water leaks during and after the first use of the appliance. The water inlet hose has a safety valve and a sheath with an inner mains cable. • • • • 2.5 Service • • • WARNING! Dangerous voltage.
www.electrolux.com 3.
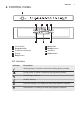
ENGLISH 4. CONTROL PANEL 1 2 8 1 2 3 4 5 On/off button Program button Programme indicators Display Delay button 3 4 7 5 6 6 7 8 9 Start button XtraDry button Indicators Option button 4.1 Indicators Indicator Description Washing phase. It comes on when the washing phase operates. Drying phase. It comes on when the drying phase operates. TimeManager indicator. XtraDry indicator. Rinse aid indicator. It is always off while the programme operates. Salt indicator.
www.electrolux.com 5.
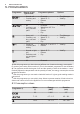
ENGLISH Water (l) Energy (kWh) Duration (min) 9 0.8 30 13 - 14 0.9 - 1.1 70 - 85 4 0.1 14 Programme 1) 9 1) The pressure and the temperature of the water, the variations of the mains supply, the options and the quantity of dishes can change the values. 5.2 Information for test institutes For all the necessary information for test performance, send an email to: info.test@dishwasher-production.com Write down the product number (PNC) that is on the rating plate. 6. SETTINGS 6.
www.electrolux.com Water hardness German de‐ grees (°dH) French de‐ grees (°fH) mmol/l Clarke de‐ grees Water softener level 47 - 50 84 - 90 8.4 - 9.0 58 - 63 10 43 - 46 76 - 83 7.6 - 8.3 53 - 57 9 37 - 42 65 - 75 6.5 - 7.5 46 - 52 8 29 - 36 51 - 64 5.1 - 6.4 36 - 45 7 23 - 28 40 - 50 4.0 - 5.0 28 - 35 6 19 - 22 33 - 39 3.3 - 3.9 23 - 27 5 1) 15 - 18 26 - 32 2.6 - 3.2 18 - 22 4 11 - 14 19 - 25 1.9 - 2.5 13 - 17 3 4 - 10 7 - 18 0.7 - 1.
ENGLISH – = rinse aid empty notification activated. – = rinse aid empty notification deactivated. 2. Press Option to change the setting. 3. Press on/off to confirm the setting. 11 AirDry is automatically activated with all programmes excluding . To improve the drying performance refer to the XtraDry option or activate AirDry. CAUTION! If children have access to the appliance, it is advised to deactivate AirDry as opening the door may pose a danger. 6.
www.electrolux.com Every time is activated, XtraDry is off and needs to be chosen manually. Activating XtraDry deactivates TimeManager and vice versa. If the option is not applicable to the programme, the related indicator is off or it flashes quickly for a few seconds and then goes out. The display shows the updated programme duration. 7.3 MyFavourite How to activate XtraDry This option allows to set and save the most frequently used programme. Press . The related indicator is on.
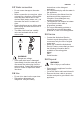
ENGLISH How to fill the salt container 1. Turn the cap of the salt container counterclockwise and remove it. 2. Put 1 litre of water in the salt container (only for the first time). 3. Fill the salt container with 1 kg of salt (until it is full). 13 8.2 How to fill the rinse aid dispenser A D B C B A M AX 4 3 2 + 1 4. Carefully shake the funnel by its handle to get the last granules inside. 5. Remove the salt around the opening of the salt container. - C D 6.
www.electrolux.com Make sure that the appliance is in programme selection mode. • If the salt indicator is on, fill the salt container. • If the rinse aid indicator is on, fill the rinse aid dispenser. • Make sure that there is rinse aid in the rinse aid dispenser. 3. Load the baskets. 4. Add the detergent. 5. Set and start the correct programme for the type of load and the degree of soil. 9.1 Using the detergent 9.
ENGLISH 15 When the countdown is completed, the programme starts and the washing phase indicator comes on. Press and hold simultaneously Program and Option until the appliance is in programme selection mode. Opening the door while the appliance operates Cancelling the programme Opening the door while a programme is running stops the appliance. It may affect the energy consumption and the programme duration. After closing the door, the appliance continues from the point of interruption.
www.electrolux.com With the ECO programme you have the most efficient use of water and energy consumption for crockery and cutlery with normal soil. 10.2 Using salt, rinse aid and detergent • • • • • Only use salt, rinse aid and detergent for dishwasher. Other products can cause damage to the appliance.
ENGLISH 17 11. CARE AND CLEANING WARNING! Before maintenance, deactivate the appliance and disconnect the mains plug from the main socket. Dirty filters and clogged spray arms decrease the washing results. Make a check regularly and, if necessary, clean them. 3. Remove the flat filter (A). 4. Wash the filters. 11.1 Cleaning the filters The filter system is made of 3 parts. C B A 5. Make sure that there are no residues of food or soil in or around the edge of the sump. 6.
www.electrolux.com 11.3 External cleaning • • • Clean the appliance with a moist soft cloth. Only use neutral detergents. Do not use abrasive products, abrasive cleaning pads or solvents. 11.4 Internal cleaning • CAUTION! An incorrect position of the filters can cause bad washing results and damage to the appliance. 11.2 Cleaning the spray arms Do not remove the spray arms. If the holes in the spray arms are clogged, remove remaining parts of soil with a thin pointed object.
ENGLISH Problem and alarm code Possible cause and solution The program does not start. • • • • The appliance does not fill with water. The display shows • • or . • • • The appliance does not drain the water. The display shows . • • • • The anti-flood device is on. • The display shows . 19 Make sure that the appliance door is closed. Press Start. If the delay start is set, cancel the setting or wait for the end of the countdown.
www.electrolux.com Problem and alarm code Possible cause and solution Rattling/knocking sounds from inside the appliance. • The tableware is not properly arranged in the bas‐ kets. Refer to basket loading leaflet. Make sure that the spray arms can rotate freely. • The appliance trips the cir‐ • cuit-beaker. The amperage is insufficient to supply simultaneous‐ ly all the appliances in use. Check the socket amper‐ age and the capacity of the meter or turn off one of the appliances in use.
ENGLISH Problem Possible cause and solution The dishes are wet. • • • • • 21 For the best drying performance activate the option XtraDry and set AirDry . The programme does not have a drying phase or has a drying phase with low temperature. The rinse aid dispenser is empty. The quality of the rinse aid can be the cause. The quality of the multi-tablets can be the cause. Try a different brand or activate the rinse aid dis‐ penser and use rinse aid and multi-tablets together.
www.electrolux.com Refer to "Before first use", "Daily use" or "Hints and tips" for other possible causes. 13. TECHNICAL INFORMATION Dimensions Width / height / depth (mm) 596 / 818 - 898 / 575 Electrical connection 1) Voltage (V) 220 - 240 Frequency (Hz) 50 Water supply pressure Min. / max. bar (MPa) 0.5 (0.05) / 8 (0.8) Water supply Cold water or hot water 2) max 60 °C Capacity Place settings 13 Power consumption Left-on mode (W) 5.0 Power consumption Off-mode (W) 0.
ENGLISH 23
156922110-A-292017 www.electrolux.