I N F O I N S T R U C T I O N REFRIGERATOR 2222747-43 B O O K L E T ER 6632 I
Contents Instructions for the user Instructions for the installer Important Safety Instructions 3 Technical specifications 14 Description of the Appliance 4 Installation 14 Operation 5 Positioning Before use Setting the temperature Fresh food refrigeration The door shelves 5 5 5 5 Health and safety guidelines 6 Defrosting 7 Normal Operating Sounds 7 Maintenance and Cleaning 8 Internal cleaning Changing the light bulb When the appliance is not use 8 8 8 Something not Working? 9 Ser
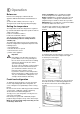
Important Safety Instructions These warnings are provided in the interests of your safety. Ensure that you understand them all before installing or using this appliance. Your safety is of paramount importance. If you are unsure about any of the meanings of these warnings contact the Customer Care Departement. Child Safety Prior to Installation ■ Check the appliance for transport damage. Under no circumstance should a damaged appliance be installed. In the event of damage please contact your retailer.
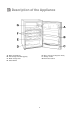
Description of the Appliance A - Dairy compartment B - Can storage shelf with egg tray C - Bottle storage shelf D - Salad drawer E - Glass shelf (for storing fresh meat) F - Storage shelves G -Thermostat control 4
Operation Fruit & vegetables: these should be thoroughly cleaned and placed in the bottom salad crisper. Butter & cheese: these should be placed in special airtight containers or wrapped in aluminium foil or polythene bags to exclude as much air as possible. Milk bottles: these should have a cap and should be stored in the bottle rack on the door. Before use Remove all securing tapes. Wash inside the appliance with lukewarm water and bicarbonate of soda (5 ml to 0.5 litre of water).
Health and Safety Guidelines Because of consumer demand, preservatives have been removed from many pre-prepared foods. This together with the changes in shopping habits to a once-a-week shop, mean that safe handling and storage of food is even more important than ever. The following tips should help you to ensure that the food in your home is in as perfect condition as possible. ■ ■ ■ Keep the time between buying chilled food and placing it in your fridge as short as possible.
Defrosting The refrigerator automatically defrost every time the compressor stops. The water is discharged, via the pipe, into a tray located at the back of the appliance above the compressor, where it evaporates. Important To avoid defrost water overflowing into the fridge, periodically clean the water discharge hole in the centre of the V shaped drip collector at the back of the refrigerator compartment behind the fruit and vegetable drawers.
Maintenance and Cleaning Before any maintenance or cleaning work is carried out, DISCONNECT the appliance from the ELECTRICITY supply. Internal cleaning Clean the inside and accessories with warm water and bicarbonate of soda (5ml to 0.5 litre of water). Rinse and dry thoroughly. NEVER USE DETERGENTS, ABRASIVE POWDERS, HIGHLY PERFUMED CLEANING PRODUCTS OR WAX POLISHES, TO CLEAN THE INTERIOR AS THESE WILL DAMAGE THE SURFACE AND LEAVE A STRONG SMELL.
Something not Working? Before contacting your local Service Force Centre check the following points. Symptom Solution No power to appliance - Check there is power at the socket. - Check there is not a power cut by checking the household lights. - Check the fuse has not blown. The light does not come on - Ensure that the bulb is correctly fitted. - Replace the bulb if it has blown. - Check the door light switch is not jammed.
Service and Spare Parts In the event of your appliance requiring service, or if you wish to purchase spare parts please contact your local Electrolux Service Force Centre by telephoning: 0870 5 929929 Your telephone call will be automatically routed to the Service Centre covering your post code area. The addresses are listed on the following pages.
Guarantee Conditions Standard guarantee conditions We, Electrolux, undertake that if within 12 months of the date of purchase this Electrolux appliance or any part thereof is proved to be defective by reason only of faulty workmanship or materials, we will, at our option repair or replace the same FREE OF CHARGE for labour, materials or carriage on condition that: ■ The appliance has been correctly installed and used only on the electricity supply stated on the rating plate.
Technical specifications POWER SUPPLY VOLTAGE AND FREQUENCY TOTAL POWER ABSORBED AVERAGE DAILY UNITS ELECTRICITY 220-240 V / 50 Hz 110 W 0,75 kWh GROSS CAPACITY 160 l NET CAPACITY 158 l Installation Positioning The appliance should be installed well away from sources of heat such as radiators, boilers, direct sunlight etc.; best performance is obtained with ambient temperature between +10°C and +32°C.
Electrical Connection This appliance complies with the E.E.C. Directive No. 87/308 of 2.6.87 relative to radio interference suppression. WARNING: THIS APPLIANCE MUST BE EARTHED. The manufacturer declines any liability should this safety measure not be observed. This appliance complies with the following E.E.C. Directive: - 73/23 EEC of 19.2.73 (Low Voltage Directive) and subsequent amendments. - 89/336 EEC of 3.5.89 (Electromagnetic - Compatibility Directive) and subsequent amendments.
Building in The appliance’s door has been locked in position for transport by means of pins on both sides. According to the door opening direction, remove relevant pins at the top and at the bottom. Instructions for totally built-in appliance Dimensions of the recess Height of housing Depth of housing Width of housing 880 mm 550 mm 560 mm For appropriate venting, follow indications in the figure. Push the appliance into the housing until stop strip (A) touches the kitchen unit.
Press in the joint covers between the appliance and the kitchen furniture. Apply covers (B) on joint cover lugs and hinge holes. Position the runners (H) at the top and bottom of the inside of the kitchen unit as shown in the figure and mark the position of the external holes. After preparing the holes, screw the runners to the kitchen unit door using 3,5x16 mm screws. H 20m m D094 Open both the appliance door and that of the kitchen unit to approx. 90°. Place the little plates over the runners.