
Portable Air Conditioners Product Manual


electrolux EXP09CS1WI front/rear view 5
• The air conditioner must be operated within the
temperature range indicated in the table below.
• Available for operation at condition of supply voltage
0V to 40V at 50Hz.
• A built-in safety device may cut off operation if the
temperature exceeds these limits.
• When cooling operation is performed at high room
temperature, the fan may run slightly slower.
Mode Room temperature
Cool upper limit 35°C
lower limit 18°C
Dehumidication lower limit 15°C
Energy efciency tips
• Avoid direct sunlight
Close blinds, drapes or shades to keep out direct
sunlight while in cooling mode.
• Keep the lter clean
Keeping the lter clean greatly aids efcient operation.
A dirty lter blocks the ow of air, making your air
conditioner work harder and less efciently.
See page 15 on how to clean the lter.
• Turn off unnecessary lights
Your air conditioner must remove the heat produced by
your lights or other heat-producing appliances. Turn off
any lights or appliances that are not in use.
• Turn off the air conditioner when no one is home
Use only when necessary. The less time the air
conditioner is used, the lower the running costs.
Location
• The air conditioner should be placed on a rm
foundation to minimize noise and vibration. For safe and
secure positioning, place the unit on a smooth, level
oor strong enough to support the unit.
• The unit has casters to aid placement, but it should only
be rolled on smooth, at surfaces. Use caution when
rolling on carpet surfaces. Do not attempt to roll the unit
over objects.
• The unit must be placed within reach of a properly rated
earthed socket.
• Never place any obstacles around the air inlet or outlet
of the unit.
• Allow at least 30 cm of space on either side from the
wall for efcient air-conditioning.
Operating conditions
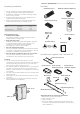
electrolux EXP09CS1WI operating conditions/included 5
Exhaust hose (1) Window exhaust adapter (1)
Remote control (1)
Insect guard net (1)
Battery (2)
(AAA.1.5V)
Extension panel (1)
Foam seal (1) Foam seal (3)
(adhesive type) A
Foam seal (1)
(adhesive type) B
Rain guard (2) Hose clamp (1)
Manual (1)
Suggested tools for window kit installation
1. Screwdriver (medium size Phillips)
. Tape measure or ruler
3. Knife or scissors
4. Saw (in the event that the window panel needs to be
cut down in size because the window is too narrow for
direct installation)
Included
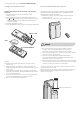
Included only together with “window kit”
Hose clamp (1)
Manual (1)
Exhaust cover (1)
Window panel (1)
Adjustment panel (1)
Rain guard (2)
Bracket (1)
Suction disk (1)
Screw (8)