FM4863-an Induction wok Installation and Operating Instructions
Dear Customer, Please read these user instructions carefully and keep them to refer to later. Please pass the user instructions on to any future owner of the appliance. 1 3 2 2 The following symbols are used in the text: Safety instructions Warning! Information that affects your personal safety. Important! Information that prevents damage to the appliance.
Contents Operating Instructions . . . . . . . . . . . . . . . . . . . . . . . . . . . . . . . . . . . . . 4 Safety instructions. . . . . . . . . . . . . . . . . . . . . . . . . . . . . . . . . . . . . . . . . . . . . . 4 Description of the Appliance . . . . . . . . . . . . . . . . . . . . . . . . . . . . . . . . . . . . . Cooking surface layout . . . . . . . . . . . . . . . . . . . . . . . . . . . . . . . . . . . . . . . . . . . Control panel layout . . . . . . . . . . . . . . . . . . . . . . . . . . .
Operating Instructions 1 Safety instructions 3 5 Please comply with these instructions. If you do not, any damage resulting is not covered by the warranty. This appliance conforms with the following EU Directives: – 73/23/EEC dated 19.02.1973 Low Voltage Directive – 89/336/EEC dated 03.05.1989 EMC Directive inclusive of Amending Directive 92/31/EEC – 93/68/EEC dated 22.07.1993 CE Marking Directive Correct use • This appliance should be used only for normal domestic cooking and frying of food.
Safety during use • Overheated fats and oils can ignite very quickly. When cooking with fat or oil (e.g. chips) do not leave the appliance unattended. • Risk of burns! Fat or oil added to a pan which has already been heated ignites very quickly and can spit. • There is the risk of burns from the appliance if used carelessly. • Remove stickers and film from the glass ceramic. • Cables from electrical appliances must not touch the hot surface of the appliance or hot cookware.
Description of the Appliance Cooking surface layout m m 00 3 Wok niche 2300W with power function 3200W Frontline strip Control panel Control panel layout Child lock pilot light Heat setting indicator Heat setting 6 / power function Child lock 6 Timer indicator Timer Timer selection Heat setting indicator On/Off pilot light On/Off Heat setting selection
Touch Control sensor fields The appliance is operated using Touch Control sensor fields. Functions are controlled by touching sensor fields. Touch the sensor fields from above, without covering other sensor fields.
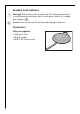
Residual heat indicator 1 3 Warning! Risk of burns from residual heat. After being switched off, the cooking zones need some time to cool down. Look at the residual heat indicator . Residual heat can be used for melting and keeping food warm. Accessories Wok pan (supplied) • 390 mm, 6 litres • With 2 handles • WOK P 6.
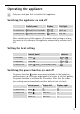
Operating the appliance 3 Only use a wok pan that is suited to this appliance. Switching the appliance on and off Control panel Display Pilot light To switch on touch for 2 seconds / lights up To switch off touch for 2 seconds / none goes out 3 After switching on, within approx. 10 seconds a heat setting or a function must be set, otherwise the appliance automatically switches itself off.
Using the child safety device The child safety device prevents unintentional use of the appliance. Switching on the child safety device Step Control panel 1. Switch on appliance. (Do not set a heat setting.) 2. Touch Display/Signal for 3 seconds Appliance switches off. The child safety device is switched on Deactivating the child safety device Step 1. Control panel Display/Signal Switch appliance on 2. Touch for 3 seconds 0 lights up Appliance switches off.
Using the timer Two functions are possible: Function Condition Outcome after time has elapsed Safety cut-out When a heat setting is set acoustic signal 0 lights up Cooking zone switches off Countdown timer When cooking zones are not used acoustic signal 0 lights up Setting the time Step Control panel Display 1. Touch Pilot light flashes 2. Touch or 0 to 99 minutes The pilot light lights up. The time is set. The time counts down to 0.
Changing the time Step Control panel Display 1. Touch Pilot light flashes 2. Touch or 01 to 99 minutes The pilot light lights up. The time is set. The time counts down to 0. Safety cut-out Cooking surface • If after switching on the cooking surface, a heat setting is not set within approx. 10 seconds, the cooking surface automatically switches itself off. • If the cooking zone is switched off, the cooking surface automatically switches itself off after approx. 10 seconds.
Tips for cooking with the wok 1 3 3 The induction wok is eminently suitable for preparing “á la minute” dishes, in particular Chinese specialities. The food is continuously turned during the short frying time. The induction heating system means that in the wok you can cook extremely quickly and at high heat. As a result meat and fish remain succulent and vegetables retain colour, taste and vitamins. Take care! Risks of burns from overheated fats and oils.
Cookware for induction cooking zones Cookware material Cookware material Steel, enamelled steel yes Cast iron yes Stainless steel 3 3 14 suitable if appropriately labelled by the manufacturer Aluminium, copper, brass --- Glass, ceramic, porcelain --- Cookware for induction cooking zones is labelled as suitable by the manufacturer. Suitability test Cookware is suitable for induction cooking, if … • ...
Methods of preparation in the wok Stir frying • Wok is swirled with oil. • Ingredients cut into small pieces, including sauces and seasonings, are quickly fried over a high heat while continuously being stirred. • Due to the extremely short cooking time the ingredients should be ready before you start cooking. • Start with the ingredients with the longest cooking time. • Very healthy method of preparation. • Vegetables retain their own taste and colour and remain nice and crunchy.
Cleaning and Care 1 1 1 Take care! Risk of burns from residual heat. Warning! Sharp objects and abrasive cleaning materials will damage the appliance. Clean with water and washing up liquid. Warning! Residues from cleaning agents will damage the appliance. Remove residues with water and washing up liquid. Cleaning the appliance after each use 1. Wipe the appliance with a damp cloth and a little washing up liquid. 2. Rub the appliance dry using a clean cloth. Removing deposits 1.
What to do if … Problem The cooking zone cannot be switched on or is not operating Possible cause Remedy More than 10 seconds have Switch the appliance on passed since the appliance again. was switched on The child safety device is switched on Deactivate child safety device (See the section “Child safety device”) Several sensor fields were touched at the same time Only touch one sensor field Safety cut-out has been triggered Remove any objects (pan, cloths, etc.) that are lying on the control panel.
1 3 If you are unable to remedy the problem by following the above suggestions, please contact your dealer or the Customer Care Department. Warning! Repairs to the appliance are only to be carried out by qualified service engineers. Considerable danger to the user may result from improper repairs. If the appliance has been wrongly operated, the visit from the customer service technician or dealer may not take place free of charge, even during the warranty period.
Installation Instructions Safety instructions 1 1 The laws, ordinances, directives and standards in force in the country of use are to be followed (safety regulations, proper recycling in accordance with the regulations, etc.) Installation may only be carried out by a qualified electrician. The minimum distances to other appliances and units are to be observed.
• This appliance’s mains cable must be a special cable (type H05BB-F Tmax 90°; or higher). The latter is available from the Customer Care Department. A device must be provided in the electrical installation which allows the appliance to be disconnected from the mains at all poles with a contact opening width of at least 3 mm. Suitable isolation devices include line protecting cut-outs, fuses (screw type fuses are to be removed from the holder), earth leakage trips and contactors.
Assembly 21
Installing more than one Frontline hob 3 Additional parts: cross bar(s), heat resistant silicon, rubber block, shaving blade. Only use special heat-resistant silicon. Cut-out section Distance from the wall: at least 50 mm Depth:490 mm Width: The widths of all appliances to be built-in are added together, minus 20 mm (see also “Overview of all appliance widths”) Example: Installing more than one appliance 1. Work out the size of the cut-out section and saw it out. 2.
5. Place first appliance in the cut-out. Lay connecting cross bar in the cut-out and push up halfway against the appliance. 6. Put silicon on the appliance corners that will touch one another. Put silicon on the end of the cross bar. 7. Loosely screw in fixing plates / retaining grips from below on the worktop and on the connecting cross bar.
8. Place Frontline strips on the appliances. Check that the Frontline strips are in line with one another. 9. Tighten the fixing plate / retaining grip screws. 10. Inject a line of silicon into the gap between the appliances. 11. Dampen silicon line with a little soapy water. 12. Press rubber block hard against the glass ceramic and draw it slowly along the gap. 13. Leave silicon until the next day to harden. 14. Carefully remove projecting silicon with a shaving blade. 15. Clean glass ceramic thoroughly.
Overview of all appliance widths 180 mm Worktop-mounted cooker hood 360 mm Glass ceramic cooking surface with 2 radiation cooking zones Glass ceramic cooking surface with 2 induction cooking zones Gas hob with 2 burners Grill Grill/Deep fat fryer Wok 580 mm Glass ceramic cooking surface with 4 radiation cooking zones Gas hob with 4 burners 720 mm Glass ceramic cooking surface with 4 radiation cooking zones Glass ceramic cooking surface with 4 induction cooking zones Gas hob with 4 burners 26
Rating Plate 941 177 661 AEG-ELECTROLUX 3,2 kW 220-240 V 50/60 59 WOK 01 AG FM4863-an 27
Guarantee Conditions Belgium DECLARATION OF GUARANTEE TERMS. Our appliances are produced with the greatest of care. However, a defect may still occur. Our consumer services department will repair this upon request, either during or after the guarantee period. The service life of the appliance will not, however, be reduced as a result. This declaration of guarantee terms is based on European Union Directive 99/44/EC and the provisions of the Civil Code.
withstand the local climatic and environmental conditions. For appliances purchased abroad, the user must first ensure that they meet the qualifications required in Belgium. Non-essential or requested adjustments are not covered by the guarantee and are not possible in all cases. Our consumer services department is always at your disposal, even after the guarantee period has expired. Address for our consumer services department: ELECTROLUX HOME PRODUCTS BELGIUM Bergensesteenweg, 719 - 1502 LEMBEEK Tel.: 02.
p t b Hellas +30 23 10 56 19 70 4 Limnou Str., 54627 Thessaloniki Hrvatska +385 1 63 23 338 Slavonska avenija 3, 10000 Zagreb Ireland +353 1 40 90 753 Long Mile Road Dublin 12 Italia +39 (0) 434 558500 C.so Lino Zanussi, 26 - 33080 Porcia (PN) Latvija +37 17 84 59 34 Kr.
Service In the event of technical faults, please first check whether you can remedy the problem yourself with the help of the operating instructions (section “What to do if…”). If you were not able to remedy the problem yourself, please contact the Customer Care Department or one of our service partners. In order to be able to assist you quickly, we require the following information: – Model description – Product number (PNC) – Serial number (S No.
www.electrolux.