Gefrierschrank /freezer / congélateur / congelatore - ISTRUZIONI PER L’USO INSTRUCTION MANUAL UG 0880-10N D UK F I SV/E/UC/70. (09.
Hinweise zur Benutzung der Gebrauchsanweisung Die folgenden Symbole erleichtern das Lesen der Gebrauchanweisung: D Sicherheitshinweise bezŸglich der Benutzung des GerŠtes RatschlŠge fŸr den korrekten Gebrauch und die optimale Ausnutzung des GerŠtes. Informationen zum Umweltschutz Sicherheitshinweise Bevor Sie Ihr neues KŠltegerŠt in Betrieb nehmen, lesen Sie bitte diese Gebrauchsanweisung aufmerksam durch. Diese sind Sicherheitshinweise.
Inhalt Sicherheitshinweise . . . . . . . . . . . . . . . . . . . . . . . . . . . . . . . . . . . . . . . . . . . . . . . . . . . . . . . . . . . . . . . . . . . . . .2 Entsorgung . . . . . . . . . . . . . . . . . . . . . . . . . . . . . . . . . . . . . . . . . . . . . . . . . . . . . . . . . . . . . . . . . . . . . . . . . . . . .3 Gebrauch . . . . . . . . . . . . . . . . . . . . . . . . . . . . . . . . . . . . . . . . . . . . . . . . . . . . . . . . . . . . . . . . . . . . . . . . . . . . . .
Vor Inbetriebnahme Man sollte mindestens 2 Std. warten, bevor das Gerät in Betrieb genommen wird, damit das Kältemittel zurückströmen kann. ¥ Bevor Sie das GerŠt in Betrieb nehmen, beseitigen Sie den typischen ÇNeugeruchÈ am besten durch Auswaschen der Innenteile mit lauwarmem Wasser und einem neutralen Reinigungsmittel. SorgfŠltig nachtrocknen. Bitte keine Reinigungs- bzw. Scheuermittel verwenden, die das GerŠt beschŠdigen kšnnten.
wird (wŠrmer als -12¡C). Sie leuchtet jedoch auch dann auf, wenn das GerŠt gerade eingeschaltet worden ist und bleibt solange eingeschaltet, bis die richtige Lagertemperatur erreicht ist. Tipps Energie-Einsparung ãOffene TŸrÒ Warnung Ein Tonwarner ertšnt, wenn die TŸr lŠnger als 60 Sekunden gešffnet bleibt. Der Tonwarner kann durch Schlie§en der TŸr abgestellt werden. Gefrierkalender Die Symbole auf den Schubladen zeigen unterschiedliche Arten von TiefkŸhlgut.
¥ Die einzufrierenden Lebensmittel sollen mit den TiefkŸhlkosten nicht in BerŸhrung kommen, um ein Temperaturanstieg an diese zu verhindern. ¥ Speiseeis, das direkt aus dem Gefrierfach genommen wird, kann KŠlte-Brandwunden verursachen. ¥ Es ist empfehlenswert, auf der Verpackung das Einfrierdatum zu notieren, damit die Aufbewahrungszeit eingehalten werden kann. ¥ Um die beste Leistung des GerŠtes zu erreichen empfehlen wir, fŸr die Lagerung des Gefriergutes alle FŠcher gleichmŠ§ig zu nutzen.
Wenn etwas nicht funktioniert Falls das GerŠt Stšrungen aufweisen sollte, bevor Sie den Kundendienst verstŠndigen, ŸberprŸfen Sie zuerst folgendes: Störung Abhilfe Im GerŠt wird es nicht kalt genug VorŸbergehend kŠltere Temperatureinstellung wŠhlen. Die Lebensmittel mŸssen so eingelagert werden, dass die KŠlte um sie frei zirkulieren kann. TŸr richtig schlie§en. Die Umgebungstemperatur ist zu warm. GerŠt kŸhlt zu stark. VorŸbergehend wŠrmere Temperatureinstellung wŠhlen.
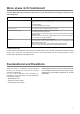
Kundendienst und Ersatzteile Falls das GerŠt Stšrungen aufweisen sollte, ŸberprŸfen Sie zuerst folgendes: ¥ Steckt der Netzstecker in der Steckdose? ¥ Befindet sich der Hauptschalter der elektrischen Anlage in der richtigen Stellung? ¥ Ist die Stromzufuhr unterbrochen? ¥ Befindet sich der Thermostatknopf in richtiger Stellung? Sollten Sie nach o.e. PrŸfungen zu keinem Resultat kommen, so wenden Sie sich bitte an unseren nŠchsten Kundendienst.
Installation Aufstellung Vorbereitung des LŸftungsgitters Das GerŠt sollte nicht in der NŠhe von WŠrmequellen wie Heizkšrpern oder …fen aufgestellt und vor direkter Sonneneinstrahlung geschŸtzt werden. Die beste Leistung erzielt man erfahrungsgemŠ§ bei Raumtemperaturen von +18¡C bis +43¡C (Klasse T); +18¡C bis +38¡C (Klasse ST); +16¡C bis +32¡C (Klasse N); +10¡C bis +32¡C (Klasse SN). Die GerŠteklasse ist auf dem Typschild angegeben. FŸr den Einbau und ev.
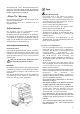
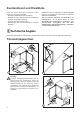
Einbau unter eine Arbeitsplatte Nischenma§e Die Ma§e der Nische mŸssen den angegebenen Werten entsprechen. 2. GerŠt in die Nische einschieben. Die zum Anschluss des GerŠtes nštige SchutzkontaktSteckdose sollte so positioniert sein, dass sich sie nicht vom GerŠt verdeckt wird. 60 0 1 5 min50 . 600 2 DO013 Mitgelieferte Montageteile 1xB 2xC 2 3.
5. Fugenabdeckprofil am GerŠt ankleben, wie in der Abbildung gezeigt. 7. MšbeltŸr montieren 2 1 a 10 C 4 2 1 3 B b 6 3 115° 4 7 6.
OBERER TEIL DER K†CHEM…BELVERKLEIDUNG 1 a = 1 = = 2 2 10 = 12 b 9 UNTERES TEIL DER K†CHEM…BELVERKLEIDUNG m 8m I I F F 27 ,5 cm 55 27 ,5 K G cm cm 10 13 8. Abdeckung (A) anbringen.
Montage der Sockelblende L 90° L 115° Achtung Um die FunktionalitŠt des GerŠtes nicht zu beeintrŠchtigen ist es notwendig das Original-LŸftungsgitter zu benutzen. ¥ Bei einer lichten Einbauhöhe Maß A=820 mm und einer Sockelblendenhöhe Maß a=100 mm kann die Sockelblende unverändert montiert werden. Ebenso bei einer lichten Einbauhöhe Maß B=870 mm und einer Sockelblendenhöhe Maß b=150 mm.
Instructions for the use of the instructions booklet t Notes which are important for your safety or for the proper functioning of the appliance Supplementary information regarding operation and practical applications of the appliance. Tips and notes concerning economical and environmentally sound use of the appliance Important Safety Instructions These warnings are provided in the interests of your safety. Ensure that you understand them all before installing or using this appliance.
¥ Frozen food should not be refrozen once it has thawed out. ¥ Do not place carbonated or fizzy drinks in the freezer compartment. ¥ Ice lollies can cause Ôfrost/freezer burnsÕ if consumed straight from the freezer. ¥ Do not remove items from the freezer compartment if your hands are damp/wet, as this could cause skin abrasions or frost/freezer burns.
Your appliance is frost free, which means there is no need to manually defrost your appliance as this will be carried out automatically. Operation Before use Remove all securing tapes. Wash inside the appliance with lukewarm water and bicarbonate of soda (5 ml to 0.5 litre of water). Do not use soap or detergent as the smell may linger. Dry thoroughly.
Freezing fresh food In any 24 hour period you can freeze up to 9 kg of fresh food. Activate fast freeze by depressing the fast-freeze button (4) - for more than one second - 24 hours before you want to freeze your fresh food, the yellow light (3) illuminates. This time can be shortened, depending on the quantity of food to be frozen. After the time has elapsed place the food to be frozen in the bottom drawer of the freezer as this is the coldest part. You should never freeze more than 13 Kg.
Making ice cubes Automatic defrost The appliance is provided with a plastic ice cube tray. Fill the tray 3/4 full to allow the ice to expand and place it in the freezer. To turn out the ice cubes simply give the tray a slight twist to release the cubes. Your appliance has been designed to be frost free. This means there is no need to manually defrost your appliance as this will be carried out automatically. Never tray to free an ice tray that is frozen to the freezer using a sharp or pointed object.
Health and Safety Guidelines Because of consumer demand, preservatives have been removed from many pre-prepared foods. This together with the changes in shopping habits to a once-a-week shop, mean that safe handling and storage of food is even more important than ever. The following tips should help you to ensure that the food in your home is in as perfect condition as possible. ¥ Keep the freezer door closed as much as possible.
Maintenance and Cleaning Warning Before any maintenance or cleaning work is carried out, DISCONNECT the appliance from the ELECTRICITY supply. Important This appliance contains hydrocarbons in its cooling unit maintenance and recharging must therefore only be carried out by authorised technicians.
Something not Working? Before contacting your local Service Force Centre check the following points. IMPORTANT: If you call out an engineer to a fault listed below, or to repair a fault caused by incorrect use or installation, a charge will be made even if the appliance is under guarantee. Symptom Solution No power to appliance - Check there is power at the socket. - Check there is not a power cut by checking the house hold lights. - Check the fuse has not blown.
Service and Spare Parts In the event of your appliance requiring service, or if you wish to purchase spare parts, please contact your local Service Force Centre by telephoning:08705 929929 Your telephone call will be automatically routed to the Service Force Centre covering your post code area. For the address of your local Service Force Centre and further information about Service Force, please visit the website at www.serviceforce.co.
Guarantee Conditions Standard guarantee conditions We, Electrolux, undertake that if within 12 months of the date of purchase this Electrolux appliance or any part thereof is proved to be defective by reason only of faulty workmanship or materials, we will, at our option repair or replace the same FREE OF CHARGE for labour, materials or carriage on condition that: ¥ The appliance has been correctly installed and used only on the electricity supply stated on the rating plate.
Installation Warning IF YOU ARE DISCARDING AN OLD APPLIANCE THAT HAS A LOCK OR CATCH ON THE DOOR, YOU MUST ENSURE THAT IT IS MADE UNUSABLE TO PREVENT YOUNG CHILDREN BEING TRAPPED INSIDE. Depending upon the position which you choose for your appliance, you may wish to reverse the way in which the door opens. To do this, refer to instructions under ÒDoor reversalÓ.
Electrical Connection Before plugging in, ensure that the voltage and frequency shown on the serial number plate correspond to your domestic power supply. Voltage can vary by ±6% of the rated voltage. For operation with different voltages, a suitably sized auto-transformer must be used. Important The appliance must be earthed. The power supply cable plug is provided with a contact for this purpose. If the domestic power supply socket is not earthed.
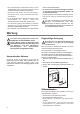
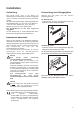
Door reversal To reverse the opening direction of the door, proceed as shown in the figures: 6 6 4 1 7 8 5 6 2 3 1 2 6 10 13 9 6 11 3 26 12 Attention After completion of the door reversing operation, check that the door gasket adheres to the cabinet. If the ambient temperature is cold (i.e. in Winter), the gasket may not fit perfectly to the cabinet.
Building-in instructions Before carrying out any work, remove the plug from the power socket. Building in the appliance under a worktop Grid preparation The dimensions of the recessed installation area must correspond with those indicated in the figure. Left door opening: Remove the left side (A) of the grid cutting it from the rear (see figure). 60 0 5 min50 .
2. Push the appliance into place. The plug socket necessary for connection of the appliance to the electricity supply should be positioned, so that the plug is not placed in the recess. 6. To mount the furniture door proceed as shown in the figures: 3. To adjust the height proceed as follows: - Loosen or tighten the two front feet. - The rear feet are adjusted by turning the screw in the front kick plate to the left or right. 2 1 a 10 C 4 596 3 5 55 x ma b + 6 - + 3 4.
a 1 b 2 45° C click 3 click c 8 Upper part of kitchen furniture panel Möbeltür Innenseite 11 a I = 1 = = c 2 10 = b 9 12 m 8m I F 27 ,5 F m cm 27 c 55 ,5 I K cm G 10 13 29
7. Refit the covering strip (A). Fitting the plinth Important For the efficient operation of the appliance, it is important that the original ventilation grid is used. A ¥ For an opening height dimension A=820 mm and a plinth height dimension a=100 mm, the plinth may be fitted without adjustments. The same applies to an opening height dimension B=890 mm and a plinth height dimension b=170 mm.
Comment lire votre notice dÕemploi Les symboles ci-dessous vous guideront au long de la lecture de votre notice: F Instructions liées à la sécurité lors de l’utilisation de l’appareil. Conseils pour une utilisation correcte de l’appareil afin d’obtenir les meilleures performances. Informations liées à la protection de l’environnement. Avertissements importants Ce sont des avertissements de sŽcuritŽ. Nous vous prions donc de les lire attentivement avant dÕinstaller et dÕutiliser votre appareil.
Sommaire Avertissements importants . . . . . . . . . . . . . . . . . . . . . . . . . . . . . . . . . . . . . . . . . . . . . . . . . . . . . . . . . . . . . . .31 Elimination . . . . . . . . . . . . . . . . . . . . . . . . . . . . . . . . . . . . . . . . . . . . . . . . . . . . . . . . . . . . . . . . . . . . . . . . . . . .32 Utilisation . . . . . . . . . . . . . . . . . . . . . . . . . . . . . . . . . . . . . . . . . . . . . . . . . . . . . . . . . . . . . . . . . . . . . . . . . . . . .
Avant la mise en service A cause du syst•me de transport, IÕhuile contenue dans le compresseur pourrait sÕŽcouler dans le circuit rŽfrigŽrant. Attendez 2 heures au moins avant de brancher lÕappareil pour permettre ˆ lÕhuile de refluer dans le compresseur. ¥ L'appareil Žtant convenablement installŽ, nous vous conseillons de le nettoyer soigneusement avec de l'eau ti•de savonneuse, pour enlever l'odeur caractŽristique de ÇneufÈ. N'utilisez pas de produits abrasifs, poudre ˆ rŽcurer, Žponge mŽtallique.
L'interrupteur de congŽlation rapide peut •tre dŽsactivŽ d•s que le voyant rouge de contr™le de la tempŽrature s'est Žteint. Voyant d'alarme dans la position extr•me. Ceci garantit un stockage sžr et commode et facilite lÕacc•s aux aliments congelŽs. Pour les sortir, tirez-les jusquÕˆ la butŽe, remontezles et enlevez-les par lÕavant (voir fig.).
¥ ¥ ¥ ¥ ¥ ¥ Žviter qu'ils puissent entrer en contact avec des produits dŽjˆ congelŽs, ce qui en Žl•verait la tempŽrature. La quantitŽ maximum d'aliments pouvant •tre congelŽs en 24 h est indiquŽe sur la plaque signalŽtique situŽe ˆ l'intŽrieur de l'appareil. A cause de la technologie NO FROST le procŽss de congŽlation est plus rapide; d•s lors que les aliments ont decongelŽs ils conservent toutes les vitamines et les propriŽtŽs originales ainsi que le gožt.
Si quelque chose ne va pas ... Si l'appareil marche mal, il faut contr™ler: Dérangement Remède La tempŽrature ˆ lÕintŽrieur de lÕappareil est trop chaude. La tempŽrature est mal rŽglŽe. Veuillez consulter la partie "RŽglage de la tempŽrature". Placez les denrŽes de fa•on ˆ ce que l'air puisse circuler tout autour. VŽrifiez que la porte soit bien fermŽe. La tempŽrature ambiante du local est trop elevŽe. LÕappareil refroidit trop. RŽguler la tempŽrature sur une tempŽrature plus ŽlevŽe.
RŽversibilitŽ de la porte Pour l'inversion opŽrer comme suit: 6 6 4 1 7 8 5 2 6 3 1 2 Attention! La rŽversibilitŽ de la porte une fois effectuŽe, contr™lez ensuite que le joint magnŽtique adh•re ˆ la carrosserie. Si la tempŽrature ˆ l'intŽrieur de la pi•ce est trop basse (en hiver, p.ex.), il se peut que le joint n'adh•re pas parfaitement.
Branchement Žlectrique PrŽparation de la grille Contr™lez, avant de brancher l'appareil, si le voltage et la frŽquence indiquŽs sur la plaque signalŽtique correspondent ˆ ceux de votre rŽseau. TolŽrance admise: ±6%. Pour l'adaptation de l'appareil ˆ des voltages diffŽrents, l'adjonction d'un autotransformateur d'une puissance adŽquate est indispensable. Ouverture de la porte ˆ gauche: Important Il faut absolument brancher lÕappareil ˆ une prise de terre qui marche.
1. Fixez ˆ lÕappareil les Žquerres livrŽes ˆ cet effet (fig.). Left hand bracket 2 4. Pour faciliter le glissement de lÕappareil dans la niche dÕencastrement, appliquez les coussinets fournis sous les deux pieds postŽrieurs. Si nŽcessaire, vous pouvez rŽduire les dimensions des coussinets en les coupant comme lÕindique la figure. Right hand bracket 2. Mettre en place l’appareil. La prise murale doit se trouver impérativement hors de la niche d’encastrement de l’appareil. 5.
6. Vissez lÕappareil. a b C clic C clic 5 c 8 7. Montez la porte du meuble.
Posez le couvre-joint (A).
Montage de la plinthe a = 100 b = 150 A = 820 B = 870 Attention! Pour ne pas compromettre le bon fonctionnement de lÕappareil, il est nŽcessaire dÕutiliser la grille dÕaŽration dÕorigine. ¥ Si la niche dÕencastrement de lÕappareil a une hauteur de A=820 mm et une hauteur de plinthe a=100 mm, la plinthe peut •tre montŽe sans modification. Il en est de m•me pour une hauteur dÕencastrement de B=870 mm et une hauteur de plinthe b=150 mm.
Guida allÕuso del libretto istruzioni I seguenti simboli guideranno nella lettura del libretto: I Informazioni legate alla sicurezza nellÕuso dellÕapparecchiatura Consigli per lÕuso corretto dellÕapparecchiatura e per ottenerne le migliori prestazioni Informazioni legate alla protezione dellÕambiente Sicurezza Vi preghiamo di leggere attentamente queste istruzioni prima dÕinstallare e utilizzare lÕapparecchiatura. Queste avvertenze sono state redatte per la Vostra sicurezza e per quella degli altri.
Indice Sicurezza . . . . . . . . . . . . . . . . . . . . . . . . . . . . . . . . . . . . . . . . . . . . . . . . . . . . . . . . . . . . . . . . . . . . . . . . . . . . . . .43 Smaltimento . . . . . . . . . . . . . . . . . . . . . . . . . . . . . . . . . . . . . . . . . . . . . . . . . . . . . . . . . . . . . . . . . . . . . . . . . . . .44 Uso . . . . . . . . . . . . . . . . . . . . . . . . . . . . . . . . . . . . . . . . . . . . . . . . . . . . . . . . . . . . . . . . . . . . . . . . . . . . . . . . . . .
Prima della messa in funzione Lasciare lÕapparecchiatura in posizione verticale almeno 2 ore prima di metterla in funzione per dar modo allÕolio di refluire nel compressore. ¥ Prima dell'uso e del collegamento elettrico pulire tutte le parti interne con acqua tiepida e sapone neutro allo scopo di togliere il caratteristico odore di nuovo, indi asciugare accuratamente. Non usare detersivi n• polveri abrasive che sono dannose alle finiture.
Allarme sonoro Cassetti LÕapparecchiatura Ž dotata di unÕallarme sonoro. Quando la temperatura interna Ž troppo elevata si sente lÕallarme sonoro e la lampada spia rossa lampeggia. LÕallarme sonoro rimane in funzione fino a quando non si preme lÕinterruttore della congelazione rapida. (4) I cassetti di conservazione sono assicurati contro ribaltamento e in posizione Þnale bloccati. Ci˜ permette sia la conservazione che l'estrazione sicura e comoda di prodotti congelati.
¥ ¥ ¥ ¥ ¥ ¥ ¥ ¥ ¥ Dopo questo periodo • necessario ripristinare il funzionamento di ÇconservazioneÈ. Porre i cibi da congelare nello scomparto inferiore dell'apparecchiatura. La quantitˆ massima di alimenti che possono essere congelati in 24 h • riportata sulla Çtarghetta matricolaÈ. Con la tecnologia NO FROST il processo di congelazione Ž pi• rapido; questo consente ai cibi scongelati di mantenere intatte tutte le caratteristiche originali, le vitamine nonchŽ il gusto dei cibi.
Se qualcosa non funziona Qualora l'apparecchiatura presentasse qualche disfunzione, è bene controllare: DISTURBO RIMEDIO Le derrate sono troppo calde. Temperatura non correttamente regolata; consultare il paragrafo ÒRegolazione della temperatura. LÕapparecchiatura • installata accanto ad una fonte di calore; consultare il paragrafo ÒInstallazioneÓ. La porta • rimasta aperta a lungo; tenere aperta la porta soltanto per il tempo strettamente necessario.
Preparazione griglia Apertura porta a sinistra: - asportare il lato sinistro (A) della griglia incidendolo dal retro (v. fig.). Successivamente, per riposizionare la griglia sull'apparecchiatura procedere come segue: - accostare la griglia alla base dell'apparecchiatura, quindi premere sui ganci (a) fino allo scatto. A a B a DO002/2 DO001 Apertura porta a destra: - asportare il lato destro (B) della griglia incidendolo dal retro (v. fig.). N.B.
6 10 13 Ultimata la reversibilitˆ della porta, controllare che la guarnizione magnetica sia aderente al mobile. Se la temperatura ambiente • fredda (ad es. in inverno), pu˜ succedere che la guarnizione non aderisca perfettamente al mobile. In tal caso attendere il naturale rinvenimento della guarnizione stessa oppure accelerare tale processo riscaldando la parte interessata con un normale asciugacapelli.
Installazione Osservare durante il trasporto e lÕinstallazione dellÕapparecchio che non venga danneggiato alcun elemento della circolazione della sostanza refrigerante. ¥ Durante il normale funzionamento il condensatore ed il compressore, che sono posti sul retro dellÕapparecchiatura, si riscaldano sensibilmente. Assicurarsi quindi che lÕinstallazione venga eseguita come da istruzioni riportate sul libretto.
Istruzioni per l'incasso Dimensioni del vano Le dimensioni del vano devono corrispondere a quelle indicate in figura. 596 60 0 5 55 x ma 5 min50 . + - 600 - + 3 DO013 1xB 2xC 1xA 1xK 3. Inserire lÕapparecchiatura nel vano. La presa con contatto di terra necessaria per il collegamento dell'apparecchiatura deve essere installata in modo che la spina non sia situata nel vano di installazione dell'apparecchiatura.
1 B 4 4. Applicare a pressione il coprifuga (B) tra apparecchiatura e mobile dopo aver inserito lÕapparecchiatura nel vano di alloggiamento. 7 I a b C click 5 click 5. Fissare lÕapparecchiatura al piano lavoro del mobile. c 8 6. Per montare la porta del mobile procedere come mostrato nelle figure successive.
m 8m I F 27 ,5 cm 27 55 ,5 I F cm K cm G 10 13 1 A 2 45° 3 11 14 7. Applicare il listello di copertura (A).
Montaggio del battiscopa Importante Per non compromettere la funzionalitˆ dell'apparecchio • necessario utilizzare la griglia di ventilazione originale. a = 100 b = 170 A = 820 B = 890 ¥ Nel caso di luce massima di misura A=820 mm e di altezza del battiscopa di misura a=100 mm, il battiscopa pu˜ essere montato cos“ com'•, senza modifiche. Lo stesso dicasi nel caso di luce massima in altezza di misura B=890 mm e di altezza del battiscopa di misura b=170 mm.
www.electrolux.com www.electrolux.