EN ICE MAKER FR ICE MAKER ES ICE MAKER USE AND CARE GUIDE GUIDE D’UTILISATION ET D’ENTRETIEN GUIA DE USO Y CUIDADO A04236401 August 2015 (41014070 August 2015)
Finding Information Please Read and Save This Guide Keep a record for quick reference Thank you for choosing Electrolux, the new premium brand in home appliances. This Use & Care Guide is part of our commitment to customer satisfaction and product quality throughout the service life of your new ice maker. We view your purchase as the beginning of a relationship. To ensure our ability to continue serving you, please use this page to record key product information.
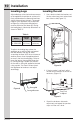
Finding Information Table of Contents Finding Information...............................2 Please Read and Save this Guide.......... 2 Keep a Record for Quick Reference...... 2 Questions?............................................ 2 Table of Contents................................... 3 Safety.....................................................4 Important Safety Instructions................. 4 Safety Precautions..........................4 Definitions.......................................
Safety Important Safety Instructions Safety Precautions Do not attempt to install or operate your unit until you have read the safety precautions in this manual. Safety items throughout this manual are labeled with a Danger, Warning or Caution based on the risk type. Definitions This is the safety alert symbol. It is used to alert you to potential personal injury hazards. Obey all safety messages that follow this symbol to avoid possible injury or death.
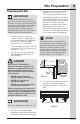
Site Preparation Preparing the Site IMPORTANT It is extremely important that the unit is level. If it is not level, the ice mold will not fill evenly. This can cause a reduction in ice rate, uneven sized cubes or water spilling into the storage area which will cause the ice in the bin to melt pre-maturely. Remember that floors near drains have a tendency to slope towards the drain. 1 2 3 Position the unit on a flat, level surface, capable of supporting the entire weight of the unit.
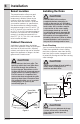
Installation Select Location Installing the Drain The proper location will ensure peak performance of your appliance. We recommend a location where the ice machine will be out of direct sunlight and away from heat sources. To ensure your product performs to specifications, the recommended installation location temperature range is from 55 to 90°F (13 to 32°C) for built in ice machines and 55 to 100°F (13 to 38°C) for freestanding ice machines.
Installation Installation Dimensions 24" (61cm) 14 7/8" ) (37.8cm Figure 3 33 5/8" (85.4cm) Adjustable to 34 3/4" (88.3cm) Water 5" Drain (12.7cm) Water Valve Water Outlet 21 3/4" (55.2cm) Factory Installed Drain Pump This pump is designed to remove drain water from ice machines installed in areas without direct drainage access. The sealed reservoir pump collects the melted ice water and pumps it to a maximum lift of eight feet (2.44 meters) through 3⁄8” I.D. vinyl tubing to a drain.
Installation Connecting the Water Supply CAUTION Observe and follow all local plumbing codes when installing this appliance. After completing the installation, turn on the water and recheck the drain and water connections for leaks. This ice machine must be connected to a potable cold water supply line delivering water pressure between a minimum of 20 psi and a maximum of 120 psi. Use 1⁄4" copper tubing for your water supply which is available at any local hardware or plumbing supply store.
Installation Electrical Connection A grounded 115 volt, 15 amp dedicated circuit is required. This product is factory equipped with a power supply cord that has a threepronged, grounded plug. It must be plugged into a mating grounding type receptacle in accordance with the National Electrical Code and applicable local codes and ordinances (Figure 6). If the circuit does not have a grounding type receptacle, it is the responsibility and obligation of the customer to provide the proper power supply.
Installation Leveling Legs Leveling the unit Adjustable legs at the front and rear corners of the appliance should be set so the unit is firmly positioned on the floor and level from side-to-side and front-to-back. The overall height of your appliance may be adjusted to higher (by turning the leveling leg out, counter clockwise) and lower (by turning the leveling leg in, clockwise) dimensions as shown in Table "A". 1 Table A Models Minimum Height Maximum Height UR15IM20RS UL15IM20RS 33 5⁄8" (85.
Door Adjustment 11 Adjusting the Door Your door is aligned at the factory before shipment. Occasional re-adjustment may be necessary, especially if an overlay panel is installed. The following procedure will correct for up to 1/4” alignment. The door should never be flush with the top of the cabinet. Even when level, the top edge of the door will be 1/8” below the top of the cabinet (Figure 1). 1/8" 4 5 If door edge opposite the hinges needs to move up, move plate toward outside of door.
Operation of Ice Machine Ice Making Process Your ice machine is unique in how it forms ice with fractional freezing to form a slab of ice that is clear and has less mineral content than the water it is produced from. This is accomplished by running water over the cold evaporator plate (Figure 1) which gradually freezes the water to produce the ice slab. Pure water freezes first, leaving the dissolved minerals in the residual reservoir water to provide clear ice.
Operation of Ice Machine 13 New Sounds The ice machine will make sounds that are different than your household refrigerator. Because these sounds are new to you they may be of concern but are most likely normal. The ice production process will make noises that are not typical in a refrigeration product, ice falling onto hard surfaces, water cascading across the evaporator plate, and valves opening and closing.
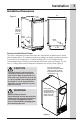
Built-In Installation/Start-Up Installing a Built-In Your Electrolux product has been designed for either free-standing or built-in installation. When built-in, your ice maker does not require additional air space for top, sides or rear. However, the front grille must NOT be obstructed. NOTE To ease unit installation and removal, the unit must be located to allow clearance for water, drain and electrical connections in the rear of the ice maker. Built-In Cabinet Dimensions Min.
Built-In Installation/Start-Up 15 Starting your clear ice machine: Delay start/Vacation mode: Plug the ice machine into a 115 ICE volt wall outlet, Your appliance is shipped from the factory in the "ICE" mode and will automatically begin making ice as soon as power is supplied to the unit. If the appliance does not start, confirm the wall outlet has power, and the control is in the "ICE" mode (Options section). Do not start the ice machine in "ECO" mode.
Built-In Installation/Start-Up Door ajar alarm: Once you have your cleaner: If the door is open, or not closed DOOR properly for 5 minutes the "DOOR" indicator will illuminate and flash and an audible tone will sound. This alarm condition can be reset by closing the door or momentarily pressing the "ON/ OFF" icon, (i.e.-if you are cleaning the storage compartment, etc.). The alarm will recur in 5 minutes if the alarm condition persists.
Built-In Installation/Start-Up 17 Drain the water from the water reservoir, by removing the black plug from the bottom of the fresh water reservoir (Figure 4). After the water is drained replace the plug in the bottom of the reservoir and firmly press into place (Figure 4b). The plastic splash shield can be removed by lifting off hanger brackets to improve access (Figure 6). Splash shield hanger brackets Figure 4 Remove the black reservoir drain plug from the bottom of the reservoir.
Maintenance Special Considerations • • • • For best performance, keep the unit out of direct sunlight. Turn the unit OFF and dispose of any ice cubes if the unit will not be used for 5 days or more. Prop door open to allow for air circulation and prevent mold and mildew. If the ambient temperature is expected to drop below 45°F (7°C), drain all water from the unit to prevent freezing damage not covered by the warranty.
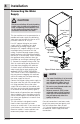
Maintenance 19 Condenser Cleaning — Every 3 Months To maintain operational efficiency, clean the condenser every three months (depending on environmental conditions, more or less frequent cleaning may be necessary). WARNING Disconnect electric power to the ice maker before cleaning the condenser. To remove and replace the grille for access to the condenser, follow this procedure (Figure 1): 1 Loosen the two Phillips head screws, one at each end of the grill. It is not necessary to remove them.
Maintenance PREPARING THE ICE MACHINE FOR STORAGE If the ice machine is moved, not used for an extended period of time, or will be in an area that will be near freezing temperatures, it is necessary to remove any remaining water in the ice-making system. Draining and Removing Water from the Ice-Making System with a Gravity Drain. 1. 2. Turn off the water supply to the ice machine. Disconnect the water supply fitting at the inlet of the water valve (Figure 2).
Maintenance 21 6. Remove the access cover from the rear of the ice machine (Figure 3). Access cover 8. Reconnect the water valve outlet water line (Figure 4). 9. Reinstall the ice machine’s access cover. 10. Clean and dry the ice machine’s storage bin. 11. Prop the door open for air circulation to prevent mold and mildew. 12. Leave the water supply line disconnected or reconnect the supply line and leave it shut off. Do NOT turn the water on and allow water to enter back into the water valve.
Maintenance 14. Remove the top clamp from the vent tube, for easier access for the air hose. 15. Apply air pressure (approximately 10 psi) to the end of the vent tube which will purge the remainder of the water from the drain pump and the drain line (Figure 6). 16. Reinstall the vent tube and clamp to the back of the ice machine and remove the winterization plug from the ice bin and save it for future use. Vent tube Remove clamp screw Drain line Figure 6 To Restart the Ice Machine 1. 2. 3. 4. 5.
Maintenance 23 DRAIN PUMP REMOVAL INSTRUCTIONS (FOR SERVICE ONLY) 1. 2. 3. 4. Unplug the ice machine from the electrical supply and remove the rear access cover from the ice machine. Unscrew the leveling leg in the back corner until the end of the threaded portion is flush with the threaded nut insert in the base (Figure 8). Unscrew the 3 hose clamps and remove the 3 hoses from the front of the drain pump and remove retaining brackets (Figure 8).
Troubleshooting Before You call For Service If the unit appears to be malfunctioning, read through Normal Operation first. If the problem persists, check the Troubleshooting Guide. Locate the problem in the guide and refer to the cause and its remedy before calling for service. The problem could be something very simple which can be solved without a service call. DANGER ELECTROCUTION HAZARD NEVER attempt to repair or perform maintenance on the unit until the main electrical power has been disconnected.
Troubleshooting 25 Problem Unit runs but produces very little ice. • High air temperature around unit. • • Scale and mineral buildup in unit. Inadequate airflow at the front of the unit. Missing or loose reservoir drain plug. Cleaning cycle recently performed. • Remedy Clean the condenser. See Maintenance. Surrounding air temperature of over 90°F (32°C). Low ice production at high temperatures is normal. Clean unit. See Maintenance. • Remove items blocking airflow. • Ice-making system is dirty.
Troubleshooting Problem The ice machine is noisy • • • Little or no ice production from the ice machine • • Is there an ice slab caught between the evaporator plate and the grid cutter? Is the electronic control set to the “ICE” position? Is water getting to the ice machine? • • Has the ice machine just been started? • • Is the reservoir drain plug in place? Is the water distributor tube restricted? • • Is the condenser fan air flow restricted? • • Is the room and/or water temperature to
Troubleshooting 27 Problem Clumps of ice Ice cubes are too big or too small • • • Is there low ice consumption? • • Is the ice slab releasing? Is the distributor tube restricted? • Is the drain hose aligned over the drain? Is the ice machine draining properly? • • Plumbing Problems Possible Cause Are there clumps of ice in the bin? • • • • Remedy If the ice isn’t used on a regular basis it will melt and form into clumps. Break up the ice clumps with the ice scoop.
Troubleshooting Troubleshooting the Drain Pump If the drain pump reservoir (not the ice machine bin) reaches overfill condition, the power to the ice machine will be shut off. If the ice machine is not working, check the following: • • • • Make sure there is power at the receptacle. Make sure the ice machine is turned on. Make sure the ice bin is not full. Then check the drain pump. The pump does not run: • • • • Make sure the pump is plugged in and there is power to the receptacle.
Warranty Information 29 Major Appliance Warranty Information Your appliance is covered by a one year limited warranty. For one year from your original date of purchase, Electrolux will repair or replace any parts of this appliance that prove to be defective in materials or workmanship when such appliance is installed, used, and maintained in accordance with the provided instructions.