EN ICE MAKER USE AND GEAR GUIDE FR ICE MAKER GUIDE UTILIZATION ET ENTREPRENEUR 5 ICE MAKER UIA DE USD Y GUIDANCE AOA23B401 August 2015 ] Electrolyte {41014070 Aug 2015)
Finding Information Table of Contents Finding Information Pl: Read and Se Questions? rabies of Contents Safety Important Safety instructions .. Safety Precautions. Definitions. (General Precautions .. Site Preparation Preparing the Sit Installation Select Location. Cabinet Clearances Installing the Dre Drain Install Dimensions Factory Inst Door Adjustment Dusting the Door Operation of ice Machine... 12 loa Making Process lee Production New Sour Burrito Installing & Bud tn.
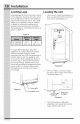
Installation Installation Dimensions 24" I > Figure 3 Fe 3 518" 3/3" (88.30) water go | Drain (12 7omj Factory Installed Drain Pump Iris pump is designed to remove Cain water from ioe machines mentalist In areas without dec drainage access, The sealed reservoir pump collects the matted ice water and pumps itt. maximum It of eight feet (2.44 meters) through 38” LD, vinyl tubing 0 a rain. The discharged Tubing is fledged up and attached to he back of the ice machine.
& Installation Connecting the Water Supply /N caution BSE and TOEFL all ld here) ig aces whet abstaining this appliance. Alter Completing he Stalin um an the water snd hack the crn and Water connections fol leaks. Iris joa making must be connected to a ly line delivering @ minimum a imagine of 120 ps. Use 1 4% Moppet tubing for your v oly which is available at any pn ware or plumbing supply store. Route the 14° copper tubing 10 suit your installation being sure not fo kink the {ping.
Installation Leveling Legs Adjustable legs at the front and rear comers of the appliance should be th units firmly postilion on the floor and chicle-to-side encl fort-to-back.
Adjusting the Door our door Is slier shipment, comet ior up to 174° The door top of the aly, specially if an era panel . The fo reduce: wil ert, should never be flush with the bidet, Even when level, the Sf the door wif fie 1 of the cabinet (Figure 1) Figure 1 To adjust 1 w Carfare the op edge of the do {opposite the hings) to the top es of the cabinet and note the typ adjustment {up or dowry nested. Remove the top hinge [vot pin with 178" Allen wrench (Fi cur off bottom hinge pin.
Ice Making Process & machine is unique In how It forms ith fractional freezing to fom shi of ia that is clear and has poy separator pate Figure 13 gradually freezes the water to prose te fats, Pure wale Breezes first. fearing the dissolved sinners in the residual serer water to provide cleat ice. When the ice sab makes the comets the ioe sheet is released and ged cutter (Figure 2).
Operation of Ice Machine 13 New Sounds The ice machine wil make sounds that are different than your household refrigerator. Because these sounds ae new to you they may be of concern but dre most | normal. The loa production process wil make noses that are not typical in a refrigeration prosciutto. ice falling onto hard surf r cascading across the evaporator pte. and Yates Goering and closing.
Installing a Built-in “eur Collectible product has been for sifter fie nation. Wuhan Built-in, yous ios maker nit requite additional sir space for top, sides of tear. H must NOT be obstructed, = Impasse i interrelation a fel medieval Lad neat lon ea be Adsorptions ihe res at the ve ele Hin, Cut-Of Dimensions Sj1atsnET) aan 24” ding of built-in the front grit 14 Built-In JAN caution BOOT nso anti ber Closed desist.
Built-in 18 Starting your clear ice machine: Plug the ice machine ir It wal cutie, Your nce shipped from the factory in the "ICE® mode and wil automatic aby bog in making ina as 10 the unit. If the only toes ot art, confirm the wal outlet has power and the control is in the "ICE* mode Options satiation.
Door ajar alarm: If the eon is open, or not clogged property for & minutes the "DOOR" incinerator will illuminate and flash anc an audible tone will sol. This afar condition be reset iy closing the cur or momentary pressing the “ON OFF” ion, you are cleaning the storage compartment, el. The lama w recur in 5 minutes ff the alarm condition persists.
Built-in Drain the water fom the lr re by removing the black piu Eater of tho dash owlet 4). Alter tre water Is dear plug In the bottom roe Figure 4 Remove the black reservoir drain plug from 1 the bottom of the reservoir Figure 4b Refer to your cleaning solution instructions 10 determine the proper amount of cleaning solicitor to add based on 3 quarts {2.8 refs) of water, Pour the clean solution between the evaporator pla the grit cutter so it flows down info he rash water reservoir (Figure 5).
Maintenance Special Considerations For best permanence, keep the unt out of direct surge + ln the unit OFF and dispose of any ice cubes If the unt will not be tis: for 5 dais Of more. Prof cur ps to allow for air circulation and pre mold and mildew.
Condenser Cleaning — Every 3 Months To dean operational condenser every thee | on environmental condition frequent clues s, 11016 or ls ing may be necessary). JAN wake Disconnect placid power to he ioe maker tiptoe leading the condensate, To turnover and replace the rile for access 10 the condenser, follow this procedure {Figure 1 {Loosen the two Philips head screws. one al each end of the girl. Its not necessary to em move them 2 With the door open.
Maintenance PREPARING THE ICE the ice machine is moved, not uss for an extensible torpedo of time, or wil be in an ares tht will be near freezing temperateness, is SATYRIC tO MB MOVE any remaining water in the ice-making This lee mashing ius! nave all water drained abd Moved fo prevent ine hacking Dana eo well 8s possible Misdid Han 0 he sue ding arms in freeing conditions (hes Hayrides de nol Over need went AN canon Do not se any pe of anti trees or ihe gs a substitution for probe drilling the fee machi
6. Remove the aces cover from the rear of the ica making Figure 3. Access cover nnn ~ sore Figure 3 7. Discontent the water veils wit lat water ne to the vir and train the remaining water left in the water line trap area (Figure 4 To disconnect the water outlet fine: Push up on I the white collar } and pull the elastic water fine rom the bot far | of the water valve.
Maintenance Remove the top came from the vent tbe, for easier access for the air hose. Apply ali pressure {approximately 10 pal 10 the and of the cant tube which will purge the remainder of the water from the drain pump and the drain fine (Figure &. Reinstall the vert ube and clamp to the back of tha ice reaching and ‘© the internalization plug from vin and save it for future use, Remove camp screw Figure 6 To Restart the foe Machine 1.
DRAIN PUMP REMOVAL INSTRUCTIONS (FOR SERVICE ONLY) I. Unplug the los machine from the wore until the end of the th portion is flush with the threaded nut insert in the base (Figure 1. 3. uns OBIS the 3 ho clamps and 4 oles he fain pup and remove from the ice machine {Figure 7). It may be necessary to dis ground wits connection in the back flange of the cabinet (Figure &) Drain valve Rotate drain pump and remove from back of lee machine.
Troubleshooting Before You call For Service if the unit appears to be malfunctioning. rear through Normal Operation fist.
Troubleshooting Probe =f Unit runs. produces ice Fossil Caves 1 Dirty Cong cools, High aif temperature around unt. Sale and mineral pullet in unt Fascinate airflow at the front of the unit sing of nose it drain plug, cle recently pertained. * Clean the condenser. See + Clean unit. See Material + Female items blocking aio. + Make sure reservoir drain plug © Allow unit to reach the set Rene) Maintenance, Surrounding ai temperature af aver 90°F (32° 1 Lov foe protection at hig temperatures 5 ron.
256 Troubleshooting icg making? Is there a “whooshing” sound? fs there an ice slay caught between the evaporator plate and the gid cutter? Bob Foible Sates Re tin 1 The ice machine vou hear water This is a normal sou water! noisy Lang climactic i the d once ave i08 making roe sure the drain plug seated in the wat First check to see if the ice chine is level.
Troubleshooting 27 Frozen Possible aes [1] Terabyte + Ave thees clumps of ioe] » If the ica Isn't Used on a regular in the bin? basis it will Matt and fom into clumps. Break up the | ham Che Cs Ces 6 100 | & 16 Terr ow big or to slam Consumption 1 wil affect the size of the cubes.
Troubleshooting Troubleshooting the Drain Pump if the drain puny reservoir nit the ice mashing bik reaches overfill condition, the power to the ice machine will be shut of, #f the ice machine is not working, check the following: Make sure there is power af the receptacle. * Make sure the ioe machine is turned or «Mak we the ie bin is not ul. w Then check the deal pump.
Warranty Information 29 Major Appliance Warranty Information Lor appliance is covers by 6 ons veer timid wearer ad ref i st cs such papa lle, used, and mainframes in covariance vA fis proved stickpins, Exclusions This warranty toes nat cover the following: with original serial nude masterminded ad of cannot bis really ner to another party or removed upstart from is origins ISA or Can ad oy this warranty. or failures.