
Service manual


107
5222
4
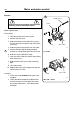
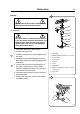
Drain valve
Repairs
Repair work on the machine should only be
done by specially trained personnel.
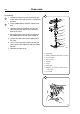
Disassembly
For repair works on the drain valve, there is
a risk that water still left in the machine may
flood onto the floor. Be sure to dry up any
spilled water since it may cause people to
slip and hurt themselves.
1. Take down power from the machine.
2. Remove the front cover.
3. Disconnect the drain hose from upper part of
the valve.
4. Undo the hose clamp holding the valve rub-
ber bellows against the sleeve coupling of the
outer drum.
5. Loosen and unscrew the 4 retaining nuts of
the valve a couple of turns (use a socket,
extender and ratchet wrench). Turn the valve
and unhook it from the bolts.
6. Disconnect the pressure hose from the lower
part of the valve.
7. Replace the valve with a new one or replace
the defective part.
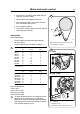
3
4
4
7
6
5
2
1
3
3
9
101772
8
1. Upper part
2. Rubber diaphragm with drain connection
3. Pressure plate
4. Recoil spring
5. Cylinder
6. Piston
7. Diaphragm
8. Nipple for connection of feed hose from
control valve
9. Lower part