WA GL4 E 201 WA GL6 E 201 ................................................ .............................................
electrolux Electrolux. Thinking of you. Share more of our thinking at www.electrolux.com CONTENTS Safety information Safety instructions Environment concerns Technical information Product description Control panel Programmes 2 3 4 5 5 6 9 Consumption values 11 Before first use 12 Daily use 12 Helpful hints and tips 15 Care and cleaning 16 Troubleshooting 19 Installation 21 Subject to change without notice.
electrolux 3 GENERAL SAFETY • Before maintenance, deactivate the appliance and disconnect the mains plug from the mains socket. • Do not change the specification of this appliance. • Obey the maximum load volume of 8 kg (refer to the “Programme chart” chapter). • If the supply cord is damaged, it must be replaced by the manufacturer, its service agent or similarly qualified persons in order to avoid a hazard.
electrolux • Do not pull the mains cable to disconnect the appliance. Always pull the mains plug. • Do not touch the mains cable or the mains plug with wet hands. • This appliance complies with the E.E.C. Directives. Water connection • Make sure not to cause damage to the water hoses. • The appliance is to be connected to the water mains using the new supplied hose-sets. Old hose sets must not be reused.
electrolux 5 TECHNICAL INFORMATION Dimensions Width / Height / Depth Electrical connection: 605 / 850 / 605 mm Total depth 640 mm Voltage Overall power Fuse Frequency 230 V 2200 W 10 A 50 Hz Level of protection against ingress of solid particles and moisture ensured by the protective cover, except where the low voltage equipment has no protection against moisture Water supply pressure Water supply IPX4 Minimum 0,5 bar (0,05 MPa) Maximum 8 bar (0,8 MPa) 1) Cold water Maximum load Cotton Sp
electrolux ACCESSORIES 1 4 2 4 Plastic hose guide To connect the drain hose on the edge of a sink. 3 CHILD SAFETY DEVICE • When you activate this device, you cannot close the door. This prevents children or pets to be closed in the drum. To activate the device, turn it clockwise, until the groove is horizontal. To deactivate the device, turn it counterclockwise, until the groove is vertical. 1 Spanner To remove the transit bolts.
electrolux 7 ON OFF BUTTON 1 Press this button to activate or deactivate the appliance. A tune sounds when the appliance is activated. The AUTO Stand-by function automatically deactivates the appliance to decrease the energy consumption when: • You do not use the appliance for 5 minutes before you press button 4 . – All settings are cancelled. – Press button 1 to activate the appliance again. – Set again the washing programme and all possible options.
electrolux D • The programme time When the programme starts, the time decreases with steps of 1 minute. • The delay start When you press the delay start button, the display shows the delay start time. • Alarm codes If the appliance has a malfunction, the display shows alarm codes. Refer to 'Troubleshooting' chapter. • Err The display shows this message for some seconds if: – You set a function that is not applicable for the programme. – You change the programme while it operates.
electrolux 9 If you deactivate the acoustic signals, they continue operate only when you press the buttons and when a malfunction occurs. CHILD LOCK FUNCTION This function prevents children to play with the control panel. • To activate the function, press button 10 and button 9 at the same time until the . display shows the symbol • To deactivate the function, press button 10 and button 9 at the same time until goes off.
electrolux Programme Temperature Type of load max. weight of load Cycle description Functions Machine washable wool. Hand washable wool and delicate fabrics with «hand washing» care symbol. max. 2 kg Wash Rinses Short spin SPIN REDUCTION RINSE HOLD Daunen - Couette Duvets 60° - 30° One synthetic blanket, duvet, bedspread and so on. max.
electrolux 11 Programme1) Type of load Auffrischen - Rafraîchir This cycle removes odours from the laundry. Max. load Cotton and synthetic items. Do not set the Steam programme for this type of clothes: • Clothes which is not specified on the care label as being suitable for tumble-drying. • Clothes with inclusion of plastic, metal, wooden parts or alike. Steam does not remove animal odours. Glätten - Défroissage This programme helps to dewrinkle the laundry. up to 1.5 Kg up to 1.
electrolux Programmes Load (kg) Energy consumption (kWh) Water consumption (litre) Approximate programme duration (minutes) Remaining moisture (%)1) WA GL4 E 201 Remaining moisture (%)1) WA GL6 E 201 2 0.35 57 58 30 30 Wool/Hand wash 30 °C Standard cotton programmes Standard 60 °C cotton 8 0.9 58 208 52 43 Standard 60 °C cotton 4 0.65 45 156 52 43 Standard 40 °C cotton 4 0.49 45 156 52 43 1) At the end of spin phase. Off Mode (W) Left-On Mode (W) 0.48 0.
electrolux 13 USING THE DETERGENT AND ADDITIVES The detergent compartment for the prewash phase and the soak programme. Add the detergent for prewash and soak before the start of the programme. The detergent compartment for the washing phase. If you use a liquid detergent, put it immediately before you start the programme. Liquid additives compartment (fabric conditioner, starch). Put the product in the compartment before you start the programme.
electrolux 4. To use liquid detergent, turn the flap down. CANCEL A PROGRAMME 1. Press button 1 to cancel the programme and to deactivate the appliance. 2. Press button 1 again to activate the appliance. Now, you can set a new washing programme. The appliance does not drain the water. 5. Measure out the detergent and the fabric conditioner. 6. Carefully close the detergent dispenser. Make sure that the flap does not cause a blockage when you close the drawer.
electrolux 15 If the temperature and level of the water in the drum are too high, the door lock symbol stays on and you cannot open the door. To open the door do the steps that follow: 1. Deactivate the appliance. 2. Wait for some minutes. 3. Make sure that no water is in the drum. Important! If you deactivate the appliance, it is necessary to set the programme again. AT THE END OF THE PROGRAMME • The appliance stops automatically. • The acoustic signals operate. • In the display comes on.
electrolux • Do not mix different types of detergents. • To help the environment, do not use more than the correct quantity of detergent. • Obey the instructions that you find on the on packaging of these products. • Use the correct products for the type and colour of the fabric, the programme temperature and the level of soil. • If you use liquid detergents, do not set the prewash phase.
electrolux 17 DRUM Regularly examine the drum to prevent limescale and rust particles. Only use special products to remove rust particles from the drum. To do this: • Clean the drum with special product for stainless steel. • Start a short programme for cotton at the maximum temperature with a small quantity of detergent. DETERGENT DISPENSER 1. Press the lever. 1 2 DRAIN PUMP Regularly examine the drain pump and make sure that it is clean. Clean the pump if: • The appliance does not drain the water.
electrolux 4. Press the two levers and pull forward the drainage duct to let the water flow out. 5. When the container is full of water, put the drainage duct back again and empty the container. Do steps 4 and 5 again and again until no more water flows out from the drain pump. 6. Pull back the drainage duct and turn the filter to remove it. 11. Put the flap back and close the drain pump door. 2 1 1 2 7. Remove fluff and objects from the pump.
electrolux 19 5. Clean the filter in the valve with a stiff brush or a towel. 6. Install again the inlet hose. Make sure that the couplings are tight to prevent leakages. 45° 20° 7. Open the water tap. EMERGENCY DRAIN Because of a malfunction, the appliance cannot drain the water. If this occurs, do steps (1) through (6) of 'To clean the drain pump'. If necessary, clean the pump. Put the drainage duct back and close the drain pump flap.
electrolux Problem The appliance does not drain the water. Possible cause Possible solution The filters in the water inlet hose is blocked . Clean the filters. Refer to 'Care and cleaning'. The water tap is blocked or is furred with limescale. Clean the water tap. The connection of the water inlet hose is not correct. Make sure that the connection is correct. The water pressure is too low. Contact your local water authority. The water drain hose is damaged.
electrolux 21 Problem The appliance makes an unusual noise. Possible cause Possible solution Incorrect level of the appliance. Adjust the level of the appliance. Refer to 'Installation'. You did not remove the packaging and/or the transit bolts. Remove the packaging and/or the transit bolts. Refer to 'Installation'. The load is very small. Add more laundry in the drum. The appliance fills with water and drain immediately. The end of the drain hose is too low.
electrolux 6. Put one of the polystyrene packaging elements on the floor behind the appliance. Carefully put down the appliance with the rear side on it. Make sure not to damage the hoses. 2. Remove the cardboard top. 3. Remove the polystyrene packaging materials. 7. Remove the polystyrene protection from the bottom. 1 4. Remove the internal film. 2 8. Pull up the appliance in vertical position. 9. Remove the power supply cable and the drain hose from the hose holders. 5. Open the door.
electrolux 23 11. Pull out the plastic spacers. 12. Put the plastic caps in the holes. You can find these caps in the user manual bag. and the movement of the appliance when in operation. x4 • The appliance must be level and stable. Caution! Do not put cardboard, wood or equivalent materials below the appliance feet to adjust the level. Warning! Remove all the packaging and the transit bolts before you install the appliance. THE INLET HOSE • Connect the hose to the appliance.
electrolux • Connect the water inlet hose to the cold water tap with 3/4 thread. With the plastic hose guide. • On the edge of a sink. Caution! Make sure that there are no leaks from the couplings. Do not use an extension hose if the inlet hose is too short. Contact the service centre for the replacement of the inlet hose. Water-stop device The inlet hose has a water stop device. This device prevents water leaks in the hose because of its natural ageing.
electrolux 25 • Directly to a built-in drain pipe in the room wall and tighten it with a clip. Refer to the illustration. Put the drain hose in the spigot and tighten it with a clip. Make sure that the drain hose makes a loop to prevent that remaining particles go in the appliance from the sink. You can extend the drain hose to maximum 400 cm. Contact the service centre for the other drain hose and the extension.
electrolux Electrolux. Thinking of you. Mehr zu unserem Denken finden Sie unter www.electrolux.com INHALT Sicherheitsinformationen Sicherheitshinweise Umwelttipps Technische Daten Gerätebeschreibung Bedienfeld Programme 26 27 29 29 30 31 34 Verbrauchswerte 36 Vor der ersten Inbetriebnahme 37 Täglicher Gebrauch 37 Praktische Tipps und Hinweise 41 Reinigung und Pflege 42 Fehlersuche 45 Montage 47 Änderungen vorbehalten.
electrolux 27 • Wartung oder Reinigung des Geräts darf nicht von Kindern ohne Aufsicht erfolgen. ALLGEMEINE SICHERHEIT • Schalten Sie vor Reinigungsarbeiten immer das Gerät aus und ziehen Sie den Netzstecker aus der Steckdose. • Nehmen Sie keine technischen Änderungen am Gerät vor. • Beachten Sie die maximale Beladungsmenge von 8 kg (siehe Kapitel „Programmtabelle“).
electrolux • • • • • • • Wenden Sie sich andernfalls an eine Elektrofachkraft. Das Gerät darf ausschließlich an eine ordnungsgemäß installierte Schutzkontaktsteckdose angeschlossen werden. Verwenden Sie keine Mehrfachsteckdosen oder Verlängerungskabel. Achten Sie darauf, Netzstecker und Netzkabel nicht zu beschädigen. Falls das Netzkabel des Geräts ersetzt werden muss, lassen Sie dies durch unseren Kundendienst durchführen.
electrolux 29 UMWELTTIPPS Recyceln Sie Materialien mit dem Symbol . Entsorgen Sie die Verpackung in den entsprechenden Recyclingbehältern. Recyceln Sie zum Umwelt- und Gesundheitsschutz elektrische und elektronische Geräte. Entsorgen Sie Geräte mit diesem Symbol nicht mit dem Hausmüll. Bringen Sie das Gerät zu Ihrer örtlichen Sammelstelle oder wenden Sie sich an Ihr Gemeindeamt.
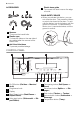
electrolux GERÄTEBESCHREIBUNG 1 2 3 8 9 10 4 5 11 6 7 1 2 3 4 5 6 7 8 9 10 11 12 Arbeitsplatte Waschmittelschublade Bedienfeld Türgriff Typenschild Ablaufpumpe Schraubfüße zum Ausrichten des Geräts Wasserablaufschlauch Wassereinlassventil Netzkabel Transportschrauben Schraubfüße zum Ausrichten des Geräts ZUBEHÖR 1 2 4 3 1 Schraubenschlüssel Zum Lösen der Transportschrauben.
electrolux 31 BEDIENFELD 1 2 3 Glätten Défroissage Koch/Bunt Blanc/Couleurs Auffrischen Rafraîchir + Vorwäsche + Prélavage Baumwolle Eco Coton Eco Extra Leise Extra Silence Super Eco Pflegeleicht Synthétiques 20 min 3 kg Leichtbügeln Repassage Facile Feinwäsche Délicats Outdoor Blousons Spülen Rinçage Schleudern/Pumpen Essorage/Vidange Wolle/Seide Laine/Soie Ein/Aus Marche/Arrêt Daunen Couette Temp.
electrolux A • Die maximale Temperatur des Programms B • Die Standard-Schleuderdrehzahl des Programms • Die Symbole „Kein Schleudergang“1) und „Spülstopp“ C • Die Display-Symbole2) Symbol Beschreibung Hauptwaschgang Spülgänge Schleudergang Kindersicherung Sie können die Tür des Geräts nicht öffnen, solange dieses Symbol erscheint. Sie können die Tür erst öffnen, wenn das Symbol erlischt. Wenn das Symbol nicht erlischt, obwohl das Programm beendet ist: • Es befindet sich Wasser in der Trommel.
electrolux 33 Diese Funktion empfiehlt sich in Gebieten mit weichem Wasser und für Menschen, die unter Waschmittelallergien leiden. FLECKEN-TASTE 8 Drücken Sie die Taste 8 , um einem Programm eine Fleckenbehandlungs-Phase hinzuzufügen. Verwenden Sie diese Funktion für Wäsche mit schwer zu entfernenden Flecken. Bei Wahl dieser Funktion geben Sie den . Fleckentferner in das Fach Mit dieser Funktion verlängert sich die Programmdauer. Diese Funktion ist bei Temperaturen unter 40 °C nicht verfügbar.
electrolux PROGRAMME Programm Temperatur Beladung Max. Beladung Programmbeschreibung Koch/Bunt - Blanc/ Couleurs Koch-/Buntwäsche 95 °C - Kalt Weiße und bunte Baumwolle, normal verschmutzt. Max. 8 kg Hauptwaschgang Spülgänge Langer Schleudergang DREHZAHLREDUZIERUNG SPÜLSTOPP FLECKEN EXTRA SPÜLEN ZEITSPAREN1) Koch/Bunt + Vorwäsche - Blanc/Couleurs + Prélavage Koch-/Buntwäsche mit Vorwäsche 95 °C - Kalt Weiße und bunte Baumwolle, stark verschmutzt. Max.
electrolux 35 Programm Temperatur Beladung Max. Beladung Programmbeschreibung Spülen - Rinçage Spülgang Mit der Hand gewaschene Teile. Spülgänge Langer Schleudergang DREHZAHLREDUZIERUNG SPÜLSTOPP EXTRA SPÜLEN Träningskläder Outdoor 40 °C - Kalt Imprägnierte Kleidungsstücke, Sport- und Outdoor-Kleidung. Keinen Weichspüler verwenden! Max. 2.5 kg Hauptwaschgang Spülgänge Kurzer Schleudergang DREHZAHLREDUZIERUNG SPÜLSTOPP EXTRA SPÜLEN 20 Min.
electrolux Programm1) Beladung Max. Beladung Dampf kann für getrocknete, gewaschene oder einmal getragene Wäsche benutzt werden. Diese Programme können Falten und Gerüche reduzieren und machen Ihre Wäsche glatter. Verwenden Sie kein Waschmittel. Entfernen Sie Flecken bei Bedarf durch Waschen oder einen an der entsprechenden Stelle angewendeten Fleckentferner. Dampfprogramme sind keine Hygieneprogramme.
electrolux 37 Programme Beladung (kg) Energieverbrauch (kWh) Wasserverbrauch (Liter) Ungefähre Programmdauer (in Minuten) Restfeuchte (%)1) WA GL4 E 201 Restfeuchte (%)1) WA GL6 E 201 Standardprogramm Koch-/ Buntwäsche 60 °C 8 0.9 58 208 52 43 Standardprogramm Koch-/ Buntwäsche 60 °C 4 0.65 45 156 52 43 Standardprogramm Koch-/ Buntwäsche 40 °C 4 0.49 45 156 52 43 1) Am Ende der Schleuderphase. Aus-Zustand (W) Ein-Zustand (W) 0.48 0.
electrolux Vergewissern Sie sich, dass keine Wäschestücke zwischen Dichtung und Tür eingeklemmt sind. Ansonsten besteht das Risiko eines Wasseraustritts oder die Wäsche kann beschädigt werden. EINFÜLLEN VON WASCH- UND PFLEGEMITTELN Waschmittelfach für die Vorwaschphase und das Einweichprogramm. Füllen Sie das Waschmittel für den Vorwaschgang und das Einweichen vor dem Start des Programms ein. Waschmittelfach für den Hauptwaschgang.
electrolux 39 Überprüfen Sie die Position der Klappe 1. Ziehen Sie die Waschmittelschublade bis zum Anschlag heraus. 2. Drücken Sie den Hebel nach unten und ziehen Sie die Schublade heraus. 3. Drehen Sie die Klappe nach oben, wenn Sie Waschpulver verwenden. 4. Drehen Sie die Klappe nach unten, wenn Sie Flüssigwaschmittel verwenden. – Verwenden Sie keine Gelwaschmittel oder Flüssigwaschmittel mit dicker Konsistenz.
electrolux ÄNDERN EINER FUNKTION Einige Funktionen können nur geändert werden, bevor sie durchgeführt werden. 1. Drücken Sie die Taste 4 . Die Kontrolllampe blinkt. 2. Ändern Sie die eingestellte Funktion. EINSTELLEN DER ZEITVORWAHL 1. Drücken Sie die Taste 5 wiederholt, bis das Display die Zeit in Minuten und Stunden anzeigt. Die entsprechenden Symbole leuchten auf. 2. Nach dem Drücken der Taste 4 beginnt das Gerät die vorgewählte Zeit herunterzuzählen.
electrolux 41 PRAKTISCHE TIPPS UND HINWEISE BELADUNG • Teilen Sie die Wäsche auf, in: Kochwäsche, Buntwäsche, Synthetik, Feinwäsche und Wolle. • Halten Sie sich an die Anweisungen auf den Kleidungsetiketten. • Waschen Sie weiße und bunte Wäsche nicht zusammen. • Manche farbigen Textilien können beim ersten Waschen färben. Wir empfehlen, sie deshalb die ersten Male separat zu waschen. • Knöpfen Sie Kopfkissen zu und schließen Sie Reißverschlüsse, Haken und Druckknöpfe. Schließen Sie Gürtel.
electrolux Wasserhärte Härtegrad Art 1 weich 0-7 0-15 0-1.5 0-9 2 mittel 8-14 16-25 1.6-2.5 10-16 3 hart 15-21 26-37 2.6-3.7 17-25 4 sehr hart > 21 > 37 >3.7 >25 °dH °TH mmol/l Clarke REINIGUNG UND PFLEGE Warnung! TÜRDICHTUNG Trennen Sie das Gerät von der Stromversorgung, bevor Sie es reinigen. ENTKALKEN Normales Leitungswasser enthält Kalk. Falls erforderlich, benutzen Sie einen Enthärter, um Kalkablagerungen zu entfernen.
electrolux 43 3. Entfernen Sie den oberen Teil des Pflegemittelfachs. Reinigen der Ablaufpumpe: 1. Öffnen Sie die Ablaufpumpenklappe. 2. Ziehen Sie die Klappe zum Entfernen heraus. 4. Reinigen Sie alle Teile mit Wasser. 5. Reinigen Sie das leere Einschubfach mit einer Bürste. 3. Stellen Sie einen geeigneten Behälter unter die Öffnung der Ablaufpumpe, um das Restwasser aufzufangen. 6. Schieben Sie die Waschmittelschublade wieder in das Einschubfach ein.
electrolux 7. Entfernen Sie Flusen und Gegenstände von der Pumpe. Warnung! Ziehen Sie den Netzstecker aus der Netzsteckdose. Reinigen der Wasserzulauffilter: 1. Schließen Sie den Wasserhahn. 2. Entfernen Sie den Wasserzulaufschlauch vom Wasserhahn. 3. Reinigen Sie den Filter im Zulaufschlauch mit einer harten Bürste. 8. Prüfen Sie, dass sich das Flügelrad der Pumpe drehen lässt. Ist dies nicht möglich, wenden Sie sich an den Kundendienst. 9.
electrolux 45 Bringen Sie den Ablaufkanal wieder in seine ursprüngliche Position und schließen Sie die Ablaufpumpenklappe. Wenn Sie das Wasser über das Notentleerungsverfahren abpumpen, müssen Sie das Abpumpsystem wieder aktivieren: 1. Füllen Sie 2 Liter Wasser in das Hauptfach der Waschmittelschublade ein. 2. Starten Sie das Programm zum Abpumpen des Wassers.
electrolux Problem Mögliche Ursache Mögliche Abhilfe Der Wasserablaufschlauch ist nicht richtig angeschlossen. Vergewissern Sie sich, dass die Schlauchverbindung in Ordnung ist. Ein Waschprogramm ohne Abpumpphase ist eingestellt. Stellen Sie das Abpumpprogramm ein. Die Funktion Spülstopp ist aktiviert. Stellen Sie das Abpumpprogramm ein. Die Gerätetür steht offen oder ist nicht richtig geschlossen. Schließen Sie die Tür richtig. Die Aquasafe-Einrichtung ist aktiv.
electrolux 47 Problem Mögliche Ursache Mögliche Abhilfe Es ist sehr wenig Wäsche in der Trommel. Füllen Sie mehr Wäsche ein. Das Wasser, das in das Gerät einläuft, wird sofort abgepumpt. Das Ende des Ablaufschlauchs liegt zu tief. Vergewissern Sie sich, dass sich der Ablaufschlauch in der richtigen Höhe befindet. Das Programm ist kürzer als die angezeigte Zeit. Das Gerät berechnet eine neue Programmdauer entsprechend der Beladung. Siehe Abschnitt „Verbrauchswerte“.
electrolux AUSPACKEN 1. Verwenden Sie Handschuhe. Entfernen Sie die äußere Folie. Benutzen Sie, falls erforderlich, ein Teppichmesser. 5. Öffnen Sie die Tür. Entfernen Sie das Styroporteil aus der Türdichtung und alle Teile aus der Trommel. 2. Nehmen Sie die Karton-Abdeckung ab. 3. Entfernen Sie die Styropor-Verpackungsteile. 6. Legen Sie eines der Styroporverpackungsteile hinter dem Gerät auf den Boden. Legen Sie das Gerät vorsichtig mit der Rückseite darauf ab.
electrolux 49 9. Entnehmen Sie das Netzkabel und den Ablaufschlauch aus den Schlauchhalterungen. Warnung! Entfernen Sie vor der Montage des Geräts alle Verpackungsmaterialien und Transportschrauben. Wir empfehlen, Verpackungsmaterial und Transportschrauben für einen späteren Transport aufzubewahren. 10. Lösen Sie die drei Schrauben. Verwenden Sie dazu den mitgelieferten Schraubenschlüssel. 11. Ziehen Sie die Kunststoff-Abstandshalter heraus.
electrolux Vorsicht! Schieben Sie weder Karton noch Holz oder ähnliche Materialien unter die Stellfüße, um das Gerät auszurichten. WASSERZULAUFSCHLAUCH • Schließen Sie den Schlauch am Gerät an. Drehen Sie den Wasserzulaufschlauch nur nach links oder rechts. Lösen Sie die Ringmutter, um ihn in die gewünschte Position zu bewegen. Aquastopp-Einrichtung Der Zulaufschlauch verfügt über eine Wasserstopp-Vorrichtung.
electrolux 51 Siphon und befestigen Sie ihn mit einer Schlauchschelle. Stellen Sie sicher, dass der Schlauch einen Bogen beschreibt, damit kein Schmutz aus dem Siphon in das Gerät gelangen kann. • Direkte Einleitung in ein Abflussrohr in der Zimmerwand. Mit einer Schlauchschelle befestigen. Orientieren Sie sich an der Abbildung. Direkte Einleitung in ein Ablaufrohr auf einer Höhe nicht unter 60 cm und nicht über 100 cm. Das Ende des Ablaufschlauchs muss immer belüftet sein, d.h.
www.electrolux.