WAGL 2 T 200 ................................................ .............................................
electrolux Electrolux. Thinking of you. Share more of our thinking at www.electrolux.
electrolux 3 • • • • • • components and cause leakages or malfunctions. Do not install and connect a damaged appliance. Make sure to remove all packaging and transport bolts. Make sure that the mains plug is disconnected from the mains socket during installation. Only a qualified person must do the electrical installation, the plumbing and the installation of the appliance. This to prevent the risks of structural damage or injury.
electrolux • If necessary, use a stain remover when you set a programme with a low temperature.
electrolux 5 CONTROL PANEL 1 2 3 10 1 On/Off button 2 Programme knob 3 Display 4 Start/Pause button 5 Delay start button ON OFF BUTTON 1 Press this button to activate or deactivate the appliance. A tune sounds when the appliance is activated. The AUTO Stand-by function automatically deactivates the appliance to decrease the energy consumption when: • You do not use the appliance for 5 minutes before you press button 4 . – All settings are cancelled. – Press button 1 to activate the appliance again.
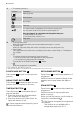
electrolux C • The display symbols.2) Symbols Description Washing phase Rinse phases Spin phase Child lock You cannot open the appliance door when the symbol is on. You can open the door only when the symbol goes off. If the programme is completed but the symbol stays on: • There is water in the drum. • The 'Rinse Hold' function is on. Delay start D • The programme time When the programme starts, the time decreases with steps of 1 minute.
electrolux 7 SPIN BUTTON 9 Press this button to: • Decrease the maximum speed of the spin phase when you set a programme. The display shows only the spin speeds available with the set programme. • Deactivate the spin phase. • Activate the 'Rinse Hold' function. Set this function to prevent fabric creases. The appliance does not drain the water when the programme is completed. Spin phase is off. 'Rinse Hold' function is on. TEMPERATURE BUTTON 10 Press button 10 to change the default temperature.
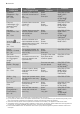
electrolux Programme Temperature Type of load max. weight of load Cycle description Functions Synthetics (Pflegeleicht / Synthétiques) 60° - Cold Synthetic or mixed fabric items with normal level of soil. max. 3 kg Wash Rinses Short spin SPIN REDUCTION RINSE HOLD STAIN1) EXTRA RINSE TIME SAVE2) Easy Iron (Leichtbügeln / Repassage Facile)3) 60° - Cold Synthetic fabric items with normal soil. max.
electrolux 9 6) Set this programme to decrease the time and the consumption of energy and water. 7) Standard programmes for the Energy Label consumption values] according to regulation 1061/2010, the “Energiesparen / Economique 60° C” and “Energiesparen / Economique 40° C” are respectively the “standard 60° C cotton programme” and the “standard 40° C cotton programme”. They are the most efficient programmes in terms of combined energy and water consumption for washing normally soiled cotton laundry.
electrolux Model Off Mode (W) Left On Mode (W) 0.60 0.60 WAGL2T200 BEFORE FIRST USE Put a small quantity of detergent in the main wash compartment of the detergent dispenser. Set and start a programme for cotton at the highest temperature without laundry. This removes all possible dirt from the drum and the tub. USING THE APPLIANCE 1. Open the water tap. 2. Connect the mains plug to the mains socket. 3. Press button 1 to activate the appliance. 4. Put the laundry in the appliance. 5.
electrolux 11 SETTING AND STARTING A PROGRAMME 1. Turn the programme knob. The related programme indicator comes on. 2. The indicator of button 4 flashes with red colour. 3. The display shows the default temperature and spin speed. To change the temperature and/or the spin speed, press the related buttons. 4. Set the available functions. The indicator of the set function comes on or the display shows the related symbol. 5. Press button 4 to start the programme. The indicator of button 4 is on.
electrolux • The indicator of the Start/Pause button 4 goes off. • You can open the lid 2 minutes after the appliance stops. The door lock symbol goes off. • Press button 1 to deactivate the appliance. After five minutes from the end of the programme, the AUTO OFF function automatically deactivates the appliance. When you activate the appliance again, the display shows the end of the last set programme. Turn the programme knob to set a new cycle. • Remove the laundry from the appliance.
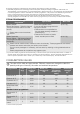
electrolux 13 areas where the water hardness is soft it is not necessary to use a water softener. To know the water hardness in your area, contact your local water authority. Obey the instructions that you find on the packaging of the products. Equivalent scales measure the water hardness: Water hardness table Level Type 1 soft 2 3 4 • German degrees (°dH). • French degrees (°TH). • mmol/l (millimol for each litre - international unit for the hardness of water). • Clarke degrees.
electrolux Warning! • Disconnect the mains plug from the mains socket. • Do not remove the filter while the appliance operates. Do not clean the drain filter if the water in the appliance is hot. The water must be cold before you clean the drain filter. To clean the water inlet filters: To clean the drain filter: 1. Close the water tap. 2. Remove the water inlet hose from the water tap. 3. Clean the filter in the inlet hose with a stiff brush. 1. Open the drain filter door. 4.
electrolux 15 EMERGENCY DRAIN Because of a malfunction, the appliance cannot drain the water. If this occurs, do steps (1) through (3) of 'To clean the drain filter'. If necessary, clean the filter. Put the drainage duct back and close the drain filter flap. 2. Put the end of the inlet hose in a container and let the water flow out of the hose. 3. Do the Drain programme and let it operate until the end of the cycle. 4. Turn the programme knob to Stop to disconnect the appliance from the power supply. 5.
electrolux Problem Possible cause The function Rinse & Hold is on. Possible solution Set the drain programme. The appliance door is open or not closed correctly. Close the door correctly. The anti-flood device is on. • Disconnect the appliance. • Close the water tap. • Contact the service centre. The spin phase does not operate. The programme does not start. There is water on the floor. You cannot open the appliance door. The appliance makes an unusual noise. The spin phase is off.
electrolux 17 Problem Possible cause Possible solution Too much laundry load. After the check, activate the appliance. The programme continues from the point of interruption. If the problem occurs again, contact the service centre. If the display shows other alarm codes, contact the service centre. SERVICE • Refer to the information supplied with this appliance for guarantee condition and point of contact. The information to give to the service is on the rating plate. Decrease the laundry load.
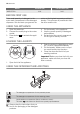
electrolux INSTALLATION UNPACKING 1. Remove the external film. If necessary, use a cutter. 2. Remove the polystyrene packaging materials. 5. Open the lid. 6. Remove the polystyrene piece. 7. Open the drum and remove all the items. 8. Remove the power supply cable and the drain hose from the hose holders. 2 3. Tilt the appliance backwards. 4. Turn the appliance on one of the corners to remove the protection from the bottom. 1 9. Remove the three bolts.
electrolux 19 POSITIONING AND LEVELLING 1 2 1 10. Remove the plastic piece. 11. Replace the plastic spacer with the plastic cap. You can find this cap in the user manual bag. 1. Pull the lever from right to left. 2. When the position of the appliance is right, put back the lever. A 12. To install the appliance at the same level as neighbouring furniture, cut these plastic pieces. Warning! Remove all the packaging and the transit bolts before you install the appliance.
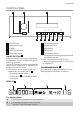
electrolux Caution! Make sure that there are no leaks from the couplings. Do not use an extension hose if the inlet hose is too short. Contact the service centre for the replacement of the inlet hose. Water-stop device • The appliance must be level and stable. Caution! Do not put cardboard, wood or equivalent materials below the appliance feet to adjust the level. A THE INLET HOSE The inlet hose has a water stop device. This device prevents water leaks in the hose because of its natural ageing.
electrolux 21 Without the plastic hose guide. • To a sink spigot. Make sure that the plastic guide cannot move when the appliance drains. Attach the guide to the water tap or the wall. • To a stand pipe with vent-hole. Refer to the illustration. Directly into a drain pipe at a height of not less than 70 cm and not more than 100 cm. The end of the drain hose must always be ventilated , i.e. the inner diameter of the drainpipe must be larger than the external diameter of the drain hose.
electrolux
electrolux 23
www.electrolux.