WA GL2 T 201 ................................................ .............................................
www.electrolux.com CONTENTS 1. 2. 3. 4. 5. 6. 8. 9. 10. 11. 12. 13. SAFETY INFORMATION . . . . . . . . . . . . . . . . . . . . . . . . . . . . . . . . . . . . . . . . . . . . . . . . . . . 3 SAFETY INSTRUCTIONS . . . . . . . . . . . . . . . . . . . . . . . . . . . . . . . . . . . . . . . . . . . . . . . . . . 4 PRODUCT DESCRIPTION . . . . . . . . . . . . . . . . . . . . . . . . . . . . . . . . . . . . . . . . . . . . . . . . . 6 ACCESSORIES . . . . . . . . . . . . . . . . . . . . . . . . . . . . . . .
ENGLISH 3 1. SAFETY INFORMATION Before the installation and use of the appliance, carefully read the supplied instructions. The manufacturer is not responsible if an incorrect installation and use causes injuries and damages. Always keep the instructions with the appliance for future reference. 1.1 Children and vulnerable people safety WARNING! Risk of suffocation, injury or permanent disability.
www.electrolux.com • If the supply cord is damaged, it must be replaced by the manufacturer, its service agent or similarly qualified persons in order to avoid a hazard. • The operating water pressure (minimum and maximum) must be between 0,5 bar (0,05 MPa) and 8 bar (0,8 MPa) • The ventilation openings in the base (if applicable) must not be obstructed by a carpet. • The appliance is to be connected to the water mains using the new supplied hose-sets. Old hose sets must not be reused. 2.
ENGLISH Water connection • Make sure not to cause damage to the water hoses. • The appliance is to be connected to the water mains using the new supplied hose-sets. Old hose sets must not be reused. • Before you connect the appliance to new pipes or pipes not used for a long time, let the water flow until it is clean. • The first time you use the appliance, make sure that there is no leakage. 2.2 Use WARNING! Risk of injury, electrical shock, fire, burns or damage to the appliance.
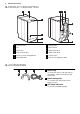
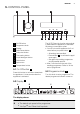
www.electrolux.com 3. PRODUCT DESCRIPTION 1 2 7 8 9 3 10 11 4 5 6 12 1 Control panel 7 Rating plate 2 Lid 8 Mains cable 3 Lid button 4 Filter access door 9 Water inlet valve 10 Water drain hose 5 Lever to move the appliance 11 Transit bolts 6 Adjustable feet 12 Feet for the appliance level 4. ACCESSORIES 1 2 3 1 Plastic cap To close the hole on the rear side of the cabinet, after the removal of the transit bolt. 2 Plastic hose guide To connect the drain hose on the edge of a sink.
ENGLISH 7 5. CONTROL PANEL 1 2 3 10 1 On/Off button 2 Programme knob 3 Display 4 Start/Pause button 5 Delay start button 6 Time saving button 7 Liquid detergent button 8 Stain button 9 Spin button 10 Temperature button 5.1 On Off button 1 Press this button to activate or deactivate the appliance. A tune sounds when the appliance is activated.
www.electrolux.com C • The display symbols.2) Symbols Description Washing phase Rinse phases Spin phase Child lock Extra rinse You cannot open the appliance door when the symbol is on. You can open the door only when the symbol goes off. If the programme is completed but the symbol stays on: • There is water in the drum. • The 'Rinse Hold' function is on. Delay start D • The programme time When the programme starts, the time decreases with steps of 1 minute.
ENGLISH Some programmes accept only one of the two functions. 5.7 Liquid detergent button 7 Press button 7 to adapt the cycle if you use a liquid detergent. 5.8 Stain button 8 Press button 8 to add the stain phase to a programme. Use this function for laundry with hard stains to remove. When you set this function, put the stain . remover into compartment This function increases the programme duration. This function is not available with a temperature lower than 40° C. 5.
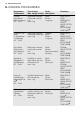
www.electrolux.com 6. WASHING PROGRAMMES Programme Temperature Type of load max. weight of load Cycle description Functions Cottons (Koch/Bunt / Blanc/Couleurs) 95° - Cold White and coloured cotton with normal soil. max. 6 kg Wash Rinses Long spin SPIN REDUCTION RINSE HOLD STAIN1) LIQUID DETERGENT EXTRA RINSE TIME SAVE2) Cottons + Prewash (+ Vorwäsche / + Prélavage) 95° - Cold White and coloured Prewash cotton with heavy soil. Wash max.
ENGLISH Programme Temperature Type of load max. weight of load Wool/Silk (Wolle/Seide / Laine/Soie) 40° - Cold Machine washable Wash wool. Hand washable Rinses wool and delicate fab- Short spin rics with «hand washing» care symbol. max. 1 kg SPIN REDUCTION RINSE HOLD LIQUID DETERGENT Pillows (Daunen / Couette) 60° - 30° One synthetic blanWash ket, duvet, bedspread Rinses and so on. Short spin max.
www.electrolux.com 2) if you press the button 6 two times (Extra Quick duration), we recommend that you decrease the quantity of the load. It is possible to load fully the appliance, however the washing results are reduced. 3) The wash and spin phase is soft to prevent the creases of the laundry. The appliance adds some rinses. 4) The default phase of the spin speed is related to cotton items. Set the spin speed. Make sure that it agrees with the laundry.
ENGLISH Programmes 13 Load (Kg) Energy consumption (kWh) Water consumption (litre) Approximate programme duration (minutes) Remaining moisture (%)1) Cottons 60 °C 6 1.10 56 180 52 Cottons 40 °C 6 0.60 54 170 52 Synthetics 40 °C 3 0.45 45 105 35 Delicates 40 °C 3 0.51 46 85 35 Wool/Hand wash 30 °C 1 0.33 46 60 30 Standard cotton programmes Standard 60 °C cotton 6 0.83 44 182 52 Standard 60 °C cotton 3 0.55 33 145 52 Standard 40 °C cotton 3 0.
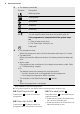
www.electrolux.com 9.1 Loading the laundry 2. 3. 4. A 1. Push the button A (depending on model). The drum opens automatically. Put the laundry. Make sure to not put too much laundry into the drum. Close the drum and the lid of your washing machine. Before you close the lid of your appliance, make sure that you close the drum correctly. Open the lid of the appliance. 9.2 Using detergent and additives • Measure out the detergent and the fabric conditioner. Detergent compartment for prewash phase.
ENGLISH 15 Liquid or powder detergent 1. 2. CLICK A 3. 4. CLICK B • Position A for powder detergent (factory setting). • Position B for liquid detergent. When you use the liquid detergent: – Do not use gelatinous or thick liquid detergents. – Do not put more liquid then the maximum level. 9.3 Setting and starting a programme 5. 9.4 Setting and starting a programme 1. Turn the programme knob. The related programme indicator comes on. 2. The indicator of button 4 flashes with red colour.
www.electrolux.com 9.6 Cancel a programme 1. 2. Press button 1 to cancel the programme and to deactivate the appliance. Press button 1 again to activate the appliance. Now, you can set a new washing programme. The appliance does not drain the water. 9.7 Change a function You can change only some functions before they operate. 1. 2. Press button 4 . The indicator flashes. Change the function set. 9.8 Set the delay start 1. 2.
ENGLISH – You must drain the water to open the door. To drain the water: 1. If necessary, decrease the spin speed. 2. Press the Start/Pause button 4 . The appliance drains the water and spins. 3. 4. 17 When the programme is completed and the door lock symbol goes off, you can open the door Deactivate the appliance. The appliance drains and spins automatically after approximately 18 hours. 10. HELPFUL HINTS AND TIPS 10.
www.electrolux.com Water hardness table Level Type Water hardness °dH °T.H. mmol/l Clarke 1 soft 0-7 0-15 0-1.5 0-9 2 medium 8-14 16-25 1.6-2.5 10-16 3 hard 15-21 26-37 2.6-3.7 17-25 4 very hard > 21 > 37 >3.7 >25 11. CARE AND CLEANING WARNING! 11.4 Detergent dispenser To clean the dispenser: Disconnect the appliance from the mains supply before you clean it. 11.1 Descaling The water we use contains limescale.
ENGLISH To clean the drain filter: To clean the water inlet filters: 1. 2. 1. Open the drain filter door. 2. Put a container below the recess of the drain filter to collect the water that flows out. Turn the filter until it is vertical. Turn the filter fully and remove it. Remove fluff and objects. Clean the filter with water. Put it back and screw it in. Make sure that you tighten correctly the filter to prevent leakages. Close the drain filter door. 3. 4. 5. 6. 7. 8. 19 3. 4. 5.
www.electrolux.com 11.7 Emergency drain Because of a malfunction, the appliance cannot drain the water. If this occurs, do steps (1) through (3) of 'To clean the drain filter'. If necessary, clean the filter. Put the drainage duct back and close the drain filter flap. 2. Put the end of the inlet hose in a container and let the water flow out of the hose. Do the Drain programme and let it operate until the end of the cycle.
ENGLISH 21 Problem Possible cause Possible solution The appliance does not drain the water. The water drain hose is damaged. Make sure that the water drain hose has no damages. The filter of the drain pump is blocked. Clean the filter of the drain pump. Refer to 'Care and cleaning'. The connection of the water drain hose is not correct. Make sure that the connection is correct. A washing programme without the drain phase is set. Set the drain programme. The function Rinse & Hold is on.
www.electrolux.com Problem You cannot open the appliance door. Possible cause Possible solution The water drain hose is damaged. Make sure that the water inlet hose has no damages. The washing programme Let the washing programme end. is in operation. There is water in the drum. Set the drain or the spin programme. Incorrect level of the appliance. Adjust the level of the appliance. Refer to 'Installation'. You did not remove the packaging and/or the transit bolts.
ENGLISH Level of protection against ingress of solid particles and moisture ensured by the protective cover, except where the low voltage equipment has no protection against moisture Water supply pressure 23 IPX4 Minimum 0,5 bar (0,05 MPa) Maximum 8 bar (0,8 MPa) Water supply 1) Cold water Maximum load Cotton Spin speed Maximum 6 kg 1400 rpm 1) Connect the water inlet hose to a water tap with a 3/4'' thread. 14. ENVIRONMENT CONCERNS Recycle the materials with the symbol .
108801500-A-422012 www.electrolux.