WASL2E300 EN Washing Machine User Manual
www.electrolux.com CONTENTS 1. SAFETY INFORMATION....................................................................................3 2. SAFETY INSTRUCTIONS..................................................................................4 3. INSTALLATION.................................................................................................. 5 4. PRODUCT DESCRIPTION.............................................................................. 10 5. THE WATER SOFTENER (SOFTWATER TECHNOLOGY)...
ENGLISH 1. 3 SAFETY INFORMATION Before the installation and use of the appliance, carefully read the supplied instructions. The manufacturer is not responsible for any injuries or damages that are the result of incorrect installation or usage. Always keep the instructions in a safe and accessible location for future reference. 1.
www.electrolux.com • • • • • • The appliance must be connected to the water mains using the new supplied hose sets, or other new hose sets supplied by the Authorised Service Centre. Old hose sets must not be reused. If the mains power supply cable is damaged, it must be replaced by the manufacturer, its Authorised Service Centre or similarly qualified persons to avoid an electrical hazard. Before any maintenance operation, deactivate the appliance and disconnect the mains plug from the socket.
ENGLISH • • • access to the mains plug after the installation. Do not touch the mains cable or the mains plug with wet hands. Do not pull the mains cable to disconnect the appliance. Always pull the mains plug. This appliance complies with the E.E.C. Directives. 2.3 Water connection • • • Do not cause damage to the water hoses. Before connection to new pipes, pipes not used for a long time, where repair work has been carried out or new devices fitted (water meters, etc.
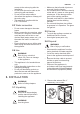
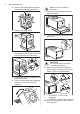
www.electrolux.com 2. Remove the cardboard top and the polystyrene packaging materials. Make sure not to damage the hoses. 7. Remove the polystyrene protection from the bottom. 1 3. Remove the internal film. 2 8. Fully clean and dry the bottom of the appliance. 4. Open the door and remove the polystyrene piece from the door seal and all the items from the drum. CAUTION! Do not use alcohol, solvents or chemical products. 9.
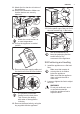
ENGLISH 11. Attach the four barriers to bottom of the appliance. 12. Refer to the illustration. Make sure that the barriers are securely attached. x4 A 16. Pull out the plastic spacers. 17. Put the plastic caps, that you find in the user manual bag, in the holes. B Attach the sound barriers at a room temperature. 13. Pull up the appliance in vertical position. We recommend that you keep the packaging and the transit bolts for any movement of the appliance. 3.2 Positioning and levelling 1.
www.electrolux.com 45 20 O O x4 The appliance must be level and stable. A correct adjustment of the appliance level prevents the vibration, noise and the movement of the appliance when in operation. 3.3 The inlet hose 1. Connect the water inlet hose to the back of the appliance. 2. Position it toward left or right depending on the position of the water tap. Make sure that the inlet hose is not in vertical position. 3. If necessary, loose the ring nut to set it in the correct position. 4.
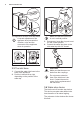
ENGLISH 9 A If this occur, close the water tap and contact the authorized service centre to replace the hose. 3.5 Water drainage The drain hose should stay at a height of not less than 60 cm and not more than 100 cm. You can extend the drain hose to maximum 400 cm. Contact the authorized service centre for the other drain hose and the extension. Make sure that the drain hose end is not immersed in the water. There may be a return of dirty water into the appliance. 3.
www.electrolux.com 5. Without the plastic hose guide, to a sink spigot - Put the drain hose in the spigot and tighten it with a clamp. Refer to the illustration. 6. Position the hose directly to a builtin drain pipe in the room wall and tighten it with a clamp. Make sure that the drain hose makes a loop to prevent particles going into the appliance from the sink. 4. PRODUCT DESCRIPTION 4.
ENGLISH 4.2 Appliance overview 1 2 9 8 3 10 4 5 11 12 6 7 4.3 Detergent dispenser and salt compartment Always follow the instructions that you find on the packaging of the detergent products. Anyway, we recommend not to exceed the maximum indicated level in each compartment ( ).
www.electrolux.com Salt Compartment for salt. Read carefully 'The Water Softener technology ( Soft Water)'. After a washing cycle, if necessary, remove any detergent residue from the detergent dispenser. Maximum level for detergent/ additives quantity. When selecting a prewash phase, put the detergent/ additive in a dosing ball inside the drum. 5. THE WATER SOFTENER (SOFTWATER TECHNOLOGY) 5.1 Introduction The water contains harsh minerals.
ENGLISH 13 Once you have entered the menu by pressing and the buttons: button. The 1. Touch the on. goes This setting increases the salt consumption. 2. Touch the Start/Pause button to confirm your choice and exit the menu. How to deactivate the water softener button 4. Touch repeatedly the until the desired level appears (from C01 to C07). 5. Touch the Start/Pause button to confirm your choice and exit the menu. Once you have entered the menu by and the pressing buttons: 1.
www.electrolux.com 5.3 Pouring salt Salt The water softener function acts through special resins present in the appliance. To regenerate the resins and make them ready to soften the water pour a special Salt : salt in the compartment 1. Open the detergent dispenser.
ENGLISH 15 6. BEFORE FIRST USE 1. Make sure that all transit bolts have been removed from the appliance. 2. Make sure that the electrical power is available and the water tap is open. 3. Make sure that there is salt in the Salt compartment marked by and set the proper water hardness level. Refer to "How to set the water hardness level". 4. Pour 2 litres of water into the detergent compartment marked by This action activates the drain system. 5.
www.electrolux.com 13 Temperature touch button (Temperature) 7.2 Multilingual badges Program Koge-/Kulørt Syntetisk Finvask Uld/Silke Damp Antiallergi 20 min. - 3 kg Motionstøj Vattæpper Adhesive badges in different languages are supplied with the appliance. Jeans The desired badge can be glued around the programme dial. 7.3 Display MIX Maximum load indicator. The icon flashes during laundry load es‐ timation (refer to "PROSENSE load detection" paragraph). Maximum laundry indicator.
ENGLISH 17 Rinsing phase indicator: it flashes during rinse phase. The indicator appears when the Soft Plus option is activated. Spin and drain phase indicator. It flashes during spin and drain phase. MIX OKO MIX indicator. Steam phase indicator. Anti-crease phase indicator. Child safety lock indicator. Time saving indicator. Temperature indicator. The is set. indicator appears when a cold wash Spin speed indicator. Rinse hold indicator. Extra silent indicator. Pre-wash indicator. Stain indicator.
www.electrolux.com You must drain the water to unlock the door. Touch the Start/Pause button: the appliance performs only the draining phase. 8.3 Temperature When you select a washing programme, the appliance automatically proposes a default temperature. Touch this button repeatedly until the desired temperature value appears on the display. When the display shows the indicators and the water. , the appliance does not heat 8.
ENGLISH 8.6 Extra Rinse With this option you can add up to 3 rinses accordingly to the selected washing programmes. Useful for people allergic to detergents and with sensitive skin. indicator indicator ; these are the standard cotton programmes, the most efficient programmes in terms of combined energy and water consumption. This option increases the programme duration. If the Extra Rinse is set as a default option and you select a compatible washing programme, the display 8.
www.electrolux.com At firth touch the appliance proposes the default setting of the washing programme again. steps of 30 minutes up to 90' and from 2 hours up to 20 h. After touching the Start/Pause button, 8.11 Delay Start the display shows the indicator and the selected delay time and the appliance begins the countdown. With this option you can delay the start of a programme in a more convenient time. 8.12 Start/Pause Touch the button repeatedly to set the required delay.
ENGLISH 21 Programme Programme description Wool/Silk Machine washable wool, hand washable wool and oth‐ er fabrics with «hand washing» care symbol1). Steam programme Steam Steam programme for cotton and synthetic items. Steam can be used for dried2), washed or worn once laun‐ dry. This programme reduce creases and odours3) and re‐ laxes the fibres. When the programme is completed, quick‐ ly remove the laundry from the drum. After a steam pro‐ gramme, ironing becomes effortless.
www.electrolux.com Programme Programme description Do not use fabric softener and make sure that there is no softener residue in the detergent dispenser. Outdoor Outdoor clothing, technical, sport fabrics, waterproof and breathable jackets, shell jackets with a removable fleece or inner insulation. The recommended laundry load is 2.5 kg. This programme can also be used as water-repellent re‐ storing cycle, specifically tailored for treating clothes with a hydrophobic coating.
ENGLISH Programme 23 Default tempera‐ Maximum spin ture speed Temperature range Spin speed range Maximum load - - 1.5 kg 30 °C 60 °C - 30 °C 1600 rpm 1600 rpm - 400 rpm 5 kg 60 °C 1600 rpm 1600 rpm - 400 rpm 9 kg 20 min. - 3 kg 30 °C 40 °C - 30 °C 1200 rpm 1200 rpm - 400 rpm 3 kg Outdoor 30 °C 40 °C - Cold 1200 rpm 1200 rpm - 400 rpm 2.5 kg1) 1 kg2) Steam OKOPower Anti Allergy 1) Washing programme. 2) Washing programme and waterproofing phase.
■ ■ Soft Plus ■ ■ Plus Steam Outdoor 1) 20 min. - 3 kg ■ Anti Allergy ■ OKOPower Delicates ■ Steam ColourPro ■ Delay Start Wool/Silk Synthetics www.electrolux.com Cottons 24 ■ ■ ■ ■ ■ ■ ■ ■ ■ ■ ■ 1) This option is not available with temperature lower than 40 °C. 2) This option is not available with a temperature lower than 30 °C. 3) If you set the shortest duration, we recommend that you decrease the load size.
ENGLISH • You make a wrong selection (3 short sounds). • The programme is completed (sequence of sounds for about 2 minutes). • The appliance has a malfunction (sequence of short sounds for about 5 minutes). To deactivate/activate the acoustic signals when the programme is completed, touch the and the buttons simultaneously for about 6 seconds. display shows . 10.4 Soft Plus Set the Soft Plus option to optimise the fabric softener distribution and improve the fabric softness.
www.electrolux.com 11.3 Filling the detergent and additives Max ▼ We recommend that you do not exceed the maximum ▼ ▼ ax ax Sa lt ). M M indicated level ( 1. Open the detergent dispenser. Max ▼ ax ▼ M M ax ▼ Filling the liquid detergent Sa lt 1. Insert the proper container for liquid detergent. 2. Put the powder detergent in the Max compartment . If using liquid detergent, refer to 'Filling the liquid detergent'. ▼ ax ▼ Sa lt M ax ▼ M Max ▼ M ax 2.
ENGLISH The display shows the maximum declared load for the programme, the default temperature, the maximum spin speed, the washing phase indicators (when available) and an indicative programme duration. 2. To change the temperature and/or the spin speed, touch the related buttons. 3. If desired, set one or more options by touching the related buttons. The related indicators come on in the display and the given information changes accordingly.
www.electrolux.com In this case, for 30 seconds, it is possible to pause the appliance and remove the exceeding garments. If you select the Plus Steam the steam phase indicators come on. Once removed the exceeding garments, touch the Start/Pause button to start the programme again. The ProSense phase can be repeated up to three times (see point 1). The steam phase is running: Important! If the laundry amount will not be reduced, the washing programme starts anyway, despite the overload.
ENGLISH 11.11 Opening the door If the temperature and level of the water in the drum are too high and/or the drum still rotates you cannot open the door. While a programme or the delay start operates, the appliance door is locked. 1. Touch the button Start/Pause. In the display the related door lock indicator goes off. 2. Open the appliance door. If necessary, add or remove the items. 3. Close the door and touch the button Start/Pause. The programme or the delay start continues. 11.
www.electrolux.com • After 5 minutes from the end of the washing programme Press the On/Off button to activate the appliance again. The display shows the end of the last set programme. Turn the programme dial to set a new cycle. If you set a programme or an option that ends with water in the drum, the Stand-by function doesn't deactivate the appliance to remind you to drain the water. 12. HINTS AND TIPS WARNING! Refer to Safety chapters. 12.
ENGLISH 12.4 Ecological hints • • Set a programme without the prewash phase to wash laundry with normal soil. Always start a washing programme with the maximum load of laundry allowed. • • 31 If you pre-treat the stains, you can use a stain remover when you set a programme with a low temperature. To use the correct quantity of detergent, refer to the quantity suggested by the detergent producer. 13. CARE AND CLEANING WARNING! Refer to Safety chapters. 13.
www.electrolux.com 13.6 Cleaning the detergent dispenser and the salt compartment Before cleaning, make sure that the all compartments are empty. Max ▼ ax ▼ ax ▼ M Sa lt M To prevent possible deposits of dried detergent, clotted fabric softener, formation of mould in the dispenser drawer and/or salt fouling in the salt compartment, once in a while carry out the following cleaning procedure: 3. Wash the drawer and all inserts under running water. 1. Open the drawer.
ENGLISH 33 WARNING! • Do not remove the filter while the appliance operates. • Do not clean the pump if the water in the appliance is hot. Wait until the water cools down Proceed as follows to clean the pump: 1. Open the pump cover. 6. Insert the detergent drawer into the guide rails and close it. Run the rinsing programme without any clothes in the drum. Max ▼ M ax 2 ▼ Sa lt M ax ▼ 1 2. Place a suitable bowl below the drain pump access to collect the water that flows out. 3.
www.electrolux.com 5. When the bowl is full of water, close the drainage duct back and empty the container. 6. Repeat the steps 4 and 5 until the water stops to flowing out. 2 1 11. Put the filter back into the special guides by turning it clockwise. Make sure that you tighten the filter correctly to prevent leakages. 7. Close the drainage duct and turn the filter anti-clockwise to remove it. 2 1 2 1 12. Close the pump access. 8.
ENGLISH 13.8 Cleaning the inlet hose and the valve filter 35 depending on the position of your water tap. It is recommended to clean both the filters of the inlet hose and valve occasionally to remove any deposit, collected over the time: 1. Remove the inlet hose from the tap and clean the filter. 45° 1 20° 13.9 Emergency drain 2 3 2. Remove the inlet hose from the appliance by loosening the ring nut.
www.electrolux.com WARNING! Make sure that the temperature is higher than 0 °C before you use the appliance again. The manufacturer is not responsible for damages caused by low temperatures. 14. TROUBLESHOOTING WARNING! Refer to Safety chapters. 14.1 Introduction The appliance does not start or it stops during operation. First try to find a solution to the problem (refer to the table). If the problem persists, contact the Authorised Service Centre.
ENGLISH 37 14.2 Possible failures Problem Possible solution • The programme does not start. • • • • • • • • The appliance does not • fill with water properly. • • Make sure that the mains plug is connected to the mains socket. Make sure that the appliance door is closed. Make sure that there is not a damaged fuse in the fuse box. Make sure that the Start/Pause has been touched. If the delay start is set, cancel the setting or wait for the end of countdown.
www.electrolux.com Problem Possible solution • You cannot open the appliance door. • • • • • The appliance makes an unusual noise and vibrates. The programme dura‐ tion increases or de‐ creases during pro‐ gramme execution. • • Make sure that a washing programme that ends with water in tub, has been selected. Make sure that the washing programme is finished. Set the drain or the spin programme if there is water in the drum. Make sure that the appliance receives electrical power.
ENGLISH 39 After the check, activate the appliance. The programme continues from the point of interruption. If the problem occurs again, contact the Authorised Service Centre. If the display shows other alarm codes. Deactivate and activate the appliance. If the problem continues, contact the Authorised Service Centre. 14.3 Emergency door opening In case of power failure or functioning failure the appliance door remains locked. The washing programme continues when the power is restored.
www.electrolux.com 5. Run a cotton or synthetic cycle, without reducing time, to restore the water softener function. 15. CONSUMPTION VALUES Stated values are obtained in laboratory conditions with relevant stand‐ ards. Different causes can change the data: the quantity and type of laundry and ambient temperature. Water pressure, the supply voltage and the temperature of inlet water may also affect the washing pro‐ gramme duration.
ENGLISH Off Mode (W) Left On Mode (W) 0.30 0.30 41 The information given in the chart above is compliant with the EU Commission regu‐ lation 1015/2010 implementing directive 2009/125/EC 16.
www.electrolux.com The tumble dryer can be stacked on the top of the washing machine only by using the correct stacking kit manufactured and approved by AEG. Verify the compatible stacking kit by checking the depth of your appliances. To raise your appliance and makes loading and unloading laundry easier. The drawer can be used for laundry storage e.g.: towels, cleaning products and more. Read carefully the instructions supplied with the accessory.
ENGLISH 43 Point of Service Morgenstrasse 131 3018 Bern Zürcherstrasse 204E 9000 St. Gallen Seetalstrasse 11 6020 Emmenbrücke Schlossstrasse 1 4133 Pratteln Comercialstrasse 19 7000 Chur Spare parts service Industriestrasse 10, 5506 Mägenwil, Tel. 0848 848 111 Specialist advice/Sale Badenerstrasse 587, 8048 Zürich, Tel.
157006941-A-112017 www.electrolux.