
User manual

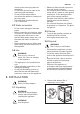


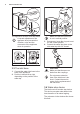


11. Attach the four barriers to bottom of
the appliance.
12. Refer to the illustration. Make sure
that the barriers are securely
attached.
x4
A
B
Attach the sound barriers at
a room temperature.
13. Pull up the appliance in vertical
position.
14. Remove the power supply cable and
the drain hose from the hose holders.
It is possible to see water
flowing from the drain hose.
This is due to the testing
with water of the appliance
in factory.
15. Remove the three bolts by using the
key supplied with the appliance.
16. Pull out the plastic spacers.
17. Put the plastic caps, that you find in
the user manual bag, in the holes.
We recommend that you
keep the packaging and the
transit bolts for any
movement of the appliance.
3.2 Positioning and levelling
1. Install the appliance on a flat hard
floor.
Make sure that carpets do
not stop the air circulation
below the appliance.
Make sure that the appliance
does not touch the wall or
other units.
2. Loosen or tighten the feet to adjust
the level.
WARNING!
Do not put cardboard, wood
or equivalent materials
below the appliance feet to
adjust the level.
ENGLISH 7