
User manual


In the display the indicator of the set
dryness level stays on.
The door locked indicator goes on.
The display shows regularly a new time
value.
The last minutes of the
drying cycle the appliance
performs the anti-crease and
the cooling phases.
12.3 Washing & Timed Drying
To have a good drying the appliance
does not let you set a too low spin speed
for the items to be washed and dried.
1. Press
to set the drying time value.
The display shows 10 minutes.
The indicator comes on in the display.
The display shows the set drying value
time. for example: . After some
seconds the display shows the final time
value
, that is the total duration of
the washing and drying cycles (washing
+ drying + anti-crease + cooling phases).
If you set only 10 minutes of
drying after washing, the
appliance calculates also the
duration of the anti-crease
and the cooling phases.
2. Press to start the programme.
In the display the indicator comes
on. The door is locked. The display
shows regularly a new time value.
12.4 End of the programme
The appliance stops automatically. The
acoustic signals operate (if they are
active).
For more information see "At the end of
the drying programme " of the previous
chapter.
1. Remove the laundry from the
appliance.
Make sure that the drum is empty.
2. Keep the door ajar to prevent mildew
and odours.
3. Close the water tap.
12.5 Fluff in the fabrics
During the washing and/or drying phase,
some types of fabric, (sponge, wool,
sweatshirt) could release fluff.
The released fluff could stick to the
fabrics during the next cycle.
To prevent the fluff in your laundry, we
recommend that you:
• Do not wash dark fabrics after you
have washed and dried light coloured
fabrics (new sponge, wool,
sweatshirt ) and the contrary.
• Line dry this type of fabrics at open air
when they are washed the first time.
• Clean the drain filter.
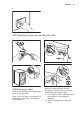
• After the drying phase, clean the
empty drum, the gasket and the door
with a wet cloth.
12.6 How to remove the fluff in
the garments
To remove the fluff inside the drum, set a
special programme:
1. Empty the drum.
2. Clean the drum, the gasket and the
door with a wet cloth.
3. Set the rinse programme.
4. Press at the same time and to
activate the cleaning function until
the display shows CLE.
5. Press to start the programme.
13. HINTS AND TIPS
WARNING!
Refer to Safety chapters.
13.1 The laundry load
• Divide the laundry in: white, coloured,
synthetics, delicates and wool.
www.electrolux.com22